Connection and synchronization with Active Directory
This tutorial explains how to configure the connection of GlobalSuite® with Active Directory (AD) or LDAP, synchronize users and employees, and map attributes between AD and the tool. It includes details about the required fields, group configuration, user and employee synchronization, differences with LDAP, and important considerations to ensure the integration works correctly.
1. Connection to Active Directory
To access the Active Directory connection screen, you need to go to the Settings > Connections section (as shown in the image). This option is available to Platinum, Gold, Consulting, Consulting Administrator, Platform Administrator, Enterprise Administrator, and Configuration Administrator users.
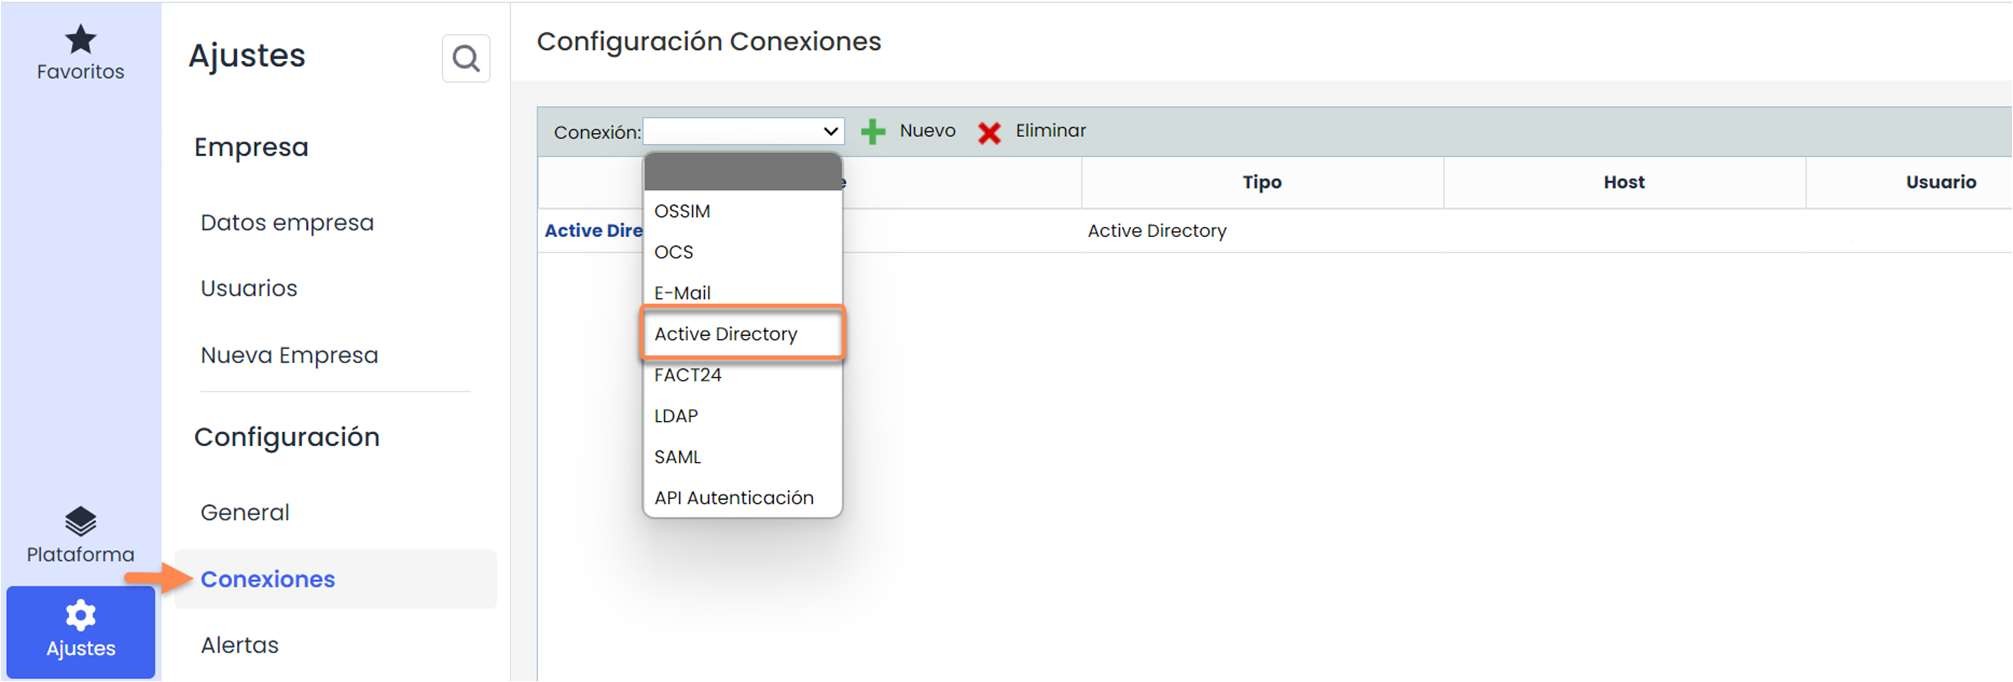
This screen has several columns described below:
-
Name: Contains the name of the connection, which is used to identify it.
-
Type: Contains the type of connection, in this case, it will be Active Directory or LDAP.
-
Host: Contains the name of the server (Server Name) to which the specific connection connects.
-
User: This is the name of the user that will be used to connect to the Active Directory server. It is necessary for this service account in Active Directory to be able to read its structure to traverse the users to be synchronized as well as the Active Directory attributes to be retrieved. It is also recommended that this service account has a password that does not expire, or alternatively, that it is taken into account to ensure the synchronization process is always operational.
-
Enabled: Indicates whether a connection is enabled or not.
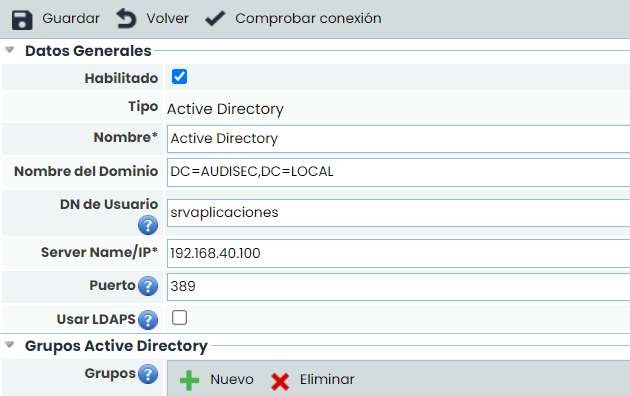
The Active Directory connection form consists of different fields, which are described below.
First, there is the “General Data” section:
-
Enabled: Indicates that this Active Directory connection is the one enabled for synchronization. Two AD connections cannot be activated at the same time.
-
Type: Indicates the type of connection (in this case, Active Directory).
-
Name*: This is a mandatory field and indicates the name of this connection to be used in other options of the tool.
-
Domain Name: Indicates the domain to which the AD connects (as shown in the image). The format is the same as in the example: “DC=development, DC=local”. Additionally, a specific Organizational Unit can be included by adding, for example, “OU=test” to the domain, which will ensure that only the users of that unit are synchronized.
-
User DN: Indicates the user that will connect to the Active Directory. Any user that is part of the AD can connect, although they will only have the privileges assigned to them in AD. That is, for GlobalSuite it is transparent, it makes the request to AD and receives the data that AD considers it can provide based on the user's privileges.
-
Server Name / IP: Indicates the IP address where the Active Directory server is hosted. This IP must be valid, so a tool administrator must add it to the system.
-
Port: Indicates the port number accessed by the synchronization. By default, the following ports are used:
-
Normal AD: 389.
-
AD with LDAPS: 636.
-
Directory trees: 3268.
-
Directory trees with LDAPS: 3269.
-
-
Use LDAPS: This field is used to connect to an Active Directory over an SSL encryption protocol. When this field is activated, the port is changed to 636 by default.
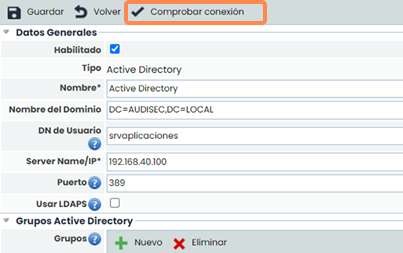
Finally, there is a “Check Connection” button, which allows you to verify if the entered parameters are valid and if they connect to a valid AD. To check the connection, the password of the user specified in the User DN field will be requested. This password is not stored in GlobalSuite and must be entered each time the test is performed.
Secondly, there is the “Active Directory Groups” section. These groups are used to synchronize with a specific set of AD users. These groups contain a “Name” field to identify the group and a “Description” field to add more information about the group. To synchronize, in the “Connection String” field, in addition to the domain name (which is copied by default when creating a new one), you can add the AD group you want to synchronize. For example: “DC=development, DC=local, CN=development”, where development is a group created in AD and contains a series of users. It should be noted that when using a group for synchronization, the connection string will be used to connect to the AD, ignoring the domain name (explained earlier) of the connection. That is, the group’s “Connection String” will replace the Domain Name configured in the connection when connecting to AD.

Example: In the previous image, you can see that the Domain Name is
“DC=development,DC=local”. However, one of the groups is
“DC=development,DC=local,CN=development”, so this will be the string used to connect, replacing the domain string.
Additionally, there is a “Type” field in each group, which can be “User” or “Employee”, indicating in which of these two options of the tool this group can be used for synchronization.
Note
In GlobalSuite, a “ User” is considered to be a person who can access (with a password) the tool and navigate through the various options they have access to in their MS (Management System). On the other hand, within GlobalSuite, there is an option called “ Employees”, which contains information about the company or MS employees, but they do not necessarily have to be aware of the tool's existence. Example: A security guard may appear as an “Employee” in the tool, as they are part of the company, but they will not have access to GlobalSuite, so they will not have a user account. Similarly, the Business Continuity Manager may be an employee of the company and also have a user account in the tool to access the various options.
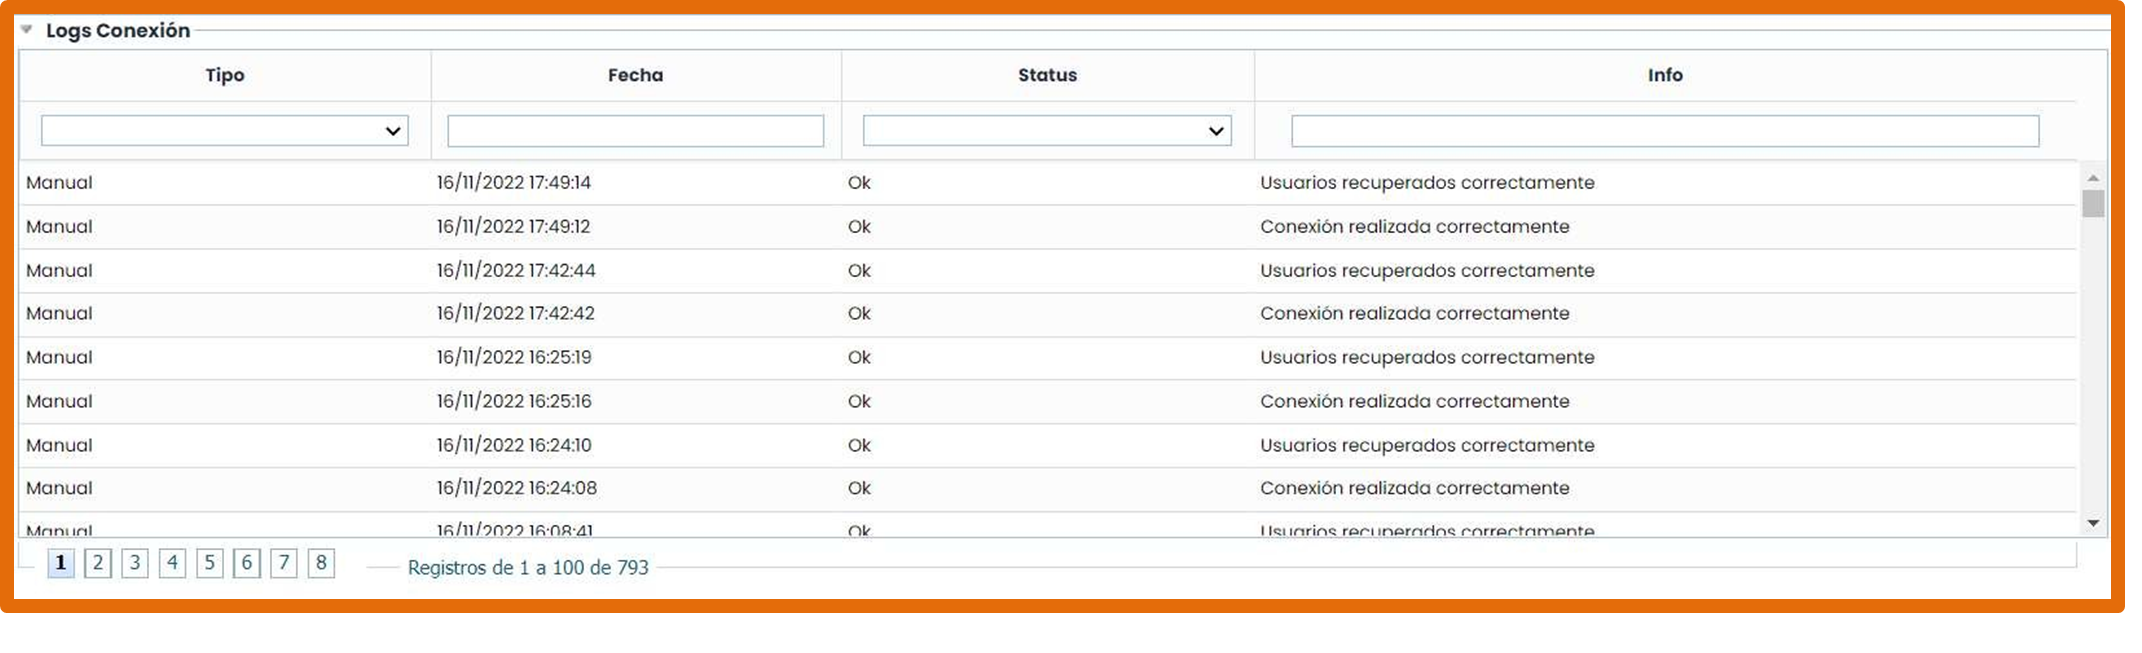
The next section, called “Connection Logs,” shows the history of connections with Active Directory. If the connection fails, you can see the error returned by the Active Directory server at the time of the connection.
In the “Connected with…” section, it indicates in which of the two mentioned options of the tool (both can be selected) synchronization with AD users will be allowed.
Finally, there is the “Synchronization Configuration” section. In this section, you can configure the relationship between Active Directory attributes and the fields in GlobalSuite forms. Specifically, it allows configuring the relationship with user and employee fields.
The configuration is done through the table shown below.
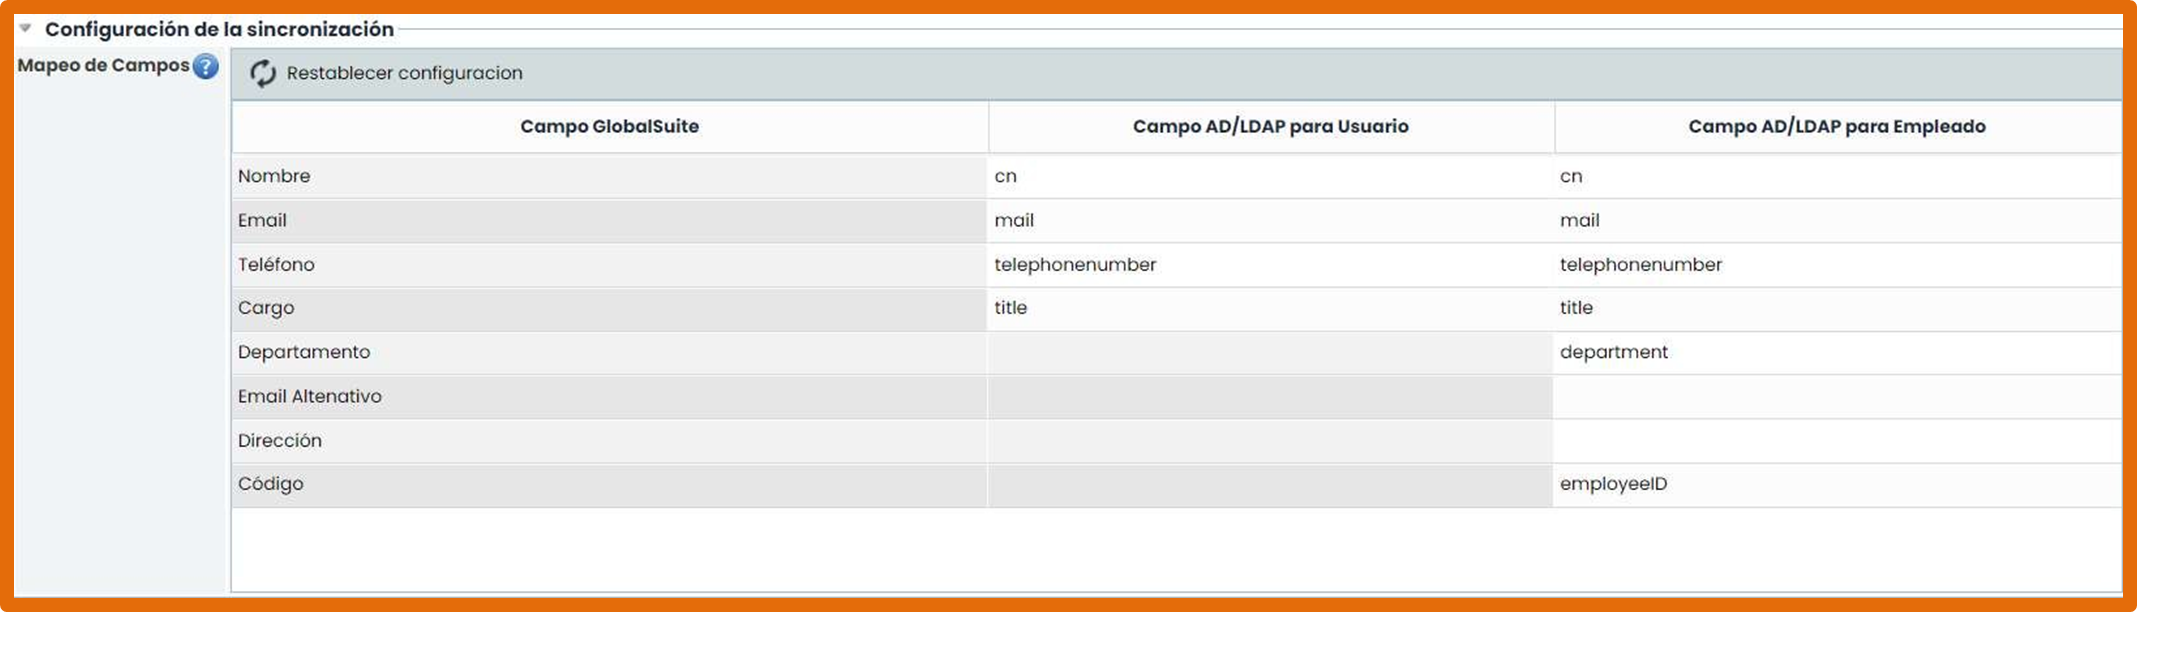
By default, the logical fields of Active Directory that are defined as related to each of the GlobalSuite fields are established. If you want to retrieve this configuration after making modifications, you can use the “Reset Configuration” button.
There is also a selectable field called “Create and associate employees when synchronizing users.” If this field is checked, each time users are synchronized in the tool, an associated employee will be created, and there will be a correspondence between their fields that will allow maintaining the relationship between both entities.
Note: It is important to note that when checking “Create and associate employees when synchronizing users,” the data to create the employee is the same as the data to create the user. Therefore, fields such as “department,” “Alternate Email,” etc., will be created blank. To fill in these fields, it is possible to perform the synchronization from the employee section, updating the employees and completing the form, this time with the mapping for employees.
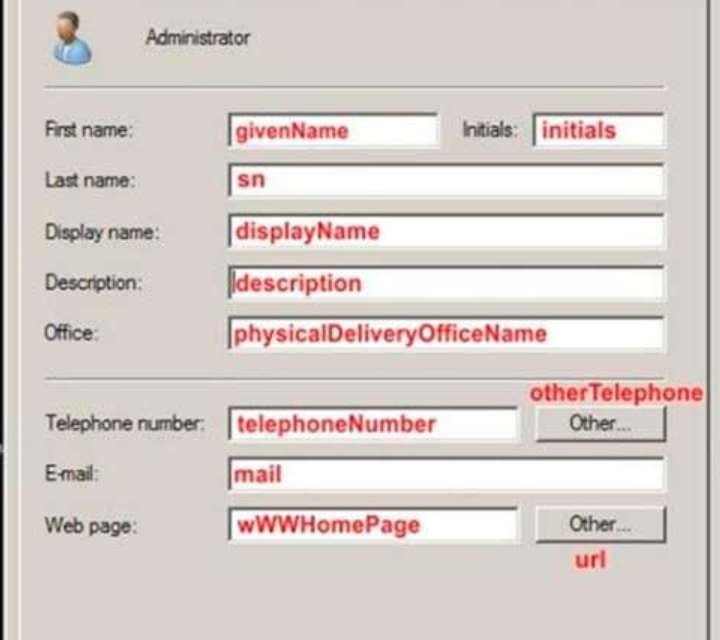
Note 2: Sometimes it is necessary to modify the field mapping to retrieve the required information. Below, in the image, the names of the fields where the most relevant information about users within the client’s AD is usually stored are shown (in red).
2. Synchronization with Active Directory
To access the synchronization screen, you need to go to the Settings > Users section (as shown in the image). This option is available to users who are not “Enterprise” or “Entity” (i.e., Platinum, Gold, Consulting users, and the various types of administrators).

This screen has several columns described below:
-
Contact Name: Name of the User, which has nothing to do with the user used to access GlobalSuite. Example: Tomás Ramírez Rodríguez.
-
Entity: Indicates the entity or management system to which the user belongs (entities are explained later in the entities section).
-
Position(s): Position held by the user in the company.
-
e-Mail: User's email address.
-
User: Name used by the user to access the tool. Example: tomas.ramirez
-
User Type: Indicates the type of user in the tool, whether it is Entity, Enterprise, or some type of administrator.
-
AD/LDAP Connection: Indicates whether a user is synchronized with an AD user, using these credentials to access the tool. If not, it would be a regular GlobalSuite user.
-
Password: Contains a “Restore” button to send a new password to a GlobalSuite user. This only applies to users local to the tool. In the case of those
synchronized with AD, it is not possible to perform the action, and the button does not appear.
-
Related User: Shows, if any, the AD user through which the tool can be accessed to have access to the same data as the dependent user.
-
User Role: Company role defined for this user. These roles can be created in Clients/Company Roles.
-
Status: Indicates whether the user is active, meaning the tool can be accessed using that user.
Some of the columns detailed above are hidden by default. To display these columns, right-click on the table header and check the columns you want to see.
Additionally, at the top, there are two buttons: “Synchronize,” which allows selecting the general connection or one of the AD groups configured in the Connections option. Once one is chosen, and the password is entered, you can access the AD synchronization screen, which is explained in the next section.
There is also the “Deactivate users by AD/LDAP” button. This button changes the configuration of users with the “AD/LDAP Connection” column set to Yes, so they become regular GlobalSuite users. In this case, these users will be sent a new password and will be desynchronized from AD.
2.1. User Synchronization
Once the user synchronization screen is open, there are 3 sections described below:

2.1.1. Active Directory Users Section
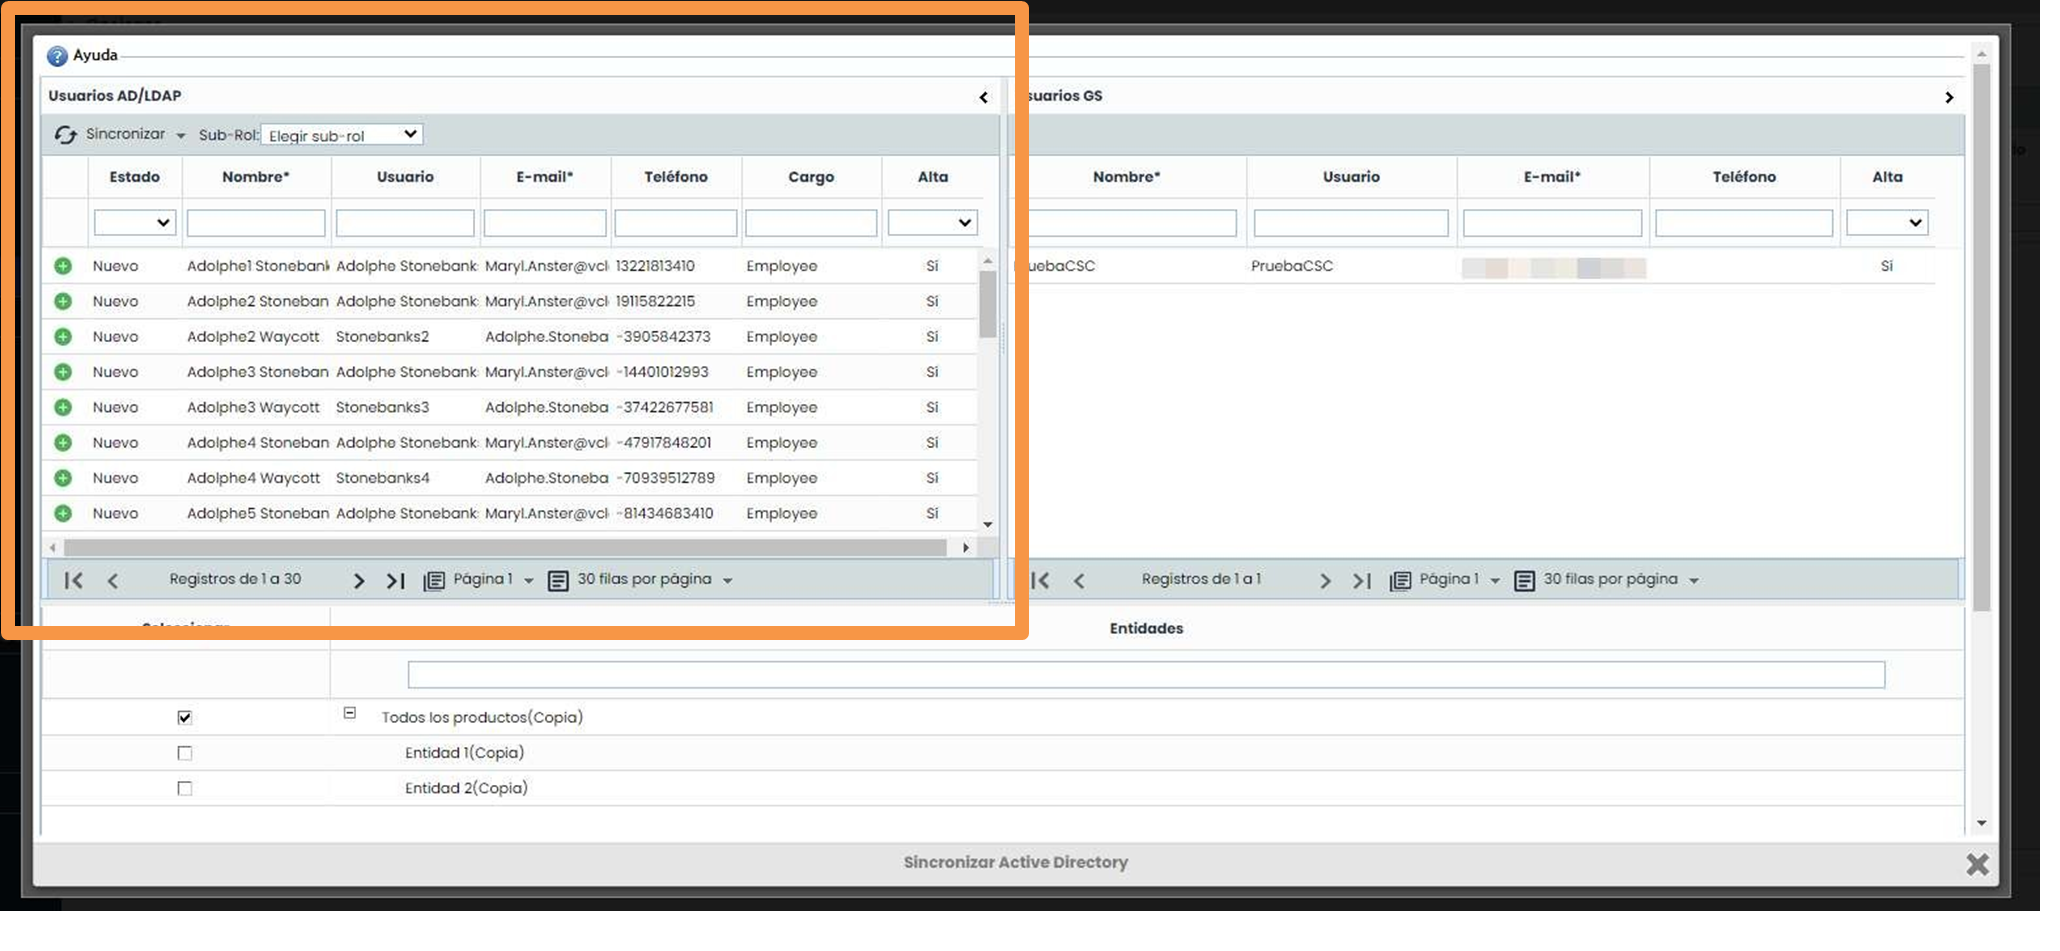
The left section corresponds to the users belonging to the established Active Directory connection. These users can be in 4 states, which are described below:
|
|
Indicates that the user is already synchronized with the tool, therefore there is a user in GlobalSuite with the same data (name, phone, and email). |
|
|
Indicates that the user exists in Active Directory, but not in GlobalSuite. |
|
|
Indicates that the user exists in both Active Directory and GlobalSuite and they are synchronized, but some data has changed in one of the two tools. It may also appear as modified if the checkbox is marked in the connection settings of |
|
“Create and associate employees when synchronizing users,” in any of these cases: If a user has an associated employee but is INACTIVE. If a user had an associated employee, but no longer has one. |
|
|
|
The user does not have some mandatory data in the AD, or that data does not have the correct format. In the specific case of the example, these fields are “Name” and “E-mail,” which is why they are marked with an asterisk *. |
Important
If there are users in Active Directory with the policy “The user must change the password at the next login” and they have not done so yet, they will not be able to access GlobalSuite. Once these users have changed their password by accessing their domain, they will have access to GlobalSuite without any issues and without needing to synchronize again.
2.1.2. Synchronization Menu

In the upper left corner, there is a “Synchronize” button that allows user synchronization actions to be carried out. It is important to note that synchronization only exists in one direction, from Active Directory to GlobalSuite, meaning GlobalSuite never modifies anything in Active Directory. Each button works as follows:
-
New: Adds Active Directory users who are not synchronized to the company's users, unless the user limit is exceeded. (Additionally, if the checkbox “Create and associate employees when synchronizing users” is marked, an employee associated with that new user will be created).
-
Modified: Updates user changes with the data from the Active Directory user. (If the checkbox “Create and associate employees when synchronizing users” is marked, the associated employee for that user is set to “Active”).
-
All: Adds new users and updates modified ones.
-
Selected: Adds or modifies (depending on the case) the users selected in the table.
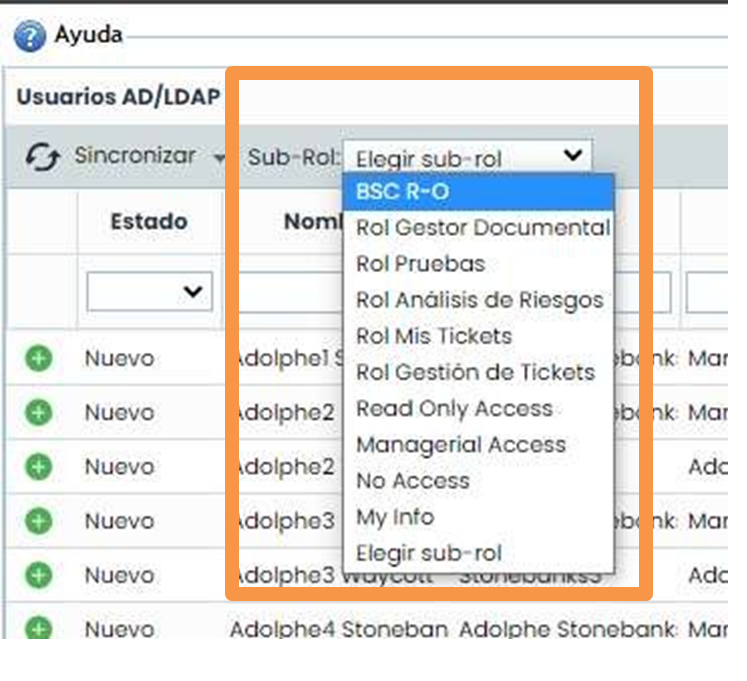
On the other hand, there is the “ Sub-Role” button, as an Enterprise or Entity user in GlobalSuite can also have a Sub-Role that allows configuring the options they have access to. For this reason, if one of these sub-roles is selected, the synchronized users will have this sub-role associated in the tool.
2.1.3 User Section
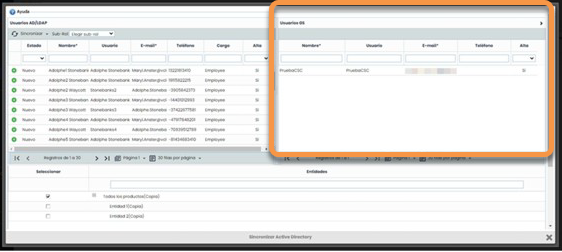
The section on the right corresponds to the users belonging to GlobalSuite, both those synchronized with AD and those who are not.
2.1.4 Entity Section
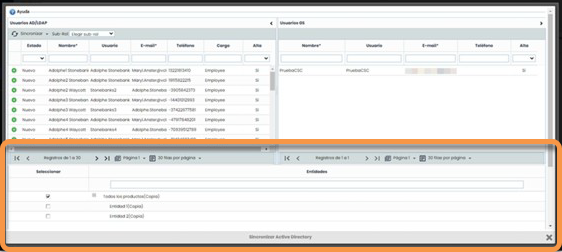
The section located at the bottom shows the entities or management systems available in the company. In GlobalSuite, a company can have one or more entities (also called Management Systems) below it. Although users are managed by the company, it is possible to indicate that some users have access only to a specific entity. Therefore, through this section, it is possible to indicate which entity the users being synchronized will belong to.
2.2 Employee Synchronization
Employee synchronization is done similarly to user synchronization (point 1), but without considering the checkbox “Create and associate employees when synchronizing users” in the connection settings.
3. Differences with LDAP
When synchronizing with LDAP, there are some differences explained below. In the connection screen, the User DN field must be prefixed with the initials “CN=”. Thus, while in Active Directory the value could be “Administrator,” in the case of LDAP it must be “CN=Administrator.”
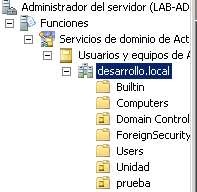
Additionally, it is also possible to access different groups or organizational units. The following images show a series of groups and the users that could be synchronized:
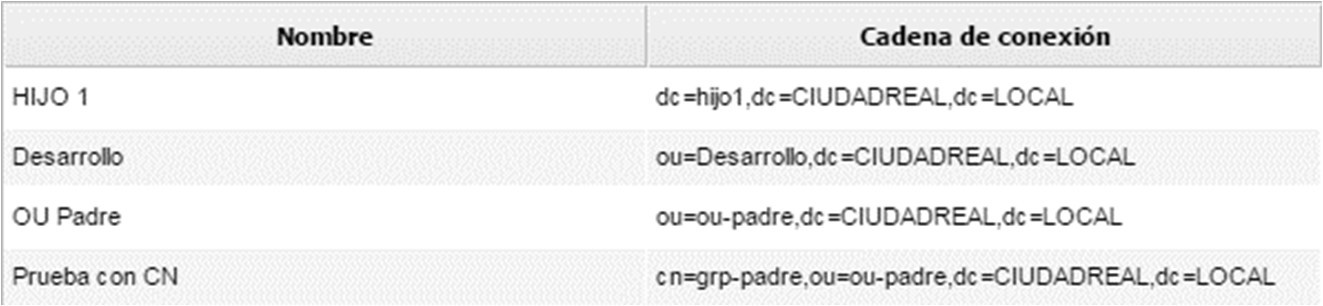
1- Groups created in LDAP
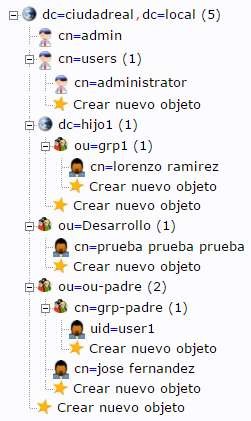
2- Example of user tree in LDAP
In each group, the following users could be displayed:
-
CHILD 1: lorenzo ramirez
-
Development: test test test
-
Parent OU: user1, jose fernandez
-
Test with CN: user1
If synchronized without a group, the 4 users could be selected: user1, test test test, jose fernandez, and lorenzo ramirez.
The rest of the configuration considerations are the same as in the case of Active Directory.
04. Required Fields for Synchronization with AD
For user synchronization to be successful, the AD connection library of GlobalSuite requires that Active Directory has at least the following attributes:
-
Attributes with predefined value
-
objectClass=user
-
samaccounttype=805306368 (NORMAL_USER_ACCOUNT)
-
objectCategory=person
-
These attributes must exist and have this value.
-
Attributes with value assigned by the AD administrator
-
cn
-
sn
-
department
-
samaccountname or employeeID (at least 1)
-
mail
-
memberof
-
title
-
displayname
-
telephonenumber
-
primarygroupid
The attributes highlighted in bold are mandatory and must have an assigned value. The rest must exist and it is recommended that they have a value as they can be used in other parts of GlobalSuite.