The project initiation and scope option allows defining the initial requirements to establish the project scope, responsible parties, locations, etc.
The first thing the user sees is a table where they can establish different scopes, such as one for each type of system, update scopes throughout the management system's lifecycle, etc.
To create a new scope, the 'New' button must be selected, and the new scope will then appear in the table. To delete a scope, the row or rows to be deleted must be selected, and then the 'Delete' button must be clicked. Additionally, there is the option to download the list of Scopes in editable format (.xlsx) or in .pdf format by clicking the 'Download' button.
To set the details of a scope, you must click directly on the name of the scope. Once you have accessed the scope details, a form will appear where you can specify each of its parameters.
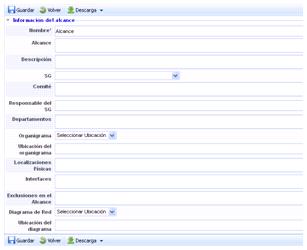
The form allows defining the following fields:
-
Name: Descriptive name of the scope. This will appear in the initial table with the list of scopes.
-
Scope: Phrase that encompasses the system's scope and will appear on the corresponding certificates.
-
Description: Allows detailing the coverage of the scope.
-
MS: Management System to which this scope applies. Different scopes can be defined for each management system of the organization.
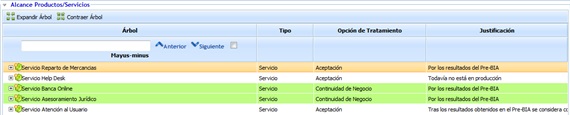
NOTE: If the selected MS is 'Business Continuity Management System,' it is possible to narrow down and justify the services that will be within the scope, based on the Business Impact Analysis (Pre-BIA) conducted.
-
Service Catalog: Provides the option to establish the services involved in the Scope.
-
Committee: This section specifies the resources involved in the management of the system.
-
MS Responsible: This will be the person in charge of the management system and the intermediary between Management and the Management Committee.
-
Departments: Allows identifying the departments involved within the system's scope. Depending on the organization's size, it is necessary to specify which ones are included.
-
Organizational Chart: There are two options to complete this section.
-
Select a location: Allows specifying in the following text field where the file is stored.
-
Upload file: If this option is selected, the file with the organization's organizational chart can be attached for a better understanding of the scope. To do this, the option to browse the file's location will appear at the bottom. Once selected, the 'Upload' button must be clicked. When the upload is complete, the file will appear in the table below.
-
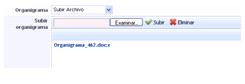
NOTE: Only one file can be uploaded. If another file is uploaded, the current organizational chart will be replaced.
-
Physical Locations. Allows identifying the locations, headquarters, and branches included in the scope.
-
Interfaces. When the entire organization is not involved in the scope, the departments involved must communicate with these parts, such as communication between the IT Department (within the scope) and the HR Department (outside the scope). The latter must be listed in this field.
-
Scope Exclusions Parts of the organization that are not included in the scope and the justification for their exclusion.
-
Network Diagram. Allows indicating the network diagram involved within the scope, something necessary for very technical standards. The management of this field is the same as the Organizational Chart field.
-
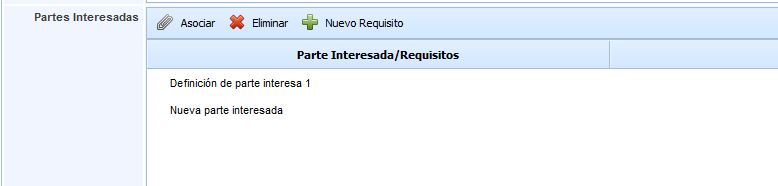
Interested Parties Allows defining the interested parties that affect the project's scope. The form allows performing the following actions:
-
Associate: If the interested parties have been previously defined from Settings, it is possible to associate them with our scope using this button.
-
Delete: Allows deleting the generated row of interested parties.
-
New Requirement: It is possible to associate requirements for each interested party. To do this, the interested party to which the requirement is to be associated must be selected, and then this button must be clicked to add the new requirement.
-
-
Context Provides the option to establish the organization's context that may affect the project's scope.
-
Purpose of the Management System Allows describing in detail the purpose for which the Management System is implemented in the organization.
-
Internal/External Factors Provides the option to indicate those internal or external elements that may affect the management system's scope.
-
Consequences Allows describing the consequences of implementing the management system based on the defined scope.
Scope Consolidation
This option allows viewing a summarized version of the different scopes associated with the entity and sub-entities.
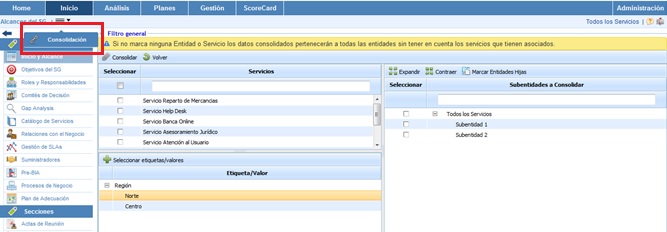
Below, the functionality provided by each of the available tables is detailed.
-
Services Table: Allows the user to filter the scopes associated with the selected Services.

-
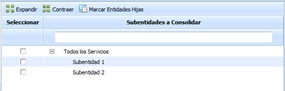
Sub-entities Table: Provides the option to filter the scopes defined in the selected sub-entities.
-
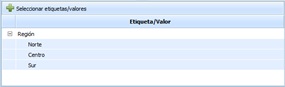
Tag/Value Table: Allows viewing the scopes associated with a specific tag.
-
Specific Filters: Provides the option to view the scopes associated with one or more management systems.

Once the necessary filters have been set, the query must be generated. To do this, the following options are available:
-
Consolidate: Once the button is clicked and based on the established filters, it allows viewing a summarized version of the scopes in the table below.
-
Back: Provides the option to return to the initial list of scopes.
The results are displayed in the lower table 'Consolidation Results'

The information provided by the table is as follows:
-
Scope: Report on the name of the established scope.
-
MS: Allows viewing the management system associated with the scope.
-
Entity: Provides the option to view the entity or sub-entity associated with the scope.