This tutorial explains how to create and assign a Role with Managerial Access in GlobalSuite®. This type of role allows limiting user visibility to the elements, processes, services, indicators, and analyses directly associated with the Services they are responsible for, thus ensuring segmented and secure access within the organization.
Company Roles
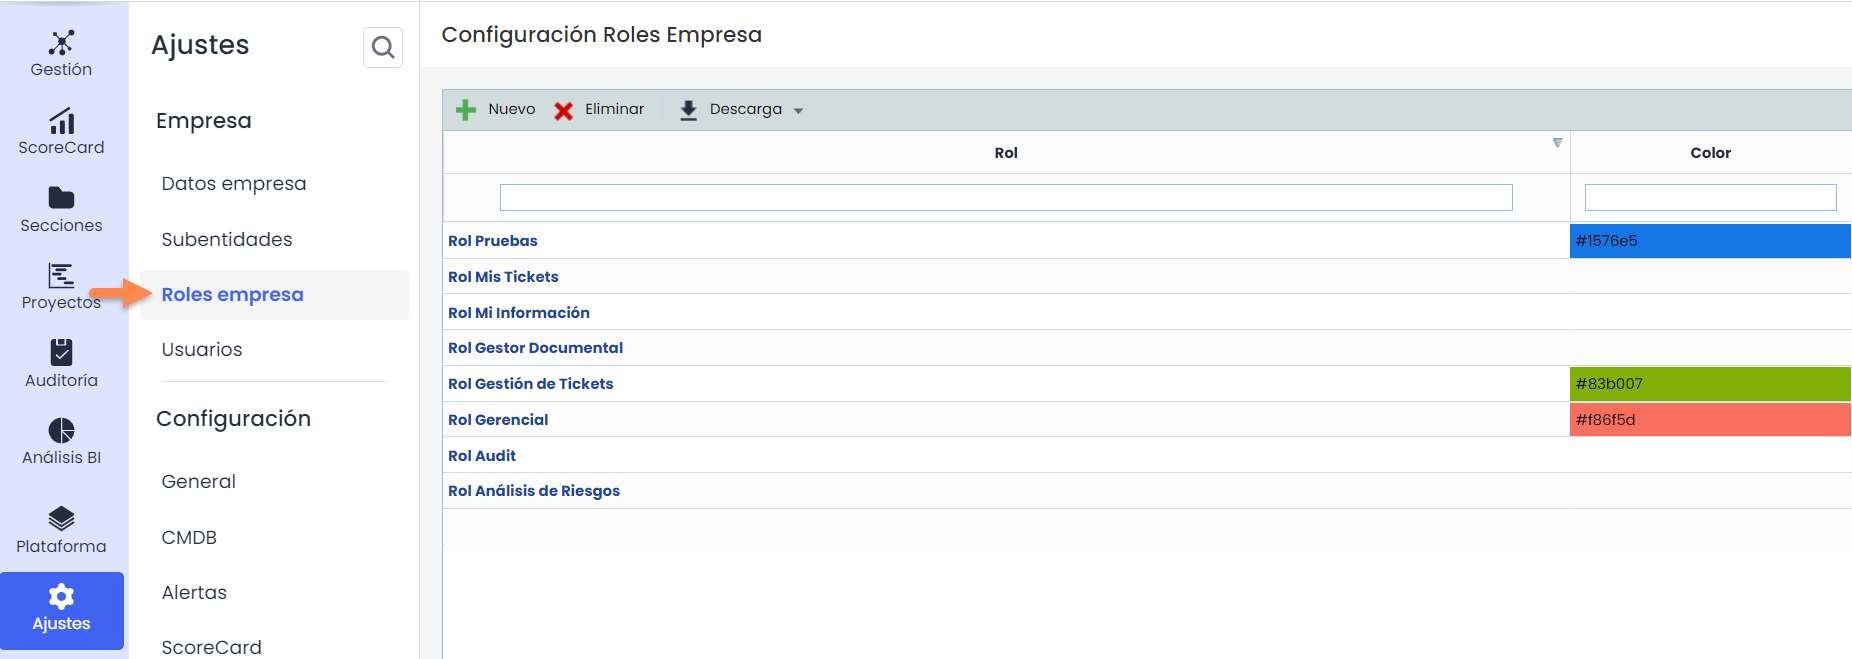
Step 1. Creation of Company Roles
GlobalSuite® allows establishing different types of access roles to ensure confidentiality in the use of platform options.
To manage Roles, you must go to Settings > Company Roles
Step 2. Configuration of Company Role access
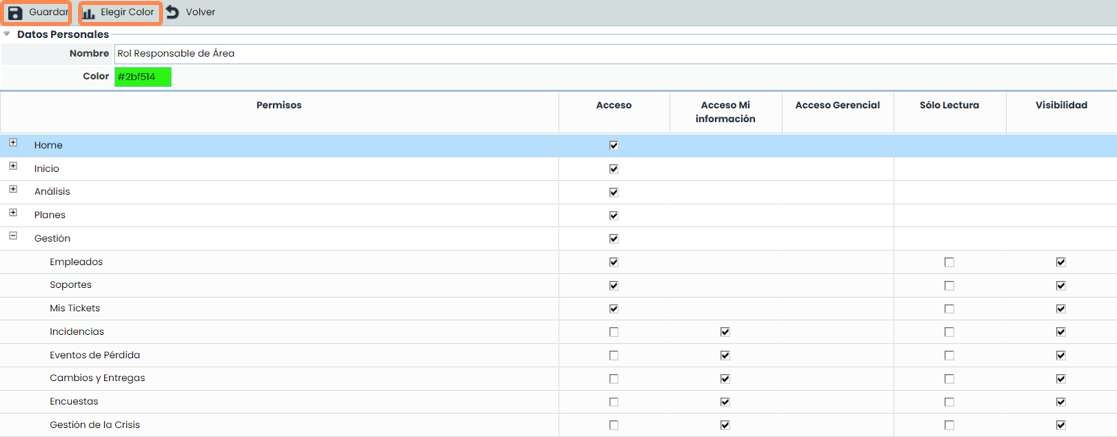
To determine the access permissions of the created Role, access the permissions screen where the following can be configured:
-
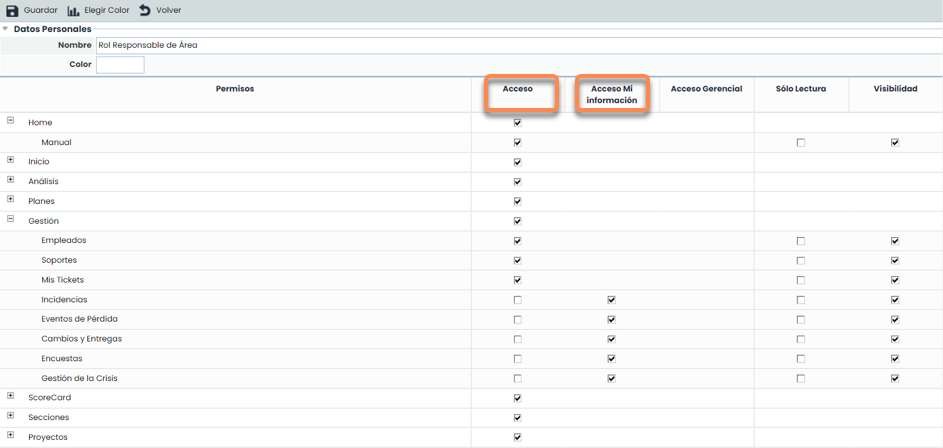
Access: By selecting the access column, the user with this role will be able to access all records and information of the selected option.
-
Access My Information: This permission allows access to the specified option but only to the records for which the user with this role is responsible. The rest of the records for that option will not be visible to the user.
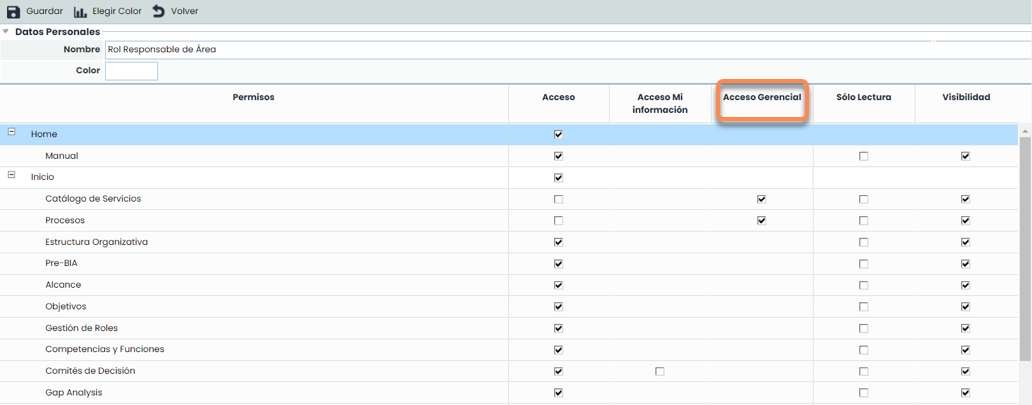
Managerial Access: This permission allows access to the specified option but only to elements dependent on the Services where the user-employee assigned this role is responsible.
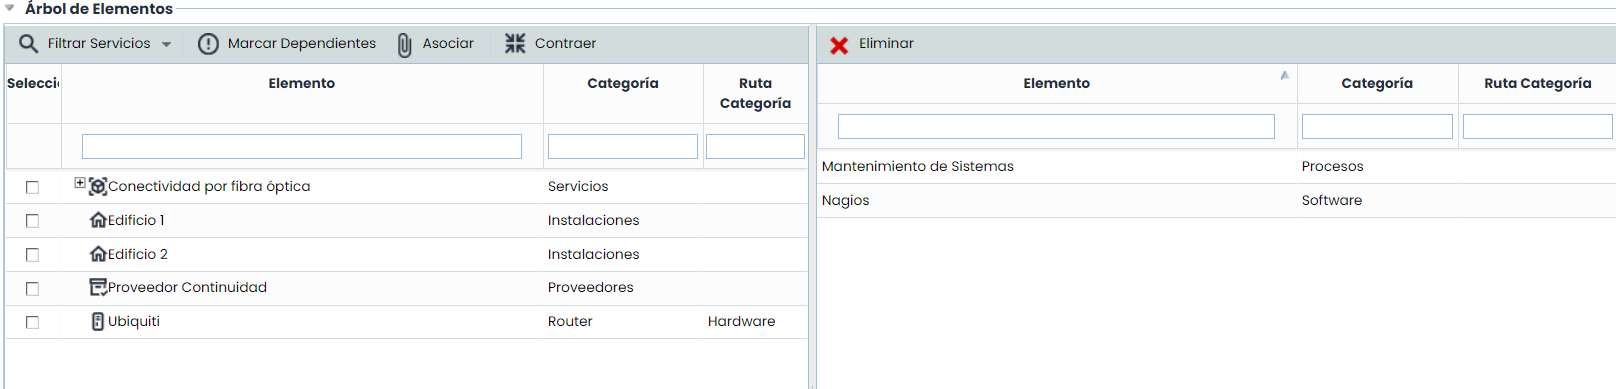
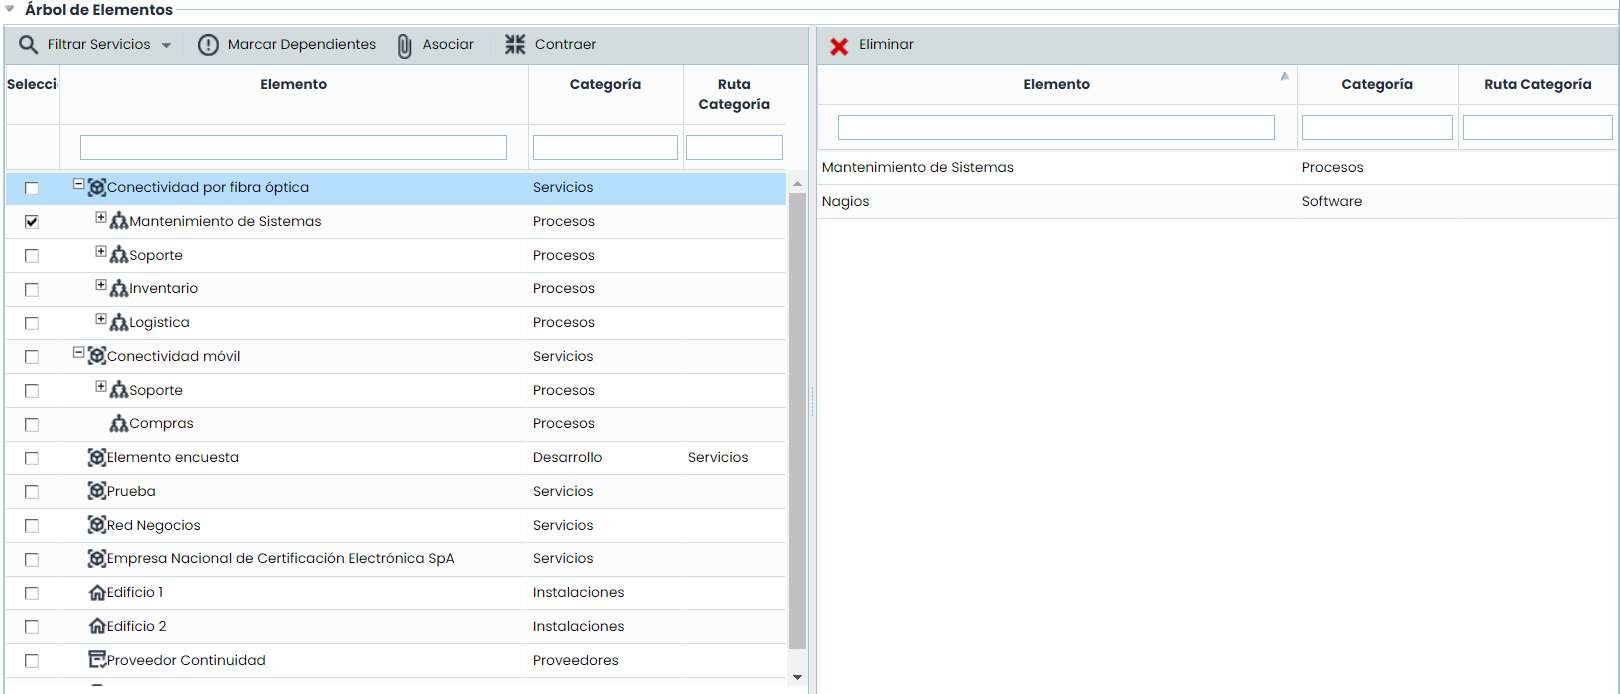
Note: the dependencies of the elements (processes, elements…) with the services are displayed in the Inventory option > Element Tree.
Example: This permission allows limiting the view to all information dependent on a specific service, hiding information not directly related to it.
-
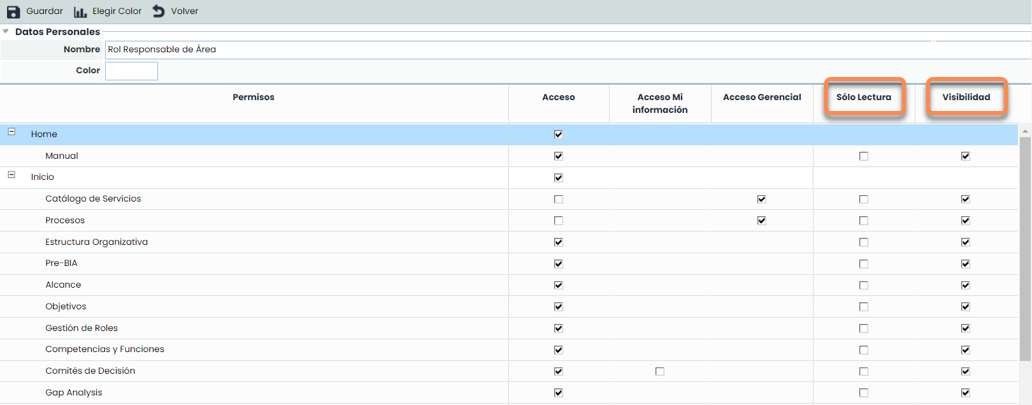
Read-Only: Allows defining access (regardless of type) to a specific option, but only in consultation mode.
-
Visibility: Allows using information from the marked option, even when management access to it is not granted. Example: from the Inventory option, an "Employee" can be assigned as responsible for an Element, but it is not desired for that user to have access to the Employees option. In that case, the "Employees" option will have the "Access" checkbox marked, but not the "Visibility" checkbox.
Step 3. Save the established Company Role
To finalize the creation of the established Role, save the configuration by clicking the save button.
Additionally, GlobalSuite® allows associating colors to facilitate the search and assignment of the Role to a specific user being configured. To do this, select the Choose Color option, displaying a color scale that allows associating them with the created Role.
Difference between users and employees
In GlobalSuite®, an employee is any person who has a relevant role within the organization. They are managed through the Management > Employees option.
The users are the people who access GlobalSuite® to manage information. They are managed through the Settings > Users option. As seen in this guide, users can be assigned a Company Role.
For the proper functioning of some options of these Company Roles (such as Managerial Access or Access My Information), it is possible to indicate that an employee corresponds to a user.
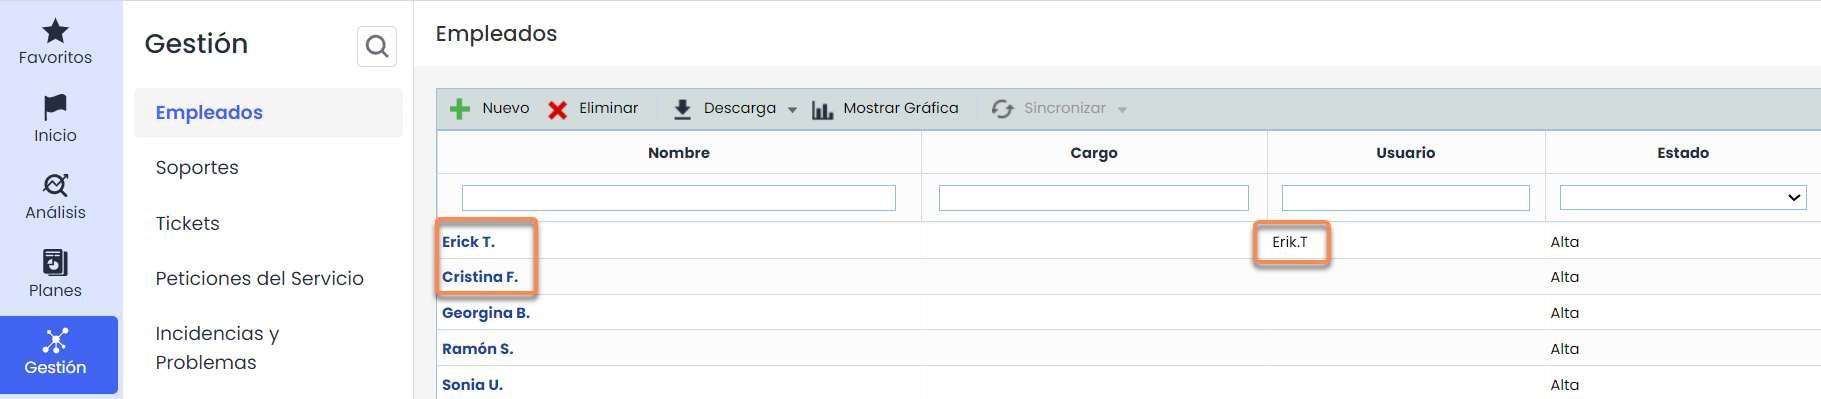
Users and employees can be linked in two ways:
-
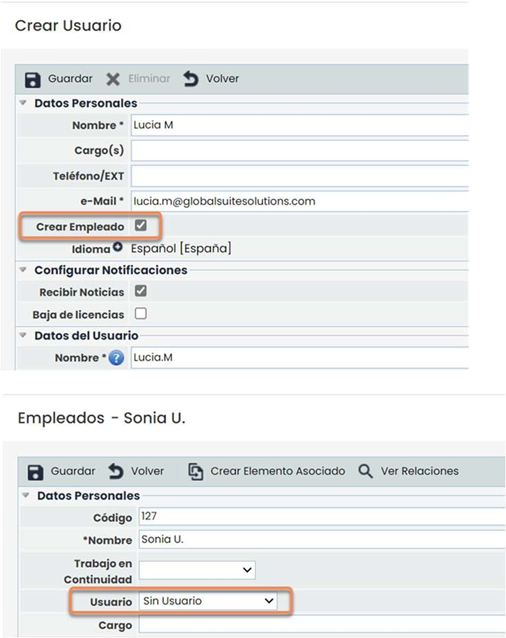
The first and most recommended way is to do it when creating the user by checking the “Create employee” box, which will automatically create an employee in the management system and link it to this User.
-
The second option would be, in case the user has already been created without having checked the previous box, a dropdown field called “User” will appear in the Management/Employees option to manually perform the association within the form. This dropdown contains all users who do not have an associated employee.
Managerial Access Role
For this Role to function correctly, it must be associated with a GlobalSuite® user who is also an employee.
This user will be an Enterprise User, to whom a previously created Role can be associated, in this case, a Role with Managerial Access.
As mentioned earlier, Managerial Access allows access to the specified option, but only to the elements that depend on the Services where the user/employee assigned this role is responsible. In other words, it allows the user to enter the different options they have been granted access to, but only viewing the elements that depend on the services assigned to them.
For this to happen, a series of steps must be followed, which are detailed in the following slides.
Step 1. Creation of the Company Role
First, the Company Role with Managerial Access must be created.
In this case, a Role will be created where access to different options will be removed, and access will only be granted to options with Managerial Access.
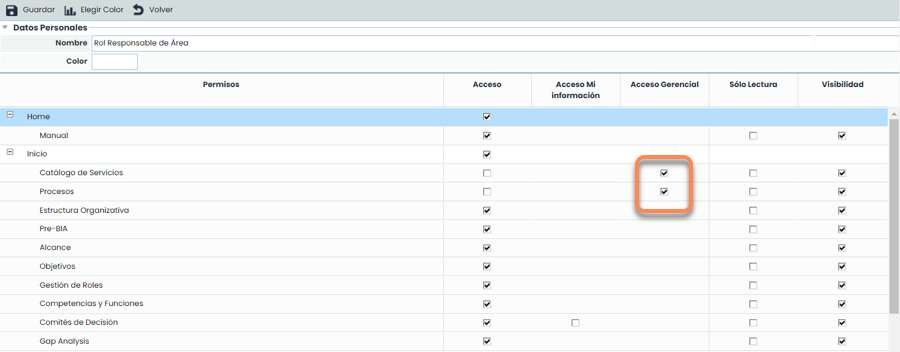
With this, the tool is configured so that people associated with this Role will not be able to see any options from which access has been removed. And in the options with managerial access, they will only see information if they belong to services that have been associated with them.
Step 2. User association to Role
Once the Role is created, it can be assigned to users in their profiles.

Step 3. Role assignment to user
As explained in point "2 - Difference between users and employees," users associated with this role/access profile must have an associated Employee. These employees can, in turn, be organized by roles (equivalent to Position or Work Team in the organization). This role organization is done in the Home > Role Management option.
In this option, users can be associated with the Company Roles they belong to, to later assign them to different services.
To assign them to a Role, the Roles must first be created. These are created in Settings > Configuration > General.
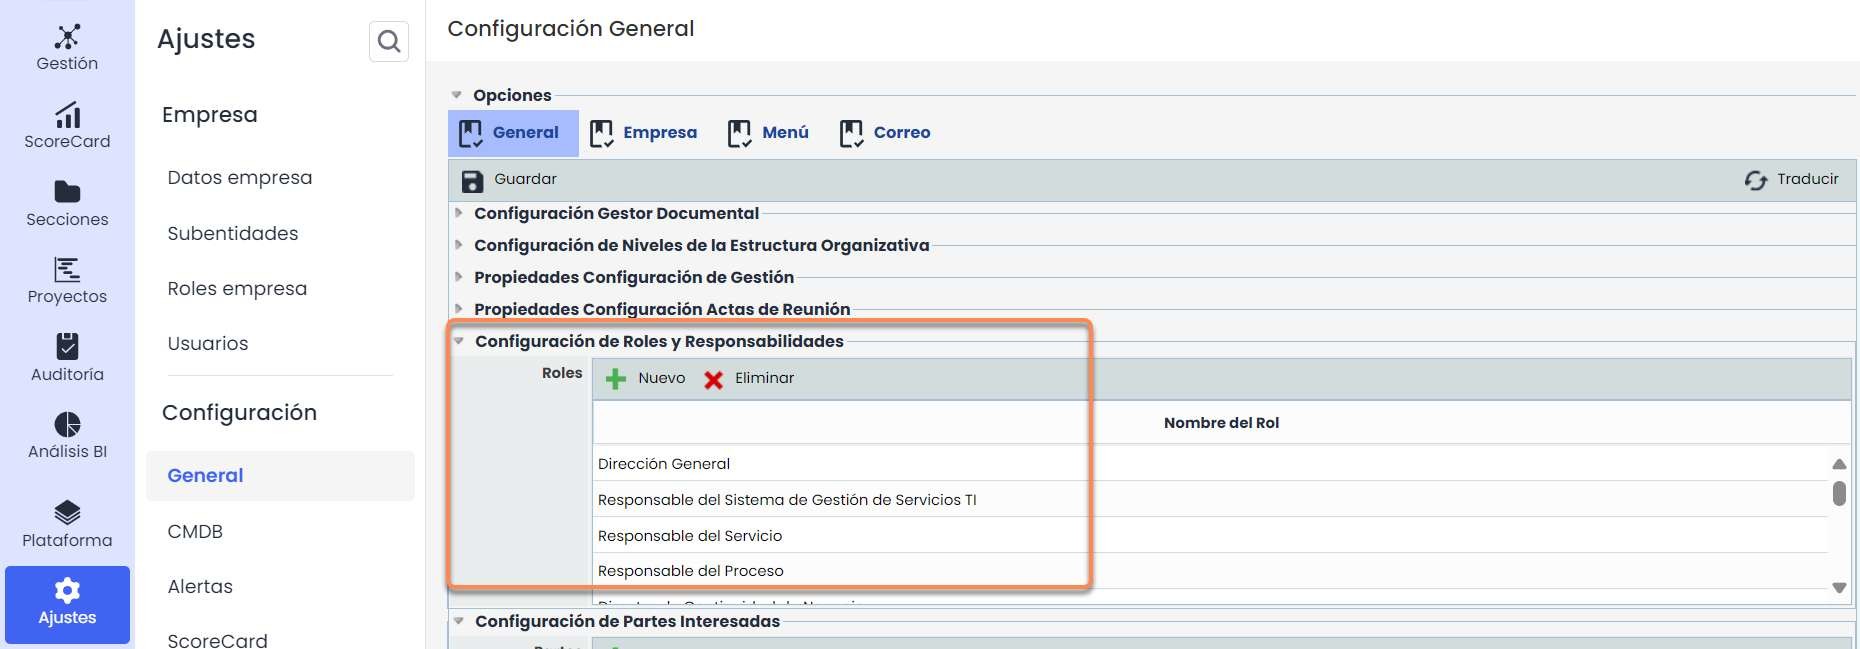
Roles can also be created by accessing Home > Role Management > Configure Roles. This button will take the user directly to the screen from the previous slide.

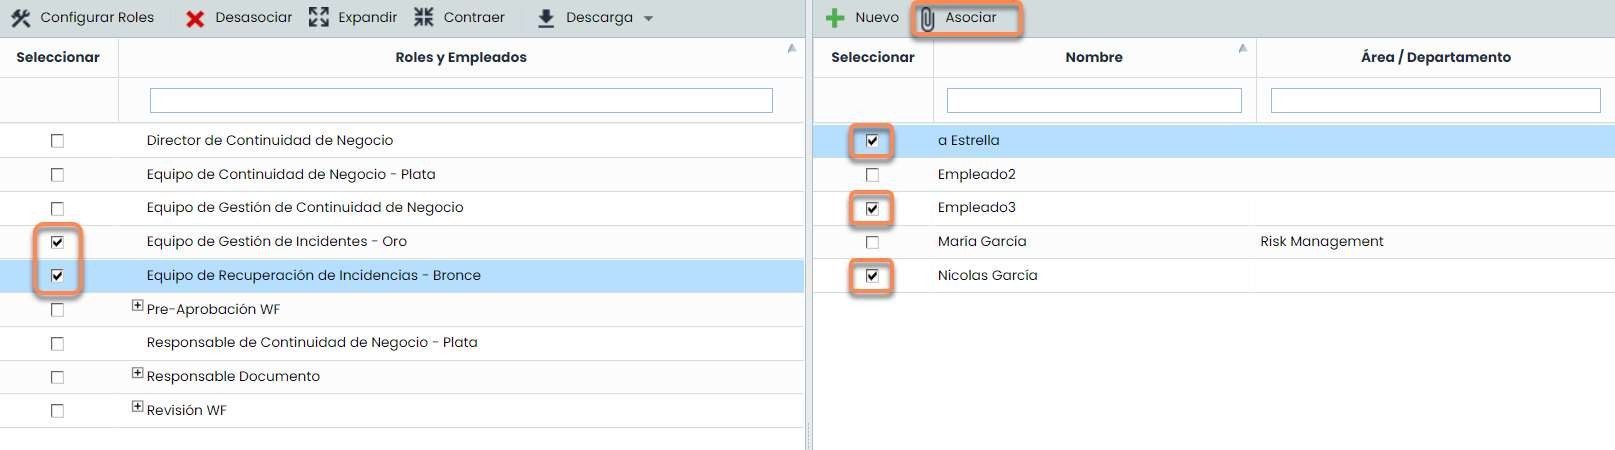
Once the organization’s Roles are created, the next step is to associate the Roles with the employees.
This association is done by checking the employees to be associated with the roles to be associated and clicking the “Associate” button.
It is not necessary for a Role to have an associated employee, nor vice versa, meaning the employee does not need to be associated with any Role. Additionally, an employee can be associated with 1 or “n” Roles.
Step 4. Assignment to Services
Once employees are associated with Roles, these Roles will be assigned to the desired Services.
To do this, go to Home > Service Catalog, enter each one, and associate one or more Roles. Specific employees within the associated Role can also be selected.
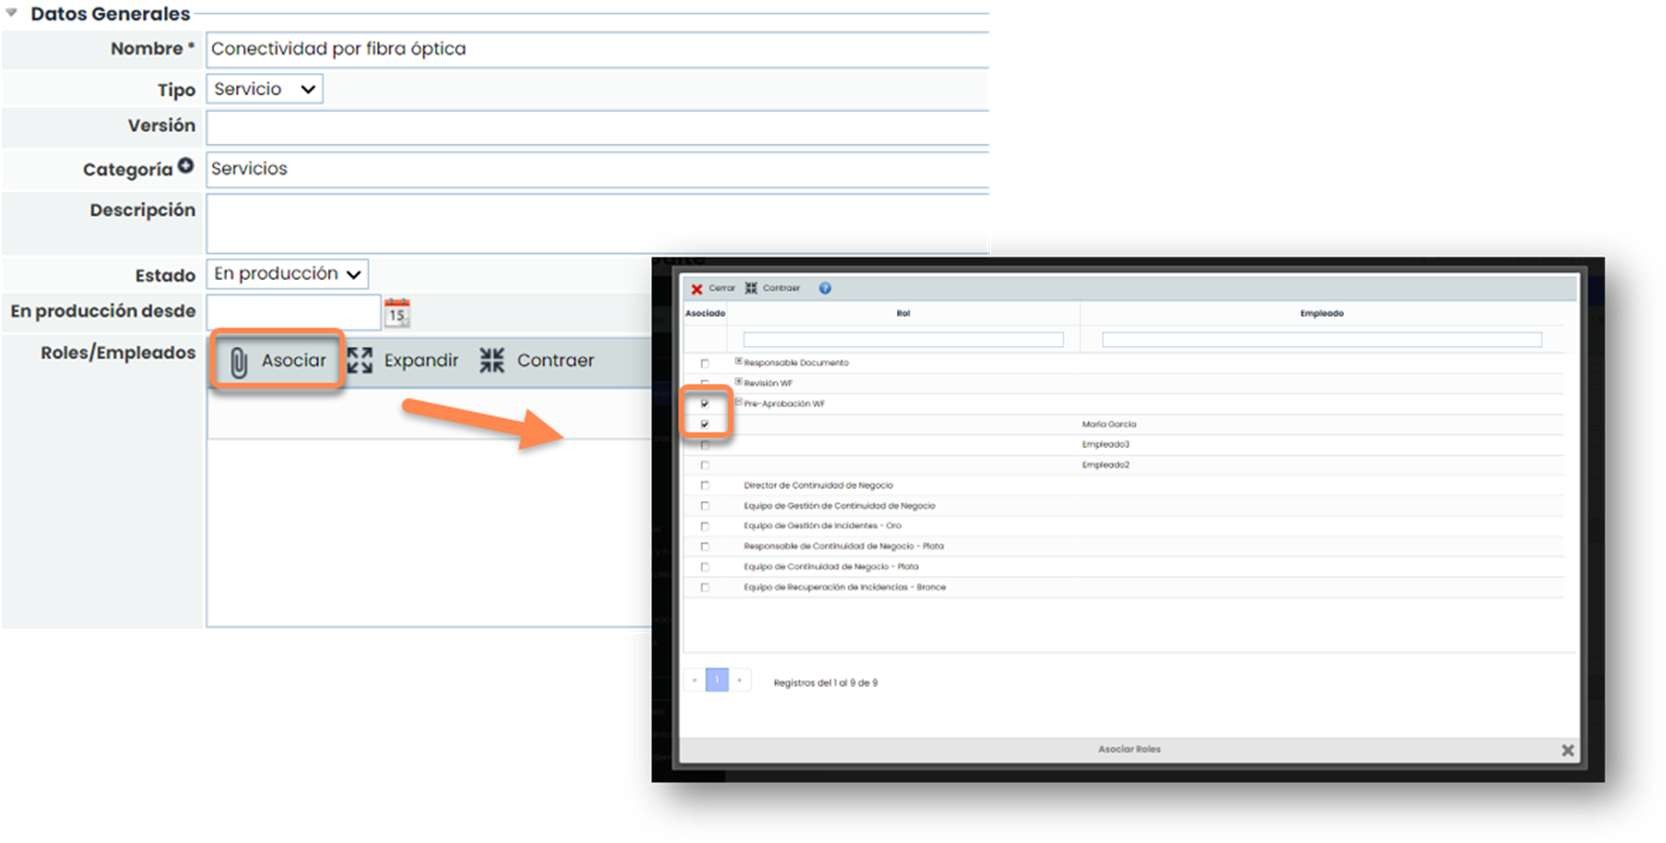
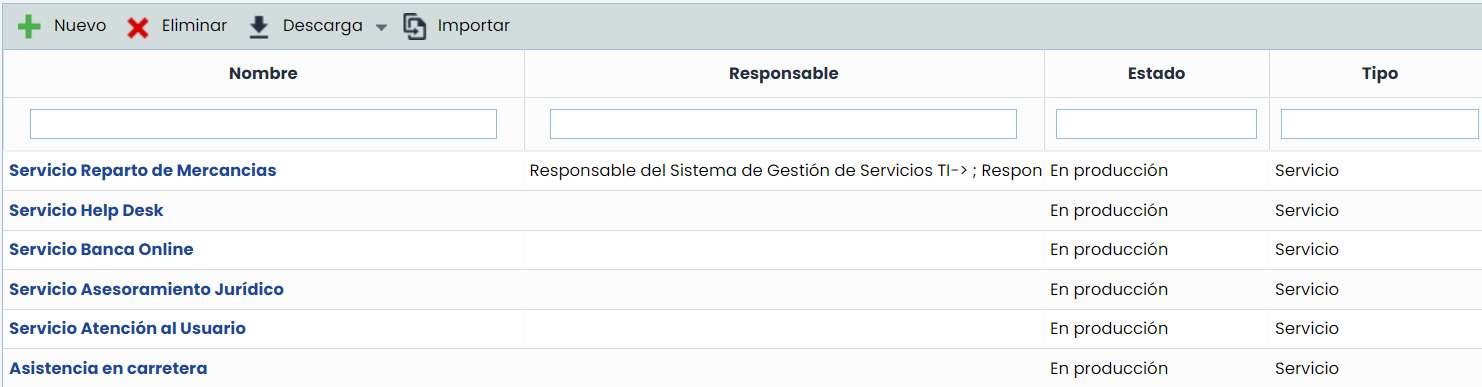
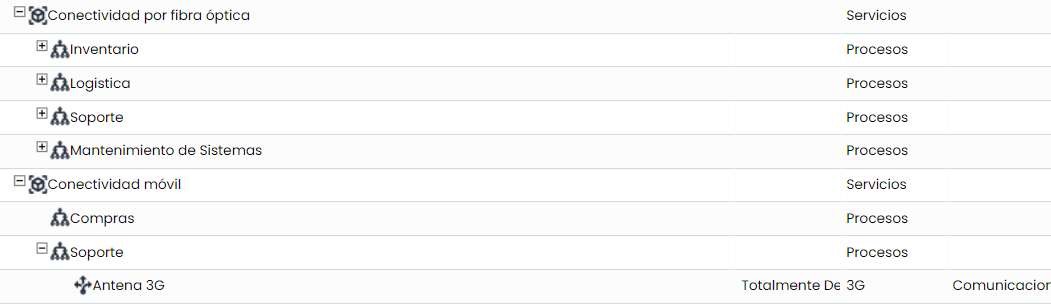
These users with the Managerial Access Role will only have access to the Services they have been assigned to.

In contrast, a user with full access to the Services option would see all the organization’s Services.
A user with a Managerial Access Role in the Inventory option will be able to see the processes and elements associated with that Service.
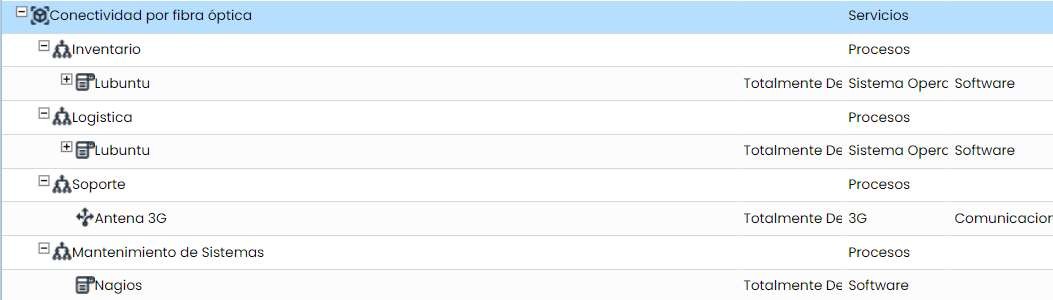
However, a user with full access to the Inventory option will be able to see all the processes and elements associated with the different Services.
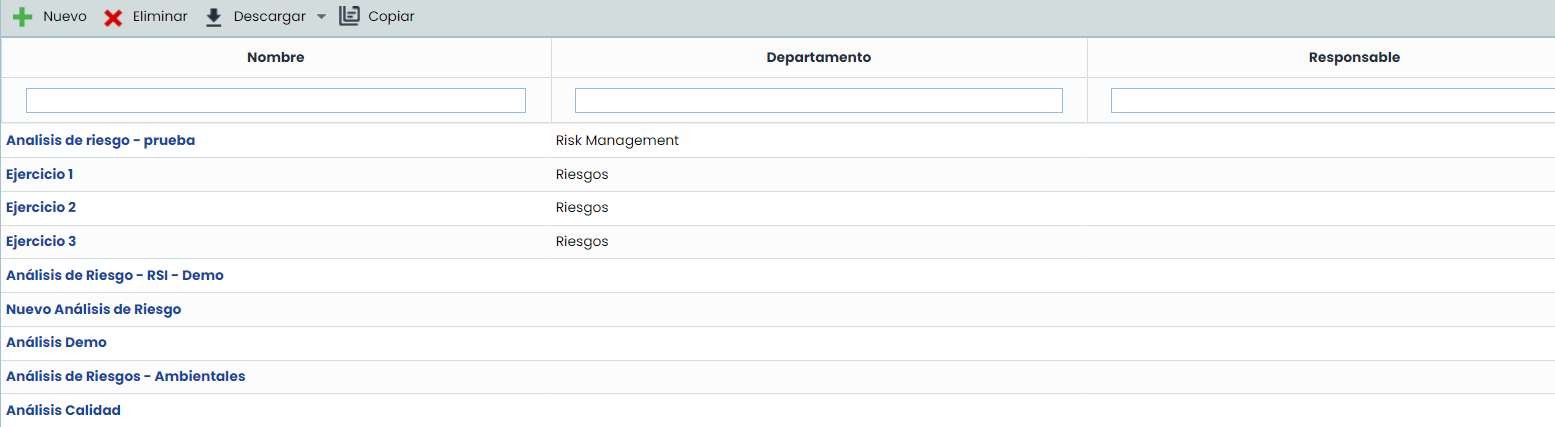
When performing a risk analysis, users with a Managerial Access Role will only be able to analyze the elements associated with the service they are responsible for.
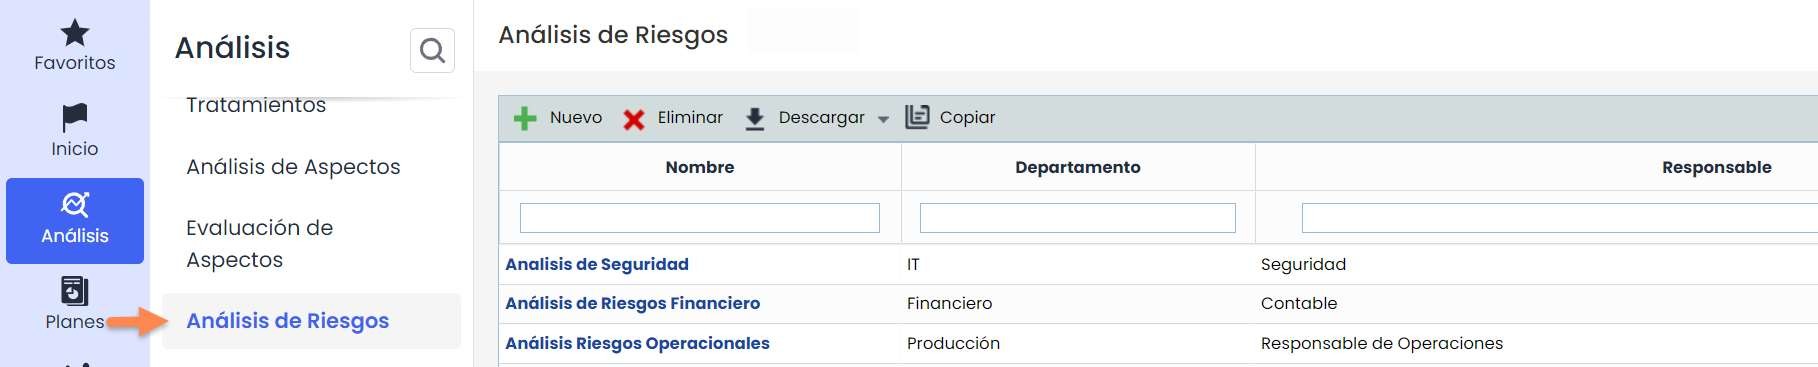
In fact, if they enter any of these analyses, in the “General Information,” the only service that appears is the one associated with the users.
No information related to other services or elements appears, except for those that do not have links in the dependency tree.
In contrast, a user with full access to the Risk Analysis option will be able to see all analyses.
And if they enter any of these analyses, in the “General Information,” they will see all services and elements regardless of the users associated with them.
The same applies to Indicators and Metrics. Only those assigned to the Service where users with the Managerial Access Role are associated will appear.
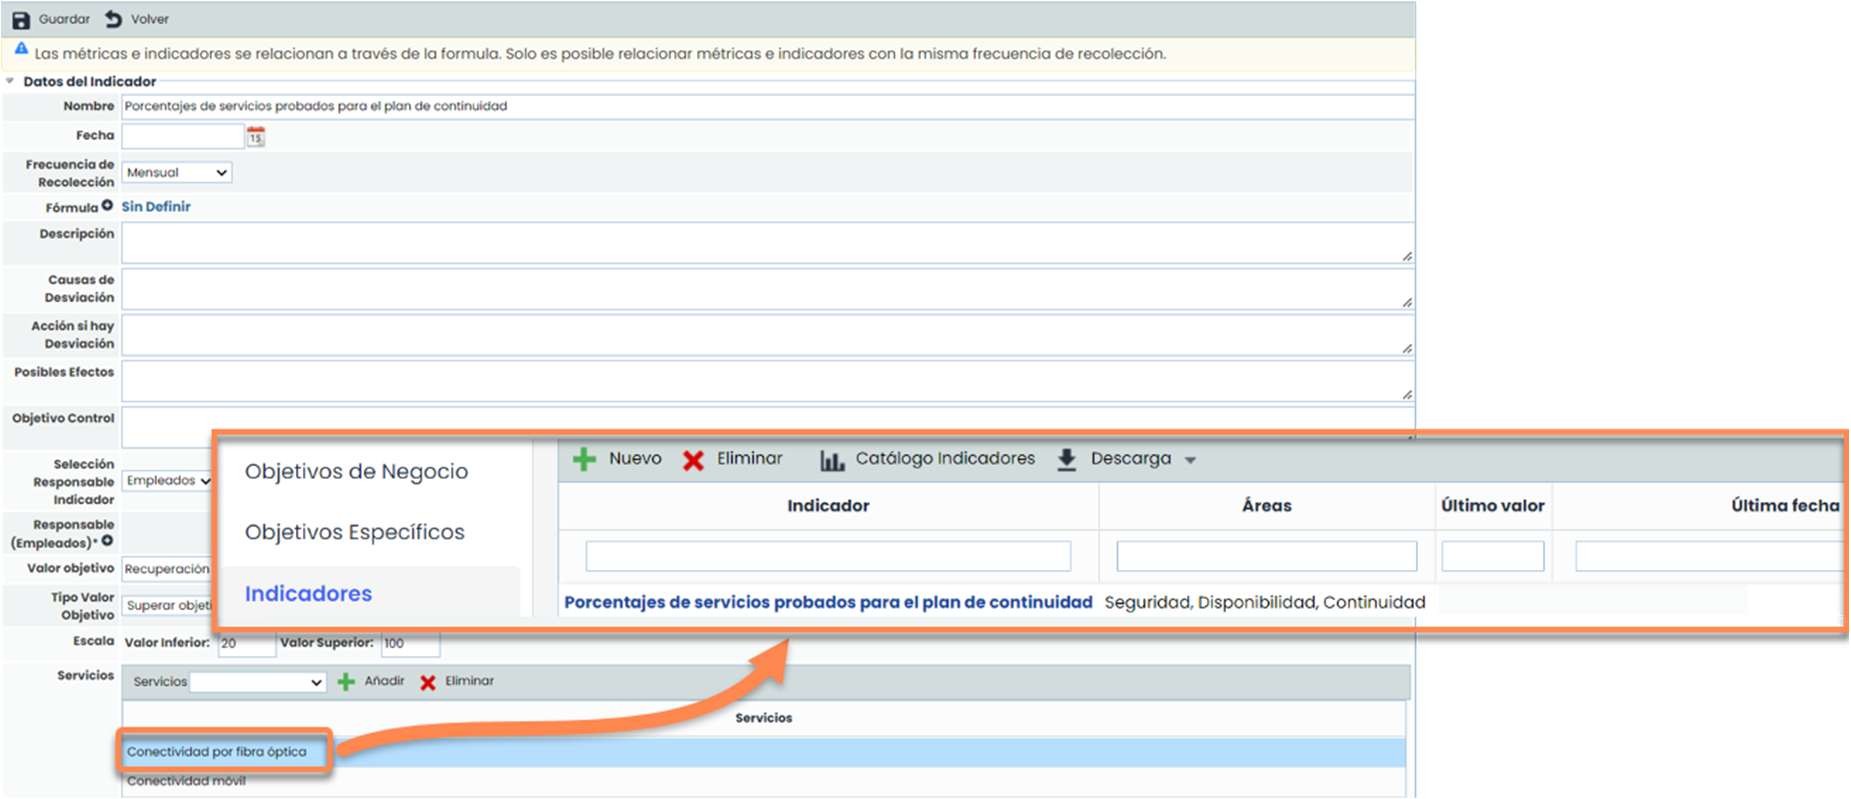
In contrast, users with full access to the Indicators and Metrics options will be able to see all the indicators and metrics configured in the tool.

