In the main table displayed when accessing the option, you will find the list of all Recovery Sequences generated for treatment and recovery in a crisis situation. Each of the Sequences shown in the table corresponds to Recovery Sequences defined as "public," which can therefore be associated with one or more Recovery Plans.
Recovery Sequences defined as "private" belong exclusively to a Recovery Plan, so they are accessible only from the Plan to which they are associated.
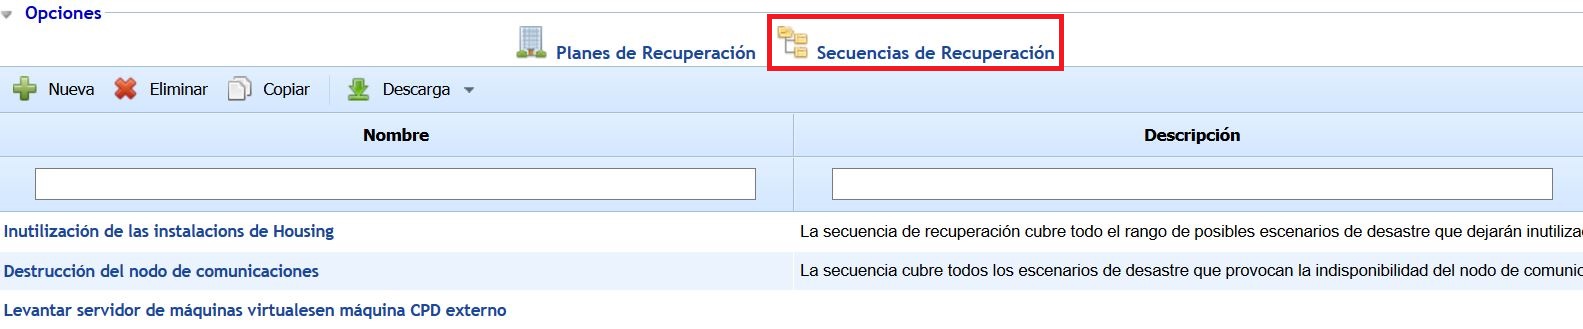
The options that can be performed on the table are as follows:
-
New: Allows generating a new Recovery Sequence.
-
Delete: Allows deleting an existing Sequence in the table. To do this, you must select the row where the Sequence you want to delete is located and click the button.
-
Copy: Allows copying a Sequence. To do this, you must select the row where the Sequence you want to copy is located and click the button.
-
Download: Allows downloading the list of all Recovery Sequences displayed in the table, in both Excel and PDF formats.
When entering a Recovery Sequence, a form with two sections is displayed, containing the following features:
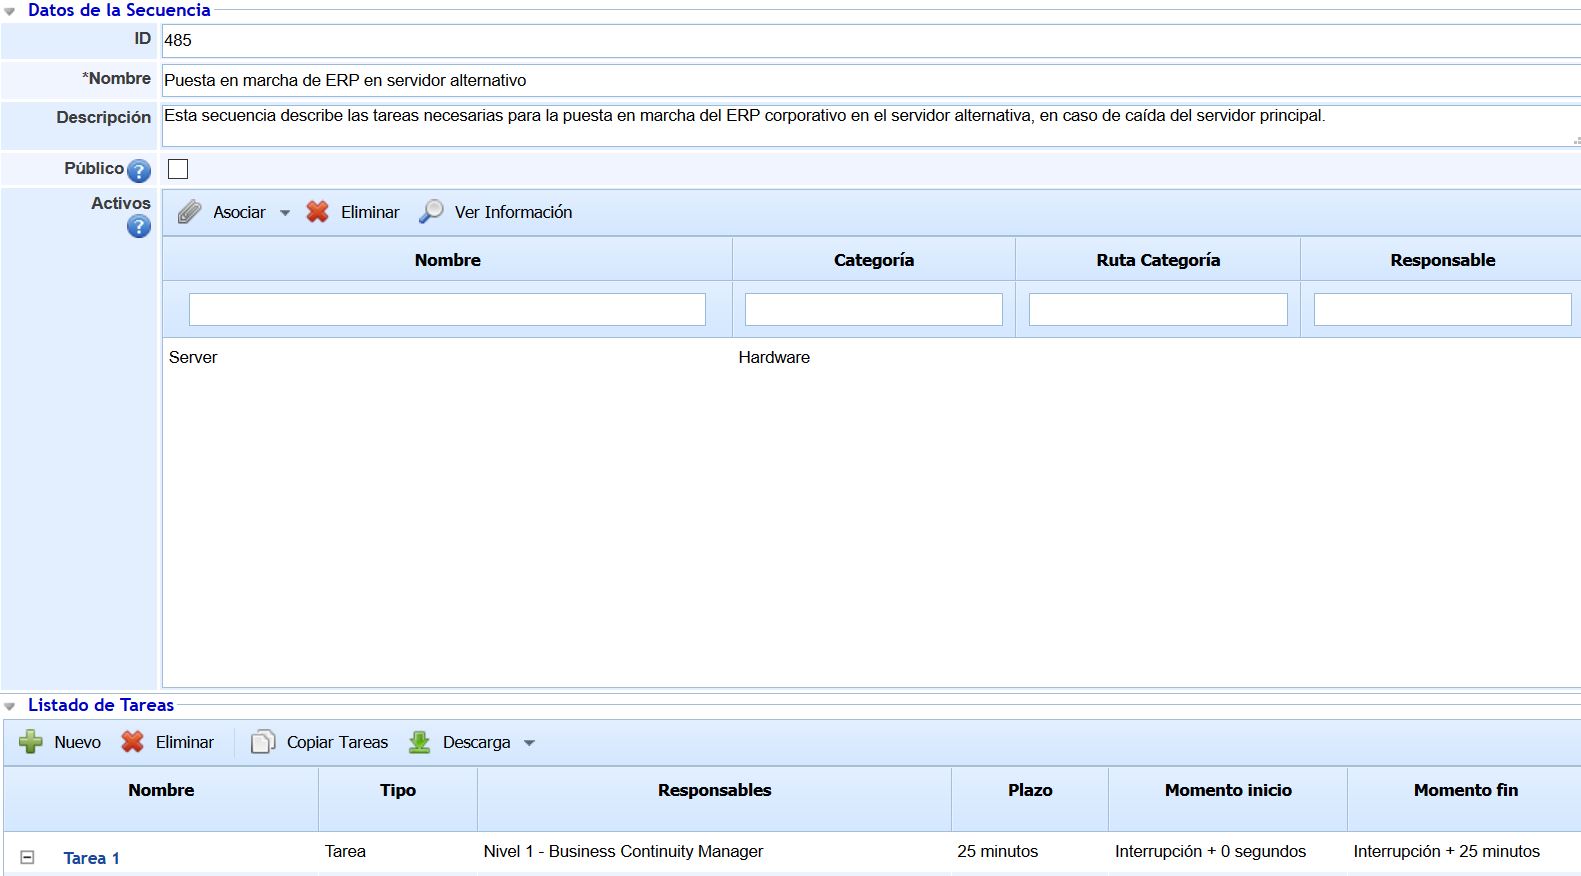
Sequence Data
-
ID: Identification number of the Recovery Sequence. The number is assigned automatically and cannot be modified by the user.
-
Name: Allows specifying the name of the Recovery Sequence.
-
Description: Allows providing a detailed description of the Sequence.
-
Public: Allows configuring whether the Recovery Sequence is available for any Recovery Plan. If the checkbox is unchecked, the Sequence will only be available in the Recovery Plans where it is already associated.
-
Assets: This table allows associating registered assets from the 'Inventory' option (menu 'Analysis') to the Recovery Sequence. The information displayed for each asset includes the name, category, and assigned responsible party.
NOTE: The visibility of this table in the Recovery Sequences is configurable in the option called "Business Continuity" located in the 'Settings' section. By default, the Assets table is disabled.
NOTE 2: The Assets table is only visible in private Recovery Sequences (i.e., Sequences that belong to only one Recovery Plan). Therefore, if the Sequence has the 'Public' checkbox marked, the Assets table will not appear.
.jpg?cb=6e461a17dd3dbfa8dd587a08b67417d1)
The options that can be performed in this table are as follows:
-
Associate - List: Clicking this button displays a pop-up window containing the list of all assets registered in the Inventory. To associate the assets with the Recovery Plan, you must select the desired assets using the checkbox on the left and click the 'Associate' button.
-
Associate - Dependency Tree: Clicking this button displays a pop-up window containing the asset dependency tree. The assets shown are those associated with the business processes included in the Recovery Plan. To associate the assets with the Plan, you must select the desired assets using the checkbox to the left of the asset and click the 'Select Assets' button. The 'Mark Dependents' button in the window allows automatically selecting all assets below the selected asset in the dependency tree.
-
Delete: This button allows deleting assets from the table. To do this, you must select the assets you want to delete and click the button.
-
View Information: This option allows viewing the properties of a specific asset. To do this, you must select an asset from the table and click the button, displaying a pop-up window containing all the characteristics of the asset registered in the Inventory.
Task List
The task list section allows establishing the steps to be taken to achieve recovery in a crisis state, as well as the deadlines or timeframes for completing the specific task and the responsible parties for its execution.
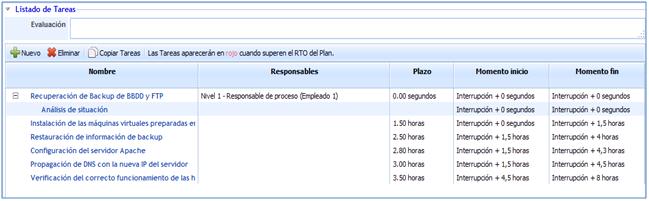
For generating tasks and subtasks to be performed, GlobalSUITE provides the following options:
-
New: Allows generating a new task.
-
Delete: Allows deleting a previously generated task.
-
Copy Tasks: Allows generating a new task copied from one that has been previously generated.
If the user clicks on the task link, a new screen will be displayed with the following options:
Task Data

-
Name: Allows determining the name of the task to be performed.
-
Description: Allows providing more detailed information about the defined task.
-
Deadline: Allows setting the stipulated time for completing the defined task.
-
Type: Offers the possibility to define the type of task to be performed.
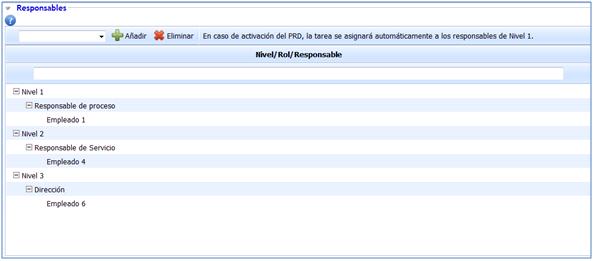
Responsible Parties
Allows the user to determine, through different levels, the roles and responsible parties in charge of managing each task.
The steps to follow for defining the roles and individuals responsible for such management are as follows:
1. By default, three different levels are established to carry out the task.
2. To assign a specific role to each level, you must select the corresponding level and choose the role responsible for the task from the dropdown menu.
3. Once the role is assigned, you must proceed to select it and associate the responsible parties for its management.
These levels are established to determine the personnel responsible for carrying out each task in the Recovery Plan.
The management order is established by the levels, with Level 1 being responsible initially. If Level 1 is unavailable to perform the task, Level 2 will take over. If neither is available, the third and final level will manage it.
Consolidated Resources
This option allows the user to associate consolidated resources resulting from the BIA establishment. To do this, click the 'Associate' button and select the checkbox for the resources you want to include in the recovery plan. To delete an entry from the table, select the desired row and click the 'Delete' button.
Attachments
Allows associating any documentation related to the recovery plan. To do this, click the 'Attach' button and select the desired file. To delete a file, select the desired row and click the 'Delete' button. In addition to attaching new files, you can associate files uploaded to the Document Manager option. To do this, click the 'Associate' button and select the necessary documentation in the recovery plan task. Finally, by clicking the 'Download' button, the tool offers the possibility to download the file.
Previous Tasks
This option allows the user to establish the sequence of task execution. To do this, click the 'Associate' button and select the task(s) that must be completed beforehand. To delete an association, select the desired row and click the 'Delete' button.
Subsequent Tasks
This option allows the user to establish the sequence of task execution. To do this, click the 'Associate' button and select the task(s) that must be completed afterward. To delete an association, select the desired row and click the 'Delete' button.
Subtasks
This option allows defining subtasks for an established task. To do this, click the 'New' button, which generates a new entry in the table. To delete a subtask, select the desired row and click the 'Delete' button.