The 'Business Relationships' option allows the platform user to have a database with all the clients to whom the organization provides the services involved within the scope.
On the home screen, you can see the list of stored clients. The options provided by the tool are as follows:
-
New: Allows you to create a new client.
-
Delete: Allows you to delete an existing client. To do this, select the client's row and click the 'Delete' button.
-
Import Data: GlobalSuite allows importing client databases in CSV format. The required data are Code, CIF, Company Name, City, Province, Country, Comment. These data are the same as those specified in the form. Once the file is prepared, it must be selected through the 'Browse' option and the separation method must be indicated.
-
Register in Client Portal: Allows, after selecting the desired company, sending an email with the access credentials to the Client Portal.
-
Download: Allows downloading the client list in editable format (.xlsx) or in .PDF format.
-
Show: Allows filtering the client list, with the following options:
-
Show all: Displays the list of all clients stored on the platform.
-
Active: Displays the list of clients identified as active.
-
Inactive: Displays the list of clients identified as inactive.
-
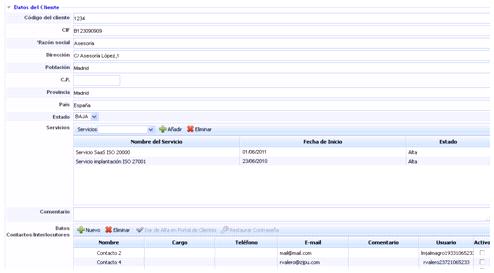
Once you have accessed the record, the tool allows you to define the following fields for each client:
-
General data such as the Client Code, CIF (Tax Identification Code), Company Name, Address, City, Postal Code, Province, and Country.
-
Status: Allows identifying whether the client is active or not for management by the organization.
-
Services: Allows identifying the catalog services provided to the client. To do this, select the service from the dropdown and click the 'Add' button. If you want to delete an associated service, select the desired row(s) and click the 'Delete' button.
-
Comment: Text field that allows indicating any additional notes related to the client.
-
Contact/Interlocutor Data: Allows identifying both the organization's personnel responsible for the relationship with the client and the client's interlocutors. To insert a new client, simply click the 'New' button, and a row will be generated where you can define the following fields:
-
Name: Identifies the contact's first and/or last name.
-
Position: Identifies the position held by the contact in the organization.
-
Phone: You can indicate their contact number.
-
E-mail: Allows indicating the contact's personal email address. When registering clients in the Portal, this will be the email address where the access credentials email will be sent.
-
Comment: Text field that allows indicating any additional notes related to the contact.
-
User: Displays the access user automatically assigned to the client to access the Client Portal.
-
Active: Allows restricting access for one or more users to the client portal once they have been registered in the portal by selecting the desired user's checkbox.
-
For the contact to have access to the Client Portal, select the row and click the 'Register in Client Portal' button.
If the contact wishes to access the portal and has forgotten the access password, it can be restored by clicking the 'Reset Password' button. The user will receive an email with the new access credentials.
-
Email Groups: Allows creating email groups based on the interlocutors defined in the previous field 'Contact/Interlocutor Data'. To do this, click the 'Add Group' button, which generates a new entry in the table. The interlocutors must be selected from the dropdown and the 'Add' button must be clicked. If you want to delete an interlocutor, select the desired row(s) and click the 'Delete' button.

-
Contracts: This field allows uploading any file related to client management, such as the contractual agreement, confidentiality clauses, etc.
-
Service Requests: This section displays those service requests registered in the 'Management/Service Requests' section that originate from the selected client. To display the ticket, click on the link in the name column.
-
Incidents and Problems: The incidents and problems field displays those events registered in the 'Management/Incidents and Problems' section that originate from the selected client. To display the ticket, click on the link in the name column.

-
RFC’s: This section displays those change requests registered in the 'Management/Changes and Deliveries' section that originate from the selected client. To display the ticket, click on the link in the name column.
-
Claims: The claims field displays those service dissatisfaction records registered in the 'Management/Claims' section that originate from the selected client. To display the ticket, click on the link in the name column.