.jpg?cb=7204c267cfedc6632547f0b97abad17e)
The workflow option allows the organization to parameterize the flow of states associated with the tickets.
.jpg?cb=81b6368d96b0af394fc2c751878d8e5b)
Once the option is accessed, a functionality is displayed that allows establishing the different workflows required by the organization. For this, the following options are offered:
-
New: Allows the user to insert a new entry in the table.
-
Delete: Offers the possibility to delete an entry in the workflows table. To do this, the desired row must be selected and the 'Delete' button must be clicked.
-
Change Name: Allows the user to modify the name of the workflow.
-
Download: Offers the possibility to download the list of workflows in an editable format (xlsx) or in PDF.
By selecting a workflow from the table, a screen is accessed that allows configuring the workflow. In the upper left part, the states that are part of the workflow are displayed.
.png?cb=cd3b0e9f12b95dcf8b052bfb8780f485)
The table allows defining the different states that make up the selected workflow. The table displays the following information:
-
Status: The column allows viewing the different defined statuses. To insert a new status, the 'New' button located at the top of the table must be pressed. If you want to delete a status from the table, the desired row must be selected and the 'Delete' button pressed.
-
Type: This column allows defining the type of status. To associate a type, you must double-click on the cell and select the type from the dropdown. The default types are as follows:
-
Initial: First status of a ticket. This type is only allowed to be associated with a single status in the table.
-
Intermediate: The intermediate type is a status following the initial type. As many intermediate types as required can be associated.
-
Final: This type is associated with the closure of a ticket. As many final types as required can be associated.
-
-
Notifications Enabled: This field allows configuring whether, by default, the responsible parties for the status will be notified by email when the ticket is assigned to them.
The states appear in green or red depending on whether the state is valid or invalid, respectively. To define a valid state, the following conditions must be met (these conditions are displayed when hovering over the question mark icon):
1. It has at least one employee associated as the state manager who has access to the tool. For this, there are two possibilities:
a. Assign a company role that has at least one employee who is a user of the tool.
b. Assign a role from higher entities that has at least one employee who is a user of the tool.
2. It has associated previous and subsequent states that allow advancing in the workflow. Depending on the type of state, the following must be met:
a. Initial State Type: It must have at least one subsequent state (if the workflow has more states).
b. Intermediate State Type: It must have at least one previous state and one subsequent state.
c. Final State Type: It must have at least one previous state.
At the top right, there is a table containing the sections of the ticket form. This table is associated with the states table, so once a state is selected, the table shows the specific section configuration for that state.
.jpg?cb=946ef0662c53dcb1588f503bbb5f1337)
The purpose of this table is to configure which sections are visible for each of the workflow states, thus allowing certain sections not to be displayed when the ticket is in a certain state. There are two columns that allow the following configuration:
-
Visible: Allows indicating whether the section is visible in the ticket form when it is in the selected state. By default, all sections are visible for all states. If you want to disable a section, you must click on "Yes," which will automatically change to "No."
-
Expanded: For those sections that are visible, it allows indicating whether the section is displayed expanded or collapsed in the ticket form. By default, all visible sections are displayed expanded. If you want to collapse a section, you must click on "Yes," which will automatically change to "No."
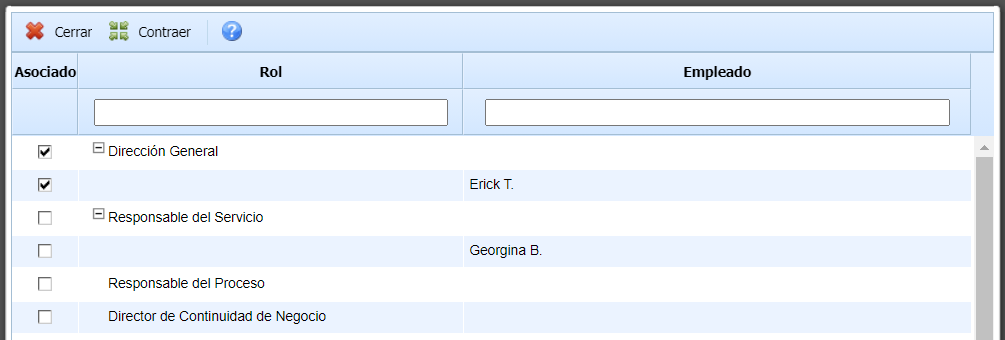
The roles and employees table offers the possibility to assign to each state the profiles or employees who will be able to manage the state. The options provided by the tool are as follows:
-
Associate Roles/Employees: Offers the possibility to assign, based on a state, the profiles and resources responsible for management.
The employees that will appear in the window will only be those who have an associated user, as it is necessary for them to have access to the tool to manage the tickets.
NOTE: Depending on the roles defined in a state, when managing a ticket, only the roles defined in the workflow can be selected.
.png?cb=921892fbecdf8601b2c4ca91b4da66a6)
In the case of 'Final' type states, it will be possible to configure which roles/employees have privileges to reopen a closed ticket.
.png?cb=64b74644b61c6f3a4973bbf9d6a4b24d)
The Associate Roles table is a functionality associated with companies that have the Subentities functionality, offering the possibility to associate Roles from higher entities responsible for managing the ticket. The options provided by the tool are as follows:
-
Associate Roles: Offers the possibility to assign, based on a state, the roles of the superior entity responsible for management.
-
Associate Areas: Allows defining the areas affected by a state.
.jpg?cb=679568404515de7d0d10f0fbab0d2c9d)
The 'Previous State' table offers users the possibility to define, based on a selected state, the states from which it can derive. The management provided by the tool is as follows:
-
States: Allows selecting, from the displayed list, which is the state prior to the one selected in the upper table.
-
Add: Once the state is selected in the dropdown, it allows inserting it into the table and associating it with the selected state.
-
Delete: Allows deleting a state inserted in the table. To do this, the desired row must be selected and the 'Delete' button must be clicked.
.jpg?cb=9a93fcd9621b8986e03f9e4dd83a00c8)
The 'Next State' table offers users the possibility to define, based on a selected state, the subsequent states that can be defined when managing the ticket. The management provided by the tool is as follows:
-
States: Allows selecting, from the displayed list, which is the state following the one selected in the upper table.
-
Add: Once the state is selected in the dropdown, it allows inserting it into the table and associating it with the selected state.
-
Delete: Allows deleting a state inserted in the table. To do this, the desired row must be selected and the 'Delete' button must be clicked.
NOTE: Once the workflow is established, it must be associated with the corresponding ticket, for which the associated flow will be applied, as shown in the following image.
.jpg?cb=28335b777b19a5c7a19bf54d825fefe3)