This tutorial explains how to configure, implement, and manage a Criminal Offense Prevention Management System (SGPDP) in GlobalSuite®.
The objective is to demonstrate how to use the functionalities of the Criminal Compliance module to design the organizational structure, perform criminal risk analysis, assess regulatory compliance, define controls and evidence, as well as establish audits, metrics, and indicators that ensure the continuous improvement of the system.
Configuration
Criminal Compliance Configuration
GlobalSuite® Criminal Compliance has a default configuration. Only for organizations that wish to customize their configuration, they can use the functionality detailed below, which is accessible through the Settings section.
This section offers the user the possibility to configure all aspects related to their Criminal Offense Prevention Management System, allowing the customization of aspects such as access permissions to the tool, the methodology used for Criminal Risk analysis, as well as the catalog to be applied in it.
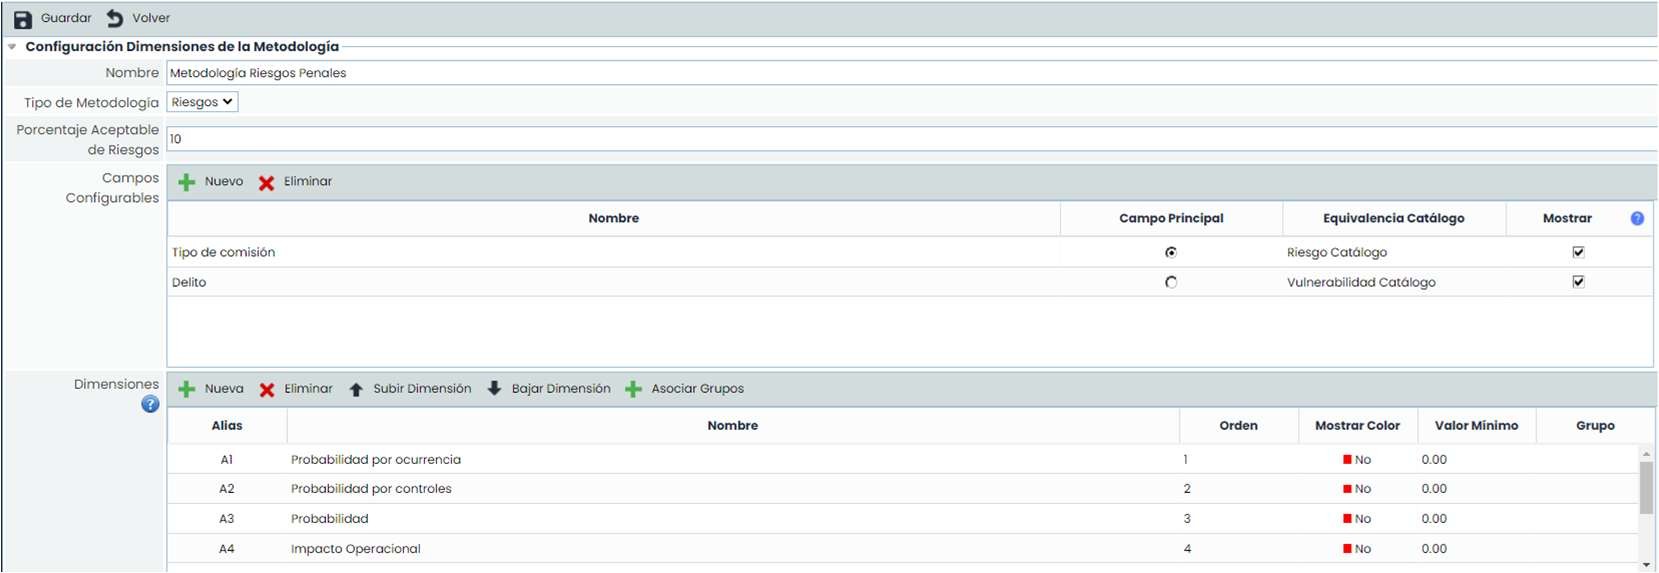
Risk Methodology
The Risk Methodology option allows configuring the different methodologies to be used in the Criminal Risk Analysis. New methodologies can be created, existing ones can be deleted, or copies of selected methodologies can be made.
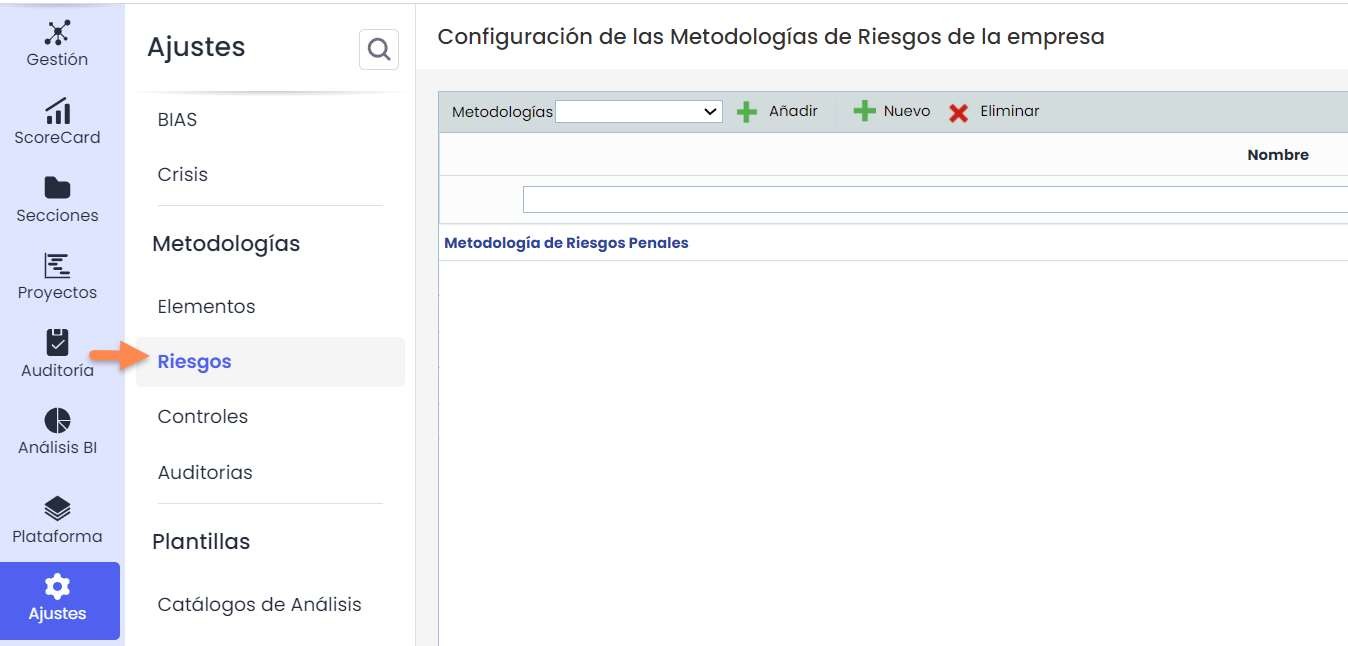
By selecting a methodology, we access the configuration form, organized into different sections, where parameters can be defined for calculating probability, impact, and inherent risk, among other aspects. The methodology of controls to be used for risk mitigation can also be associated.
Analysis Catalogs
This option provides the possibility of having a list of crimes and/or criminal acts to work with in the Criminal Risk Analysis.
These catalogs can be generated by the tool or custom catalogs can be created.
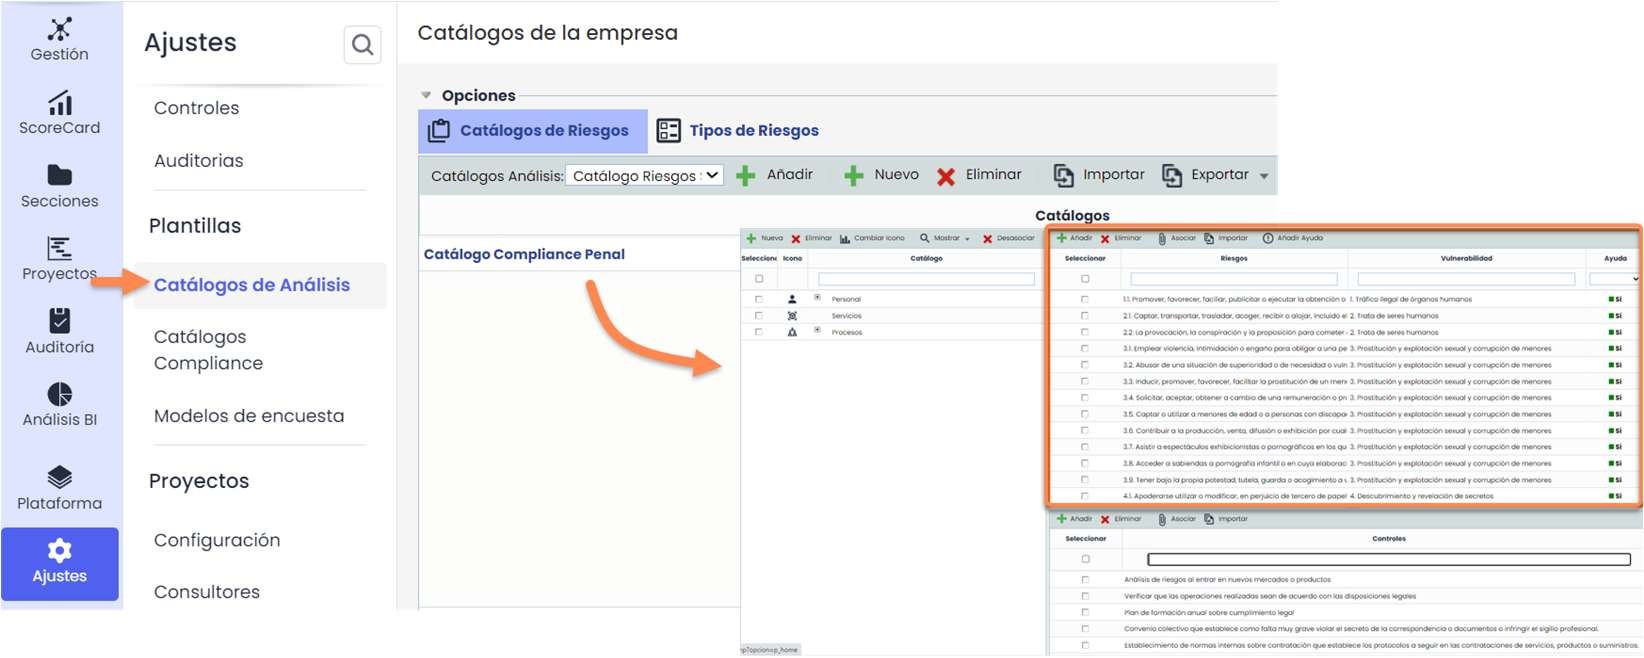
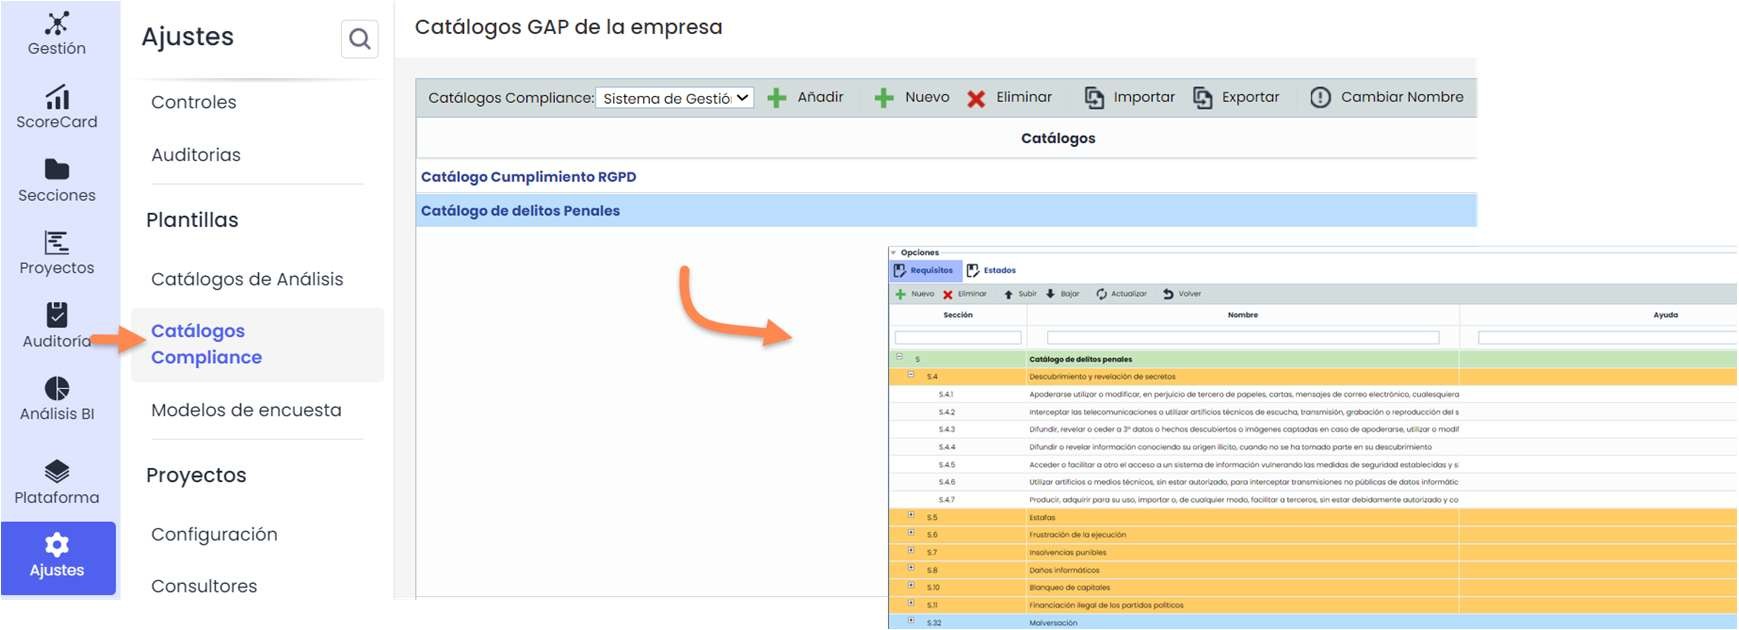
Compliance Catalogs
This option provides the possibility of having regulatory compliance catalogs already generated in the tool or creating a custom catalog.
These catalogs can be used in the Gap Analysis and/or Compliance options.
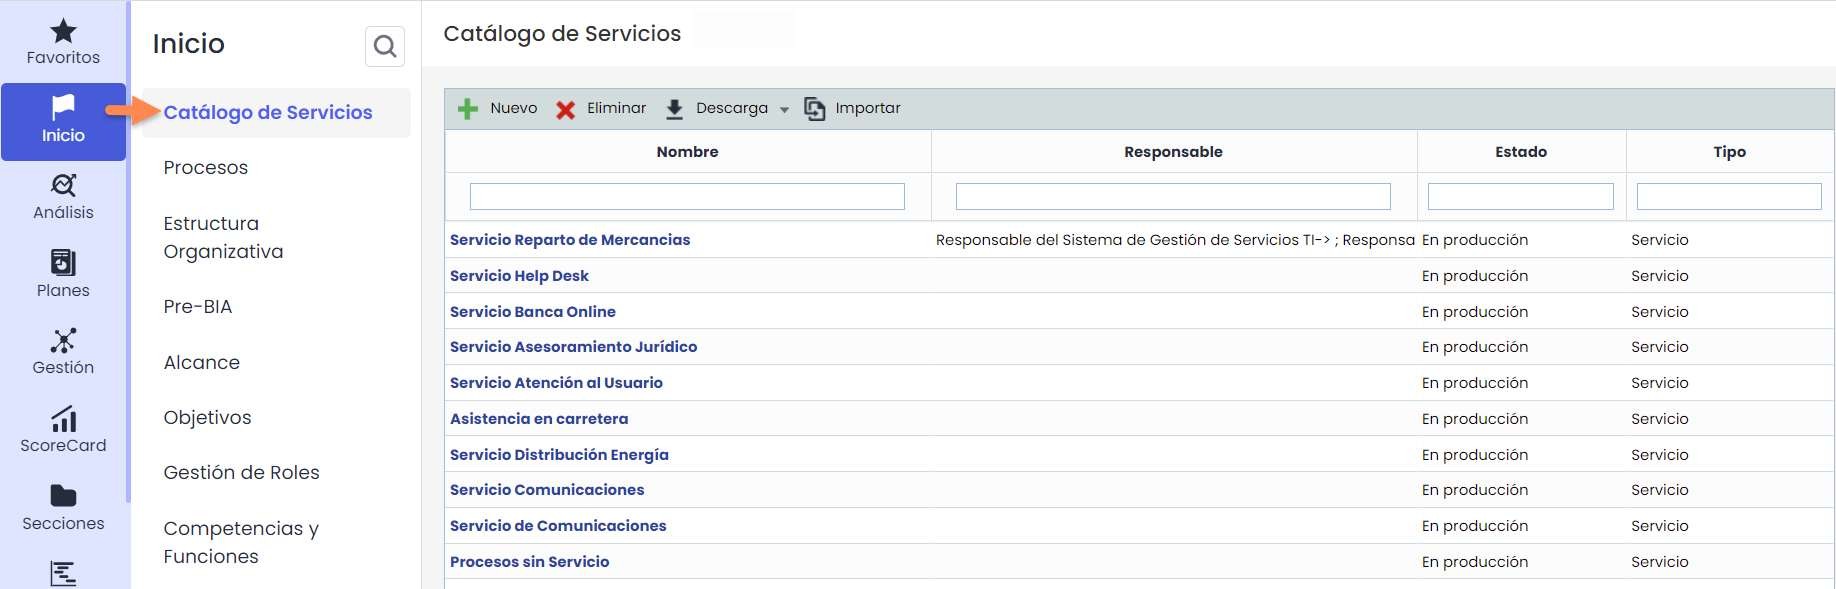
Services and Processes Catalog
Through both options, the functional structure of the entity can be defined, for example, registering the areas or departments in the Services Catalog and/or the Processes that compose these areas.
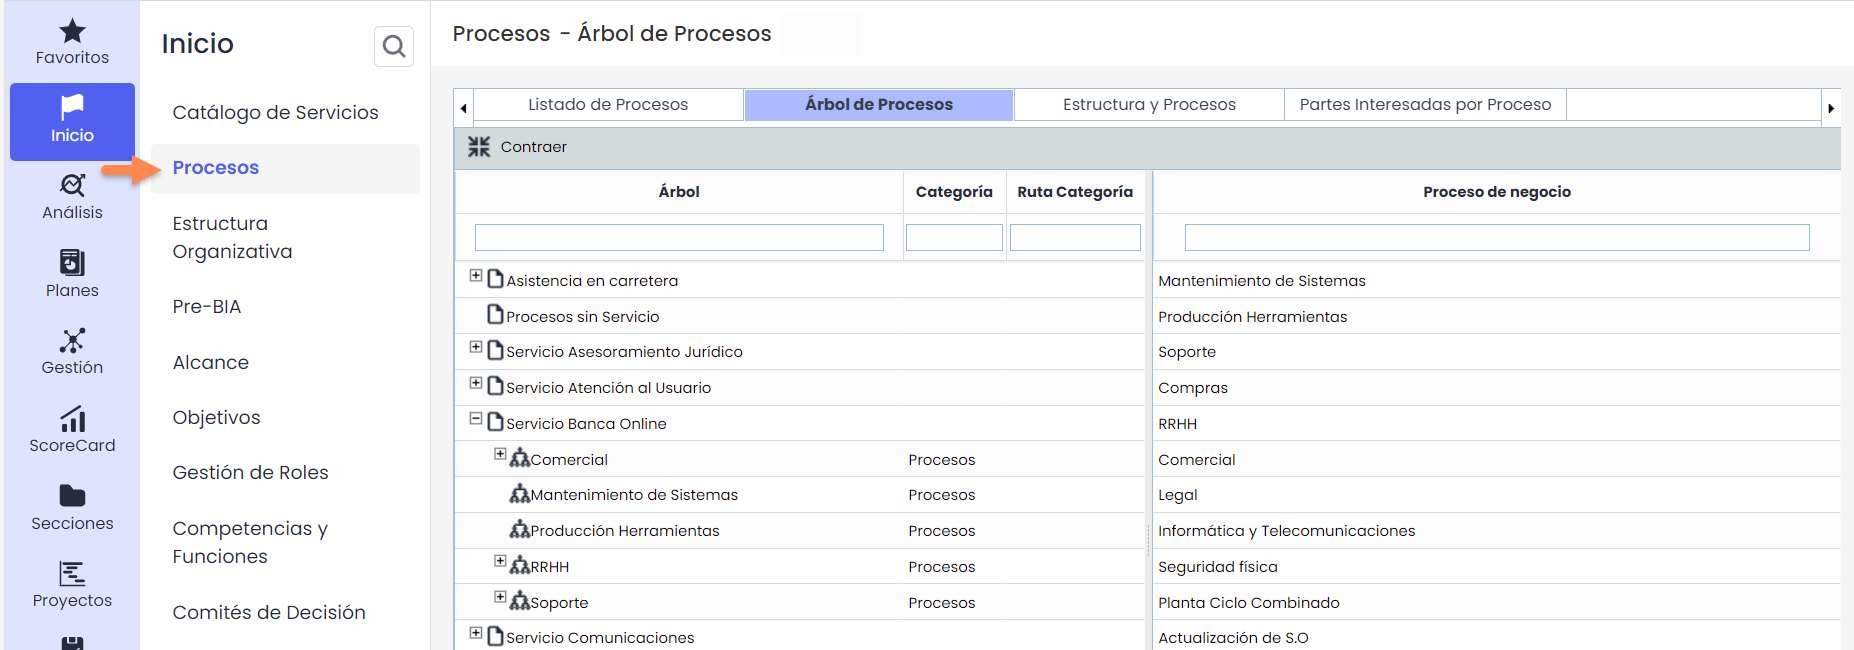
The Services - Processes relationship can be defined in the Process Tree tab included within the Processes option.
The services (areas or departments) and processes registered can later be used as elements within the Criminal Risk Analysis.
Role Management
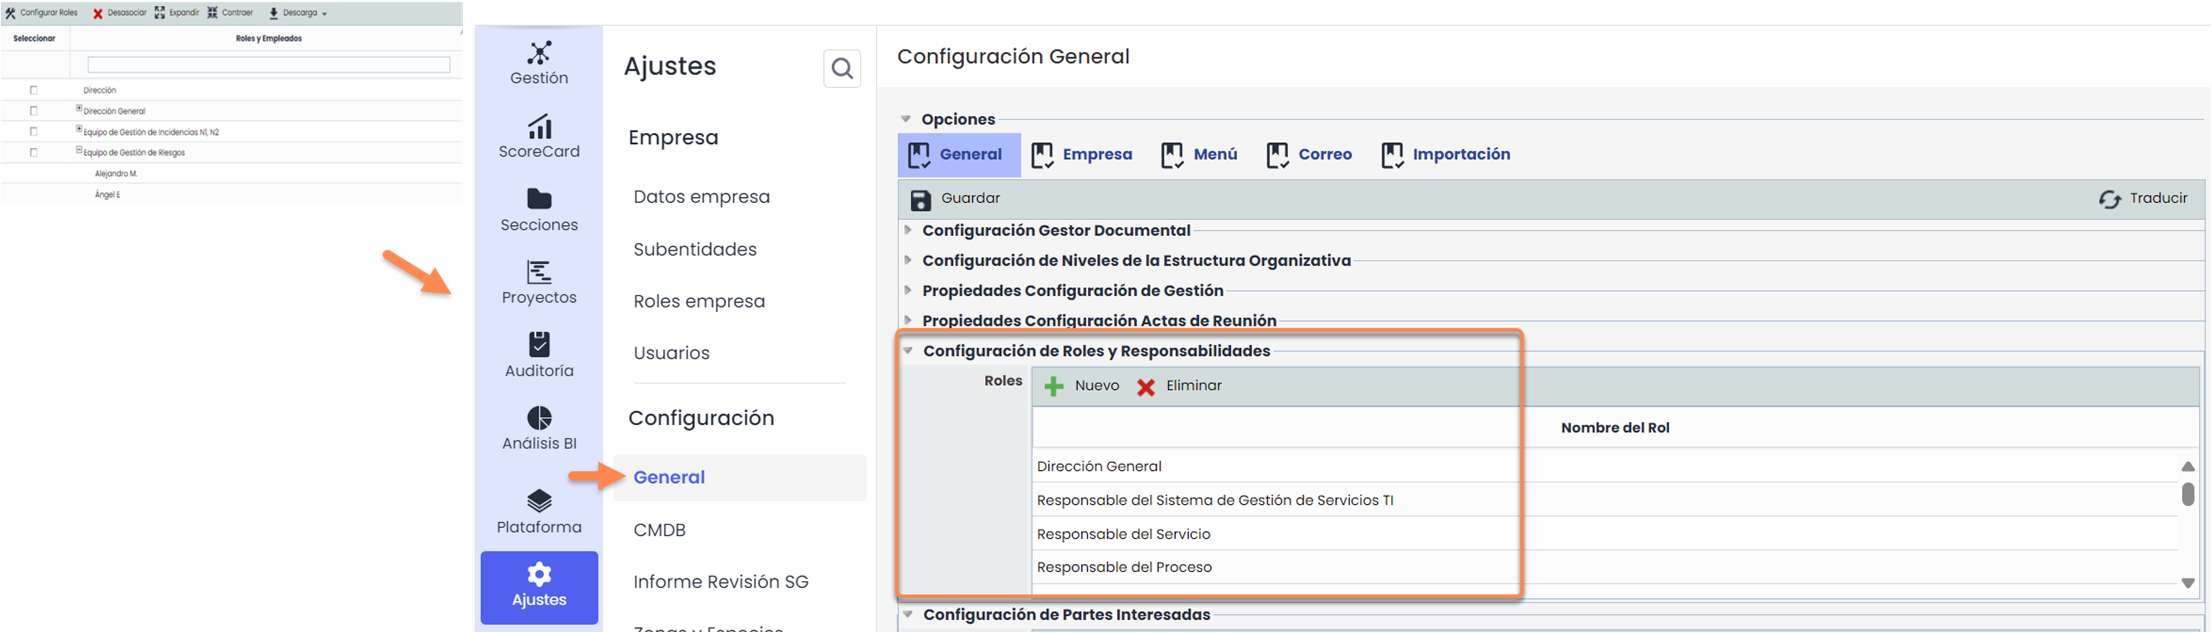
The Role Management option allows defining the roles identified within the entity that will interact within the Criminal Compliance System. Additionally, employees performing these roles can be associated through the Associate/Disassociate buttons.
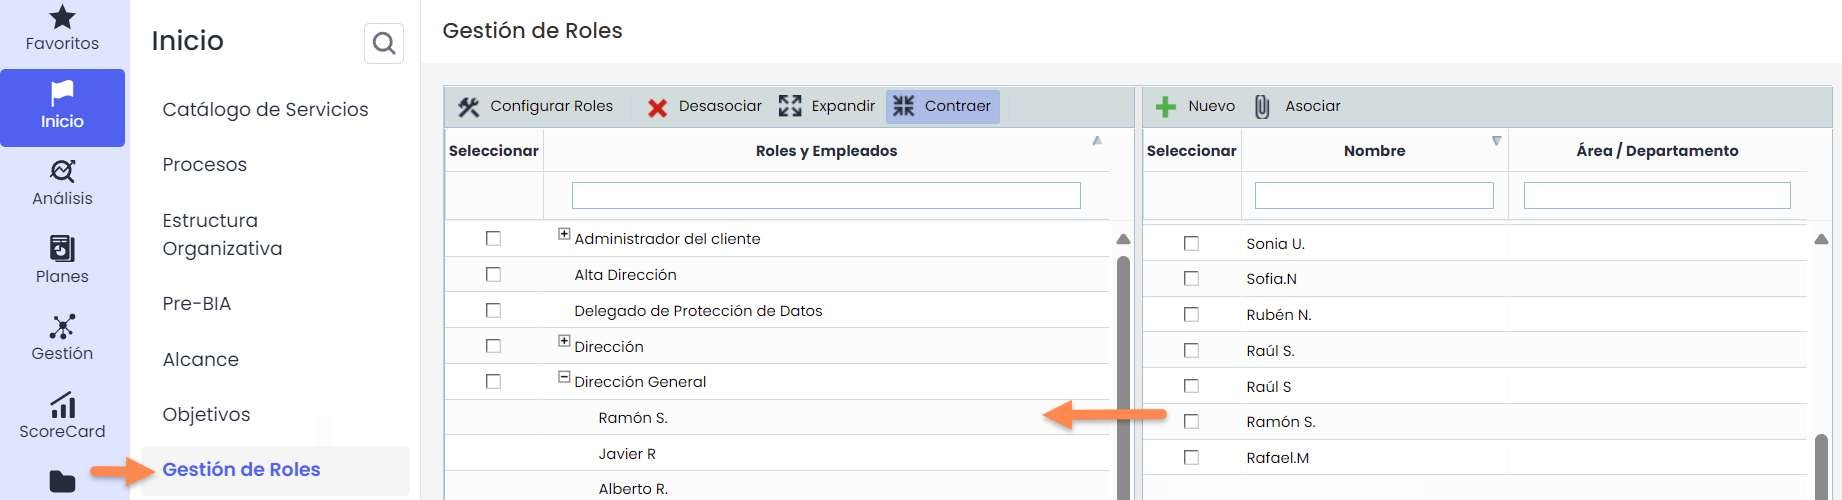
To create new Roles, access Settings > Configuration > General > Role and Responsibility Configuration and click the “New” button. Administrator users will also have the “Configure Roles” button enabled in the Role Management option, which will automatically take them to the General Configuration in the Administration panel.
Existing roles can also be deleted by clicking the “Delete” button. Once changes are made, they will be reflected in the Role Management option.
GAP Analysis
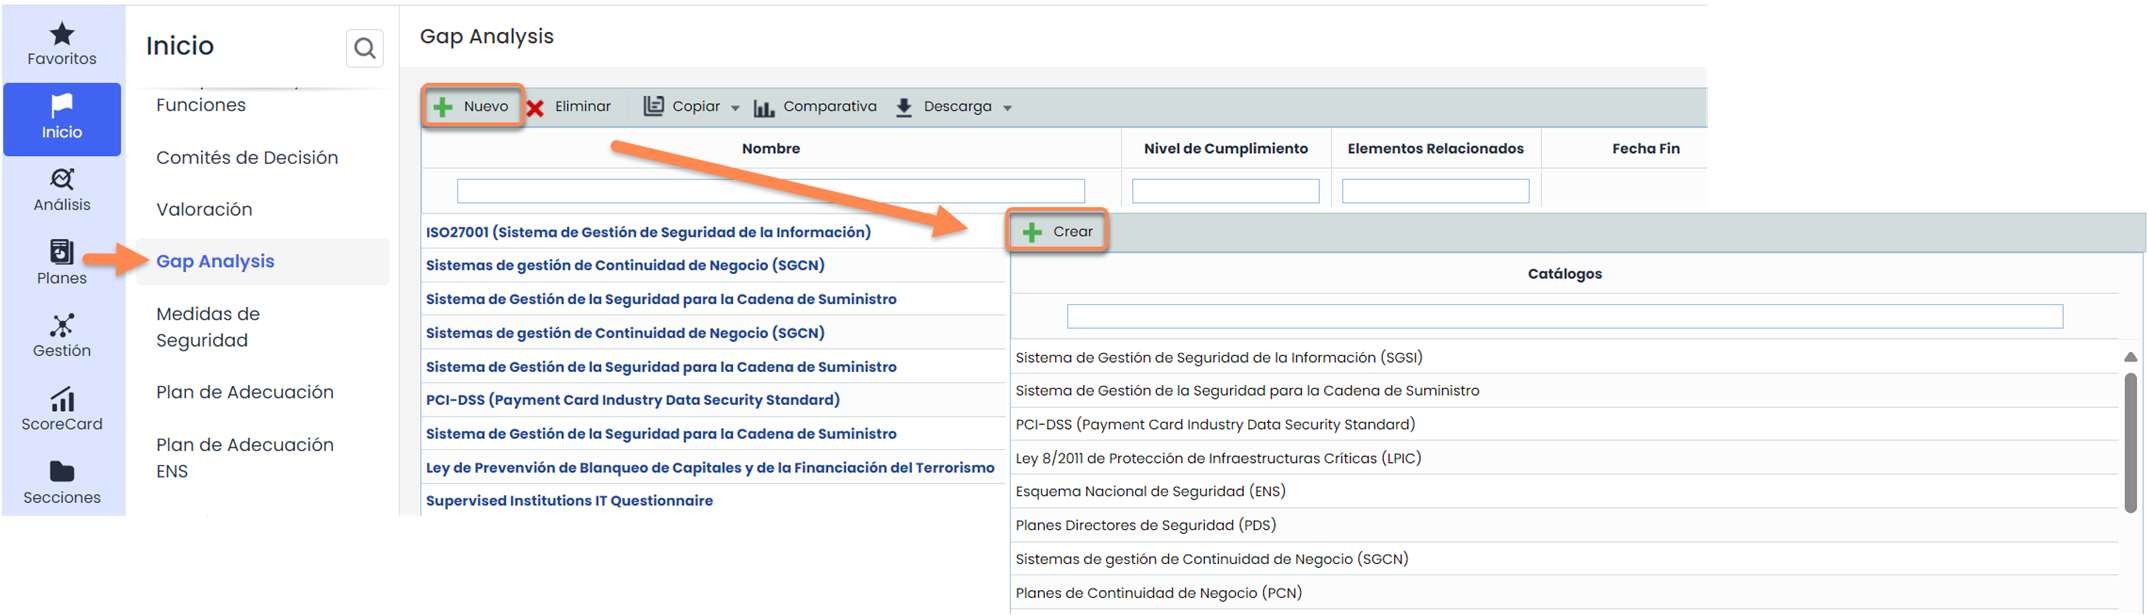
GlobalSuite® Criminal Compliance allows evaluating the compliance status concerning the UNE-ISO 19600 standard or other standards such as ISO 37301 for Compliance Management Systems. To do this, use the Start menu > Gap Analysis, click the “New” button, select the corresponding catalog, and click the “Create” button.
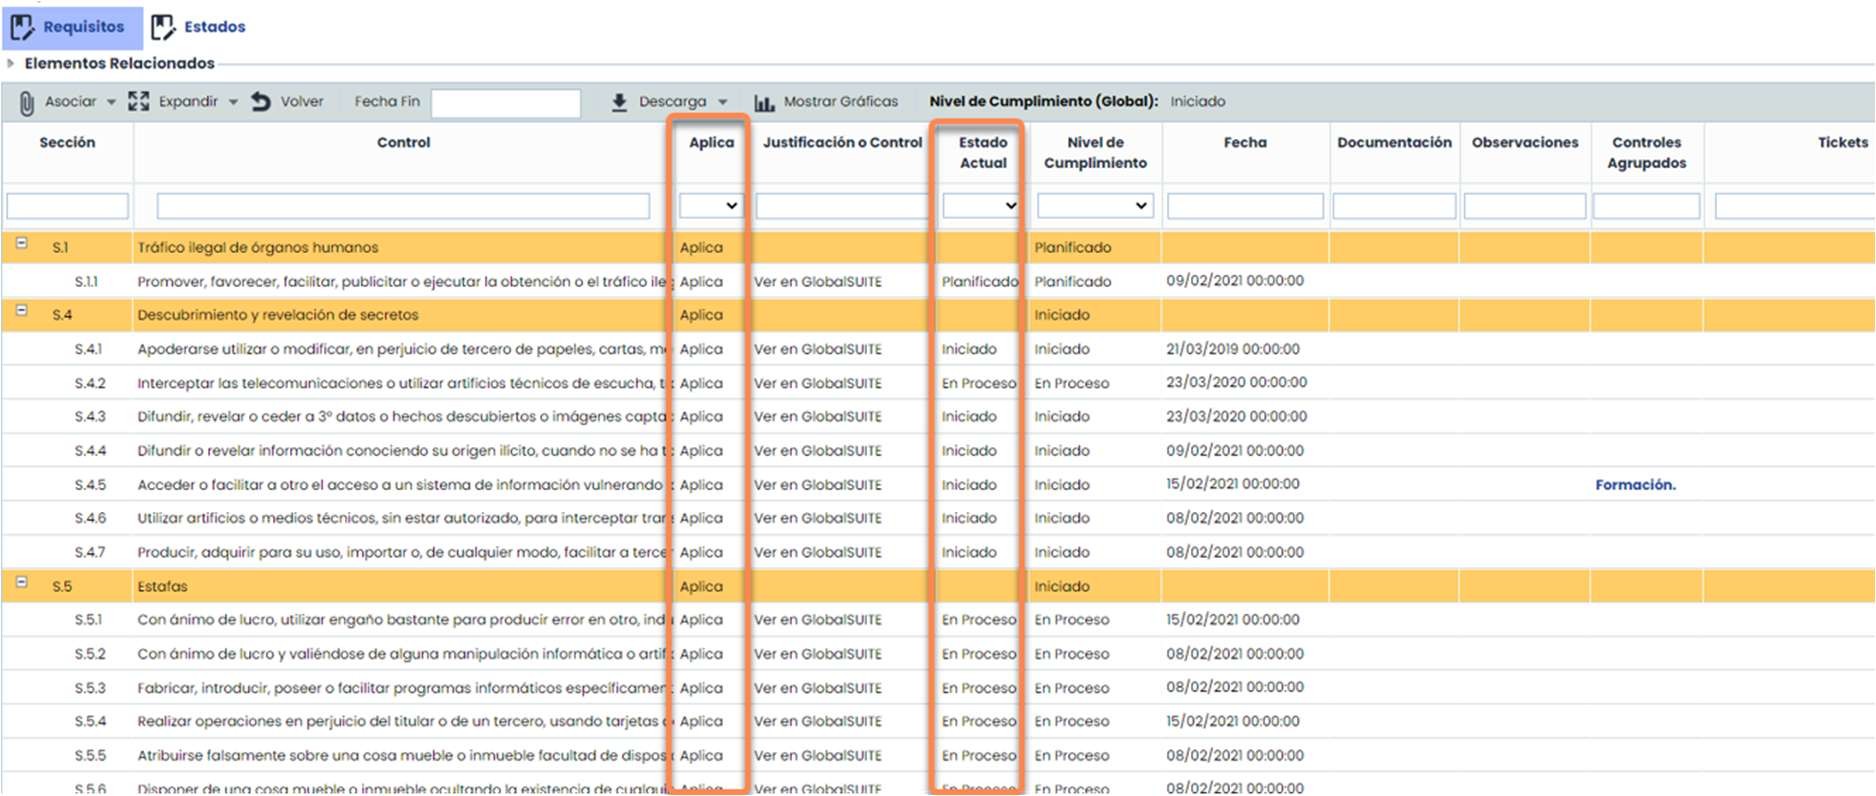
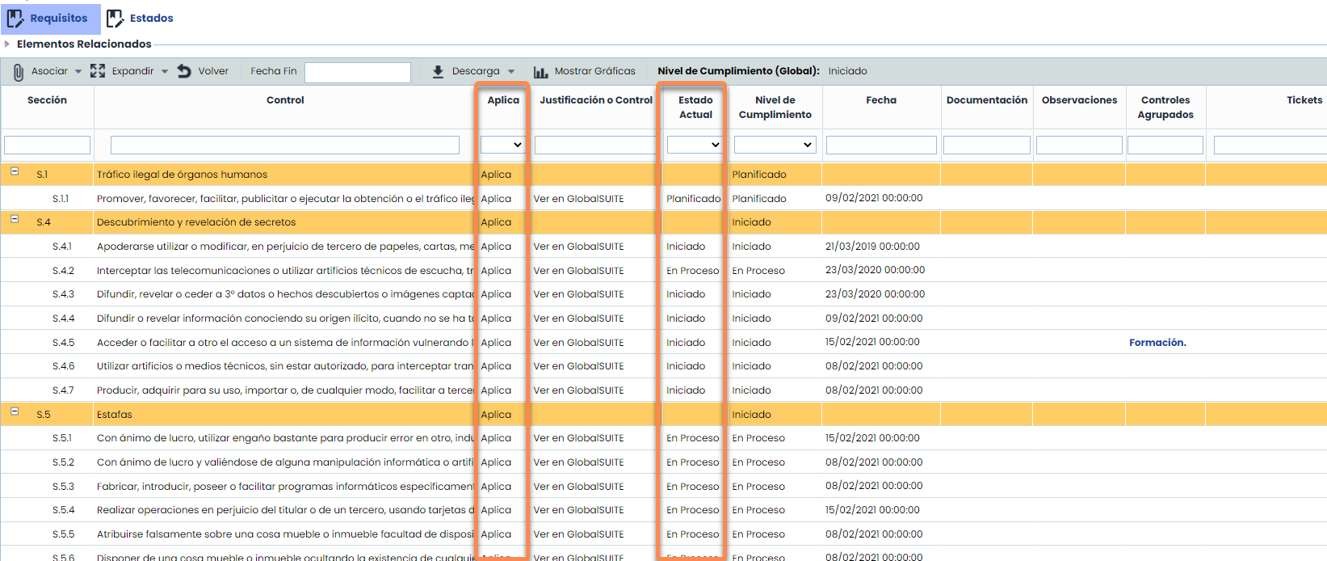
Within the catalog, the status of each clause can be determined through the Current Status column. Only clauses previously defined as applicable in the Applies column can be evaluated. Additionally, documentation, controls, and non-conformities previously introduced in GlobalSuite can be directly associated.
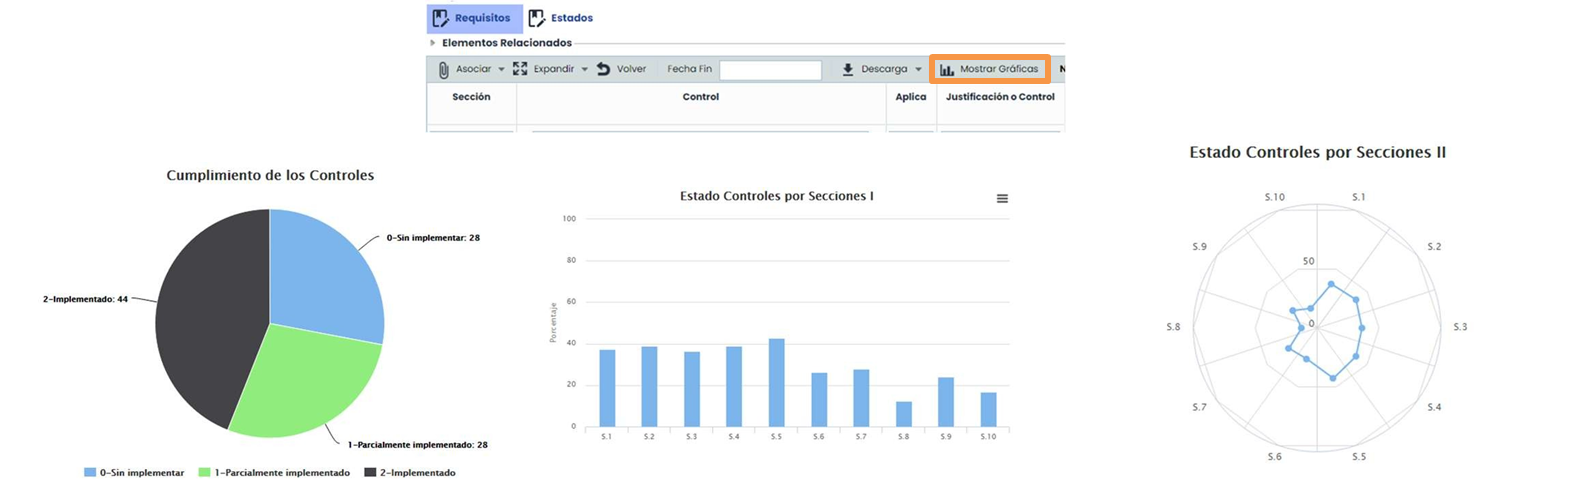
Once the compliance status evaluation is completed, graphs can be extracted to form a report of the initial compliance status using the Show Graphs button.
Home
Adaptation Plan
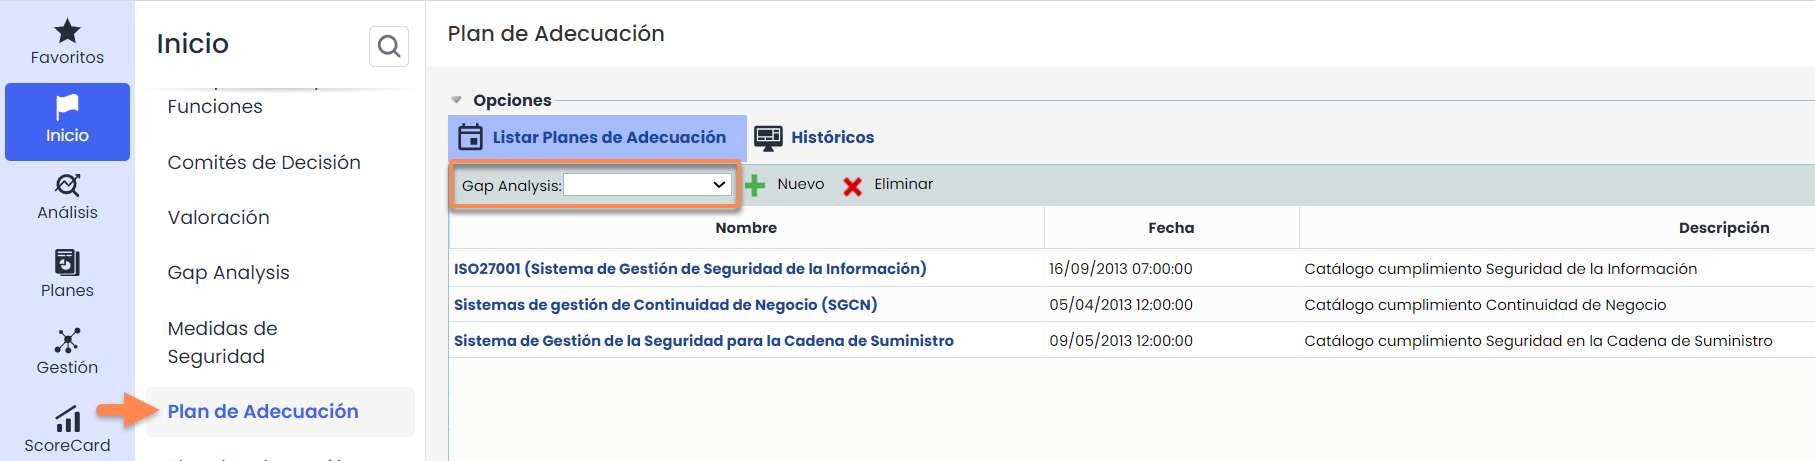
After evaluating the compliance status of a standard, specifically through the Gap Analysis option, Adaptation Plans can be created to establish actions to achieve the desired compliance status. To do this, use the Start menu > Adaptation Plan and select the completed Gap Analysis.
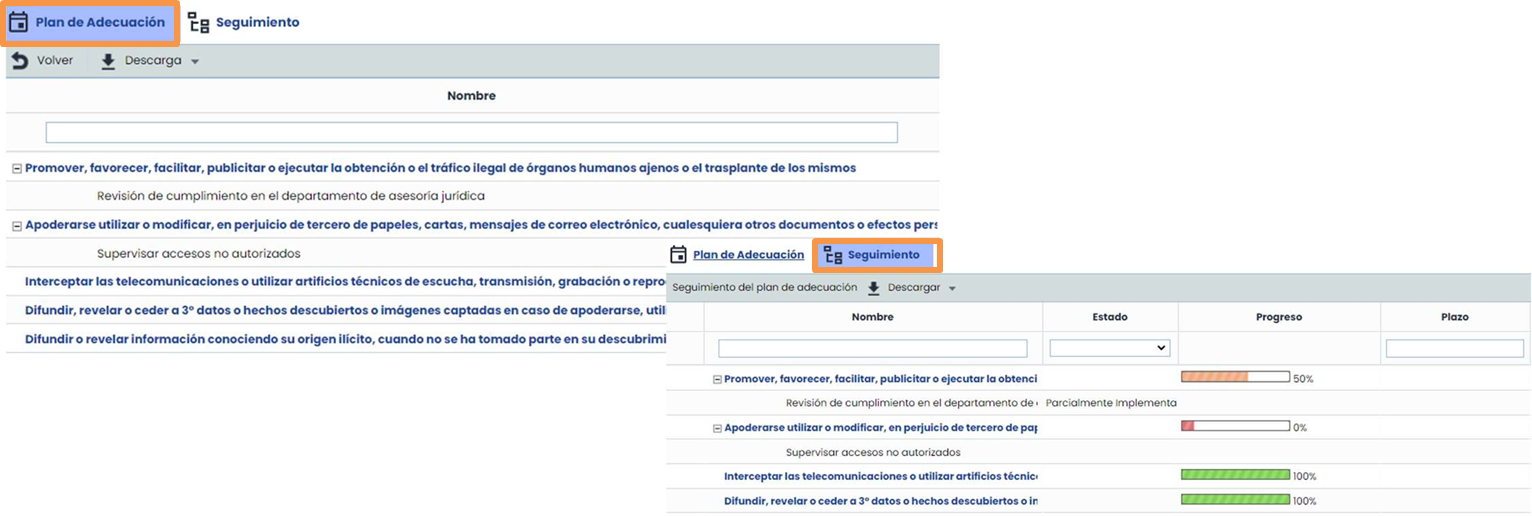
For clauses that have not been implemented, actions can be established to ensure compliance by accessing each of them in the internal tab of Adaptation Plan. Subsequently, they can be monitored from the Monitoring tab.
Analysis
Compliance
This option allows monitoring the compliance status of the organization concerning any standard that needs to be evaluated.
It allows continuous monitoring from the starting point (GAP Analysis) to full compliance with the standard.
To add a Compliance catalog (previously configured in Settings), click the New button and select the corresponding catalog.

For each standard, there is the active version (current version) and its history. The active version is identified by its green color, is editable, and is the only one that appears by default when the Compliance option is opened.
However, the rest of the versions - which cannot be modified - can be viewed by clicking the Show All button. When a new Compliance is added, by default, it will be created as the active version, making the last one of the same standard inactive. Versions can always be activated or deactivated by selecting them and clicking the Activate/Deactivate button.

When accessing the catalog, the status of each clause can be determined through the Current Status column. Only clauses previously defined as applicable in the Applies column can be evaluated. Additionally, documentation, controls, and non-conformities previously introduced in GlobalSuite can be directly associated.
Risk Analysis
Through this functionality, a risk analysis can be performed on the elements previously identified in the Services and Processes Catalog.
New analyses can be created, existing ones deleted, or copies of them made using the buttons enabled in the top bar of the window.

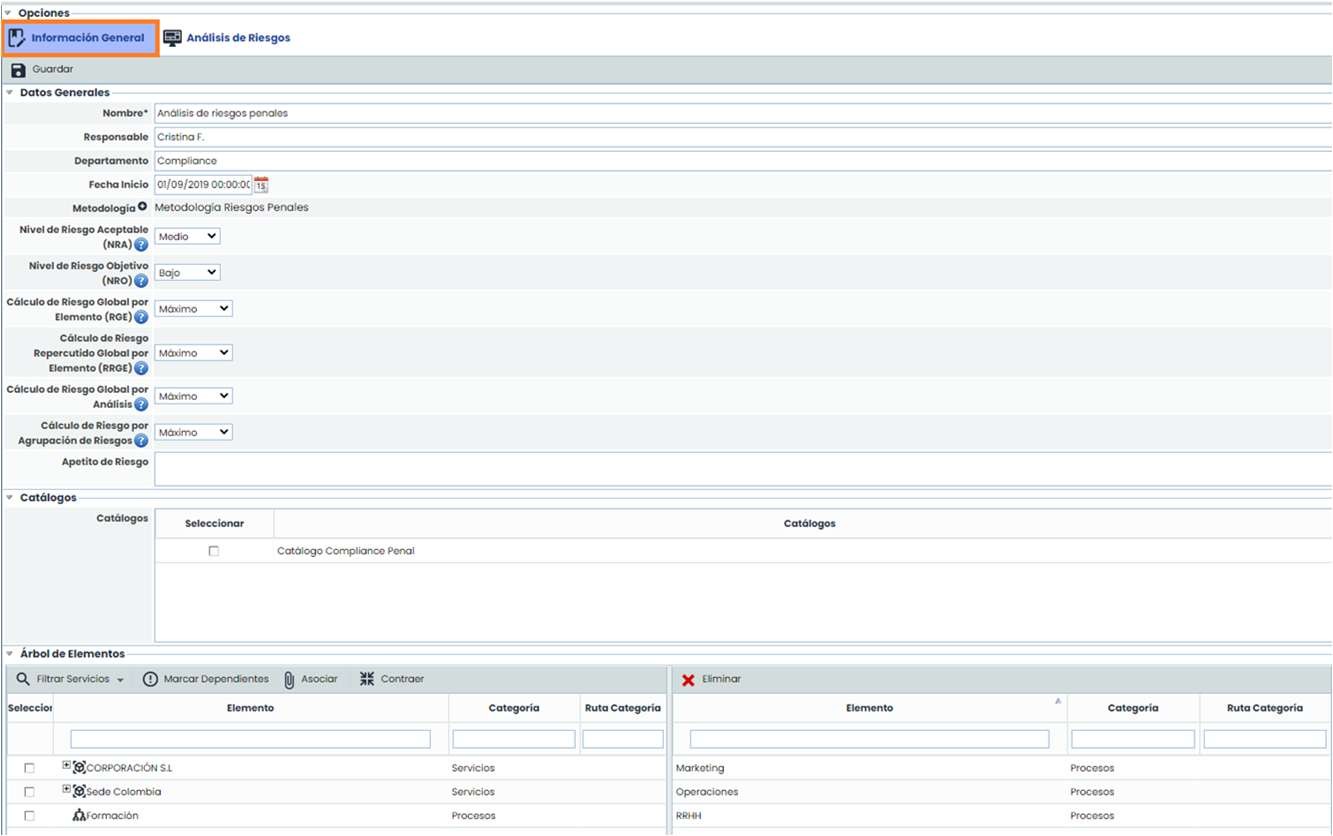
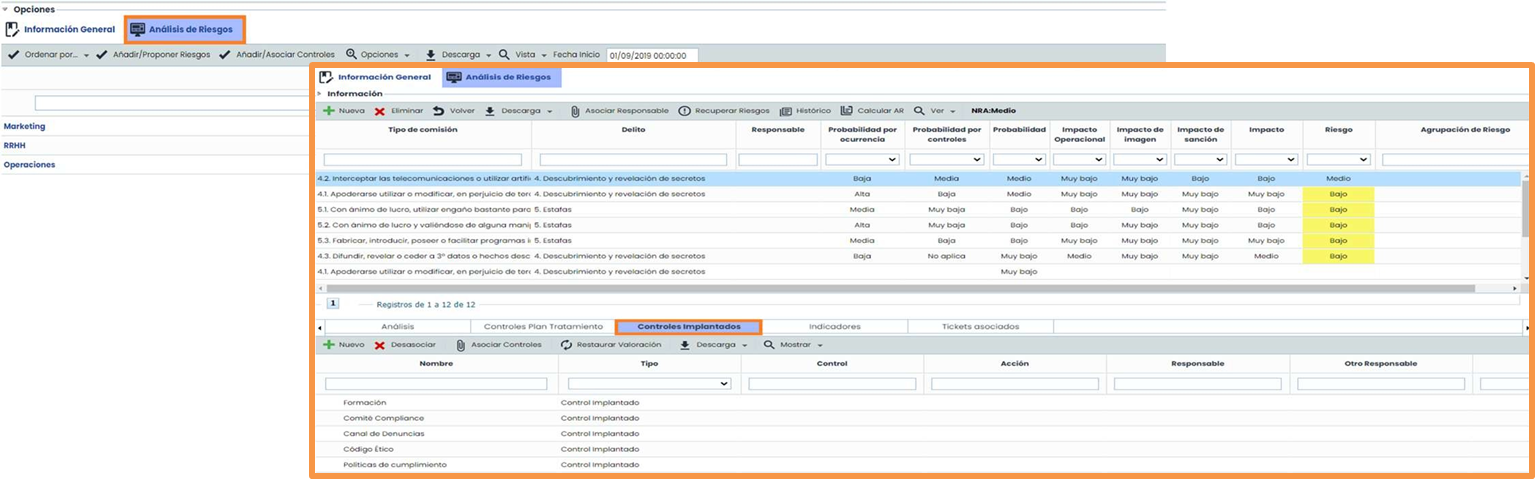
To create a risk analysis, the required information must be completed in the General Information tab. The important fields to complete are: Name, Methodology, Acceptable Risk Level, Catalog (if working with them), and the departments or processes (elements) to be analyzed.
Once the required fields in “General Information” are completed, work can proceed in the Risk Analysis tab, where the identified risks in each department or process (elements) will be added. By selecting an element, the identified risks can be reviewed and evaluated, and the fields defined in the methodology added to the analysis, such as probability, impact, or inherent risk, among others, can be completed. Additionally, the controls mitigating the specific risk can be associated through the Implemented Controls option, available in the bottom bar of the window.
Risk Evaluation (View Risk Map)
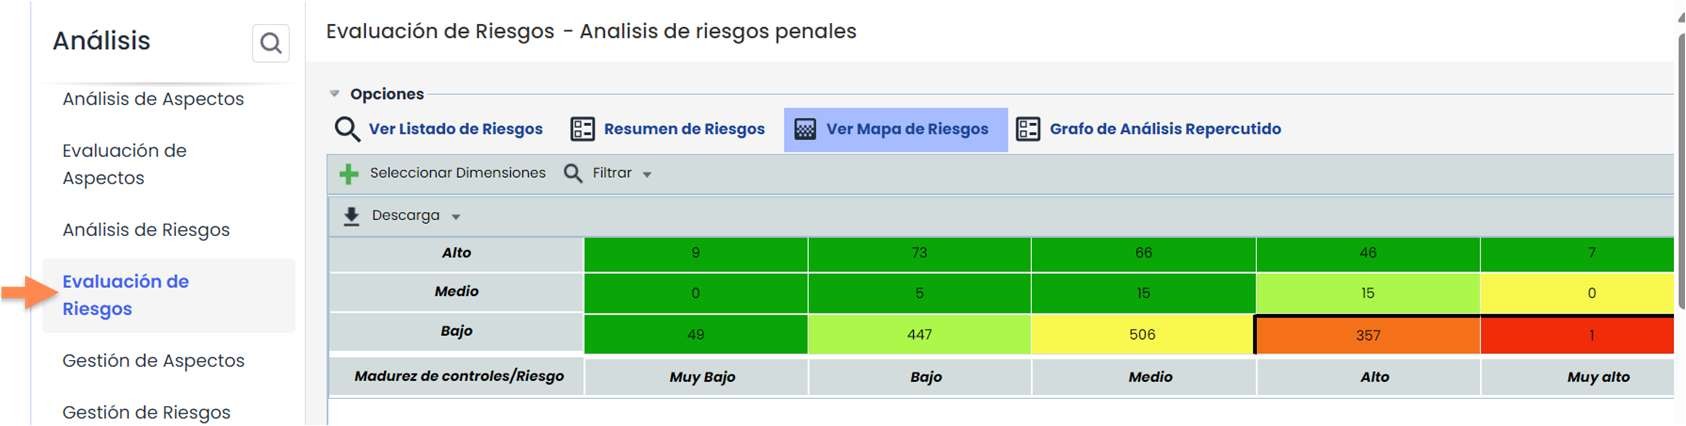
Through this option, the results obtained in the Risk Analysis can be reviewed graphically.
By default, when selecting the analysis, the View Risk Map tab is directly accessed, where a heat map with the risk analysis results after the evaluation will be displayed. The configuration of this view is directly related to the methodology of the previously selected risk analysis.
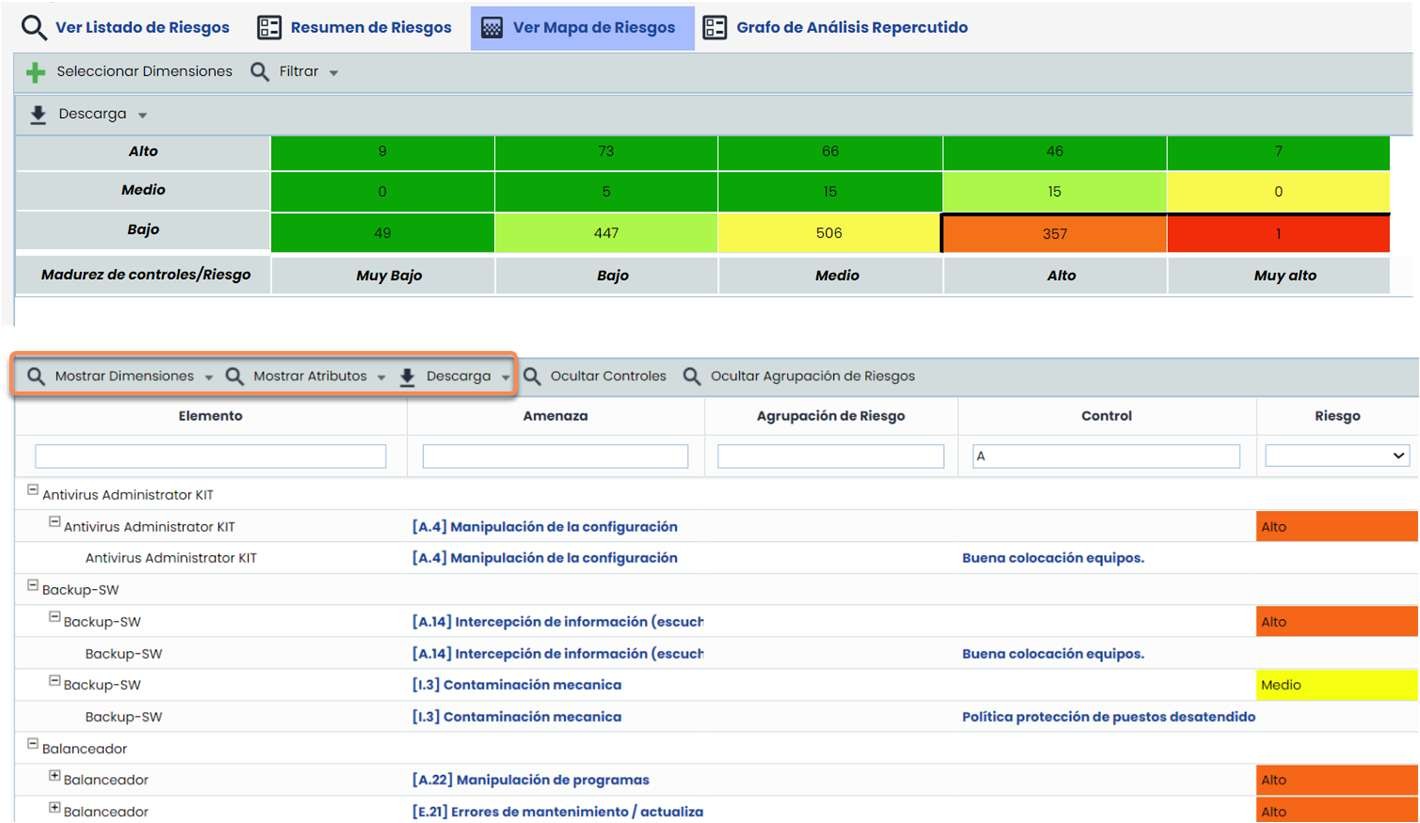
At the bottom, detailed and complete information regarding the element - risk - control relationship can be obtained. This information can be downloaded using the Download button, and more information can be added to the initial view (probability, impact, among others) by selecting the available dimensions in the Show Dimensions button or the textual fields in Show Attributes.
Risk Evaluation (Risk List)
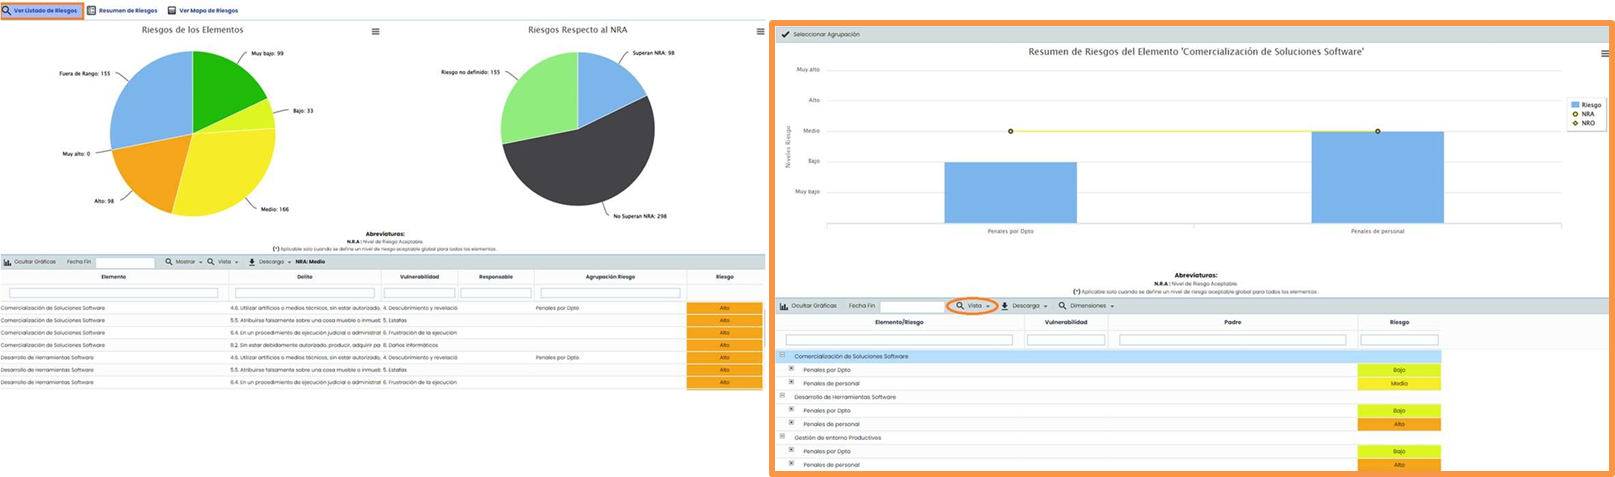
In the “Risk List” tab, GlobalSuite® Criminal Compliance provides two pie charts on the risk level concerning the Acceptable Risk Level (NRA). It also provides a bar chart if working with groupers or risk typologies. To view this chart, select the “View > Risks option” button.
At the bottom of the window, detailed information can be viewed, and using the buttons on the bar, the information can be filtered.
Control Management
GlobalSuite® Criminal Compliance allows managing the controls implemented in the organization. To do this, click on the Analysis > Control Management option, available, and choose a risk analysis.

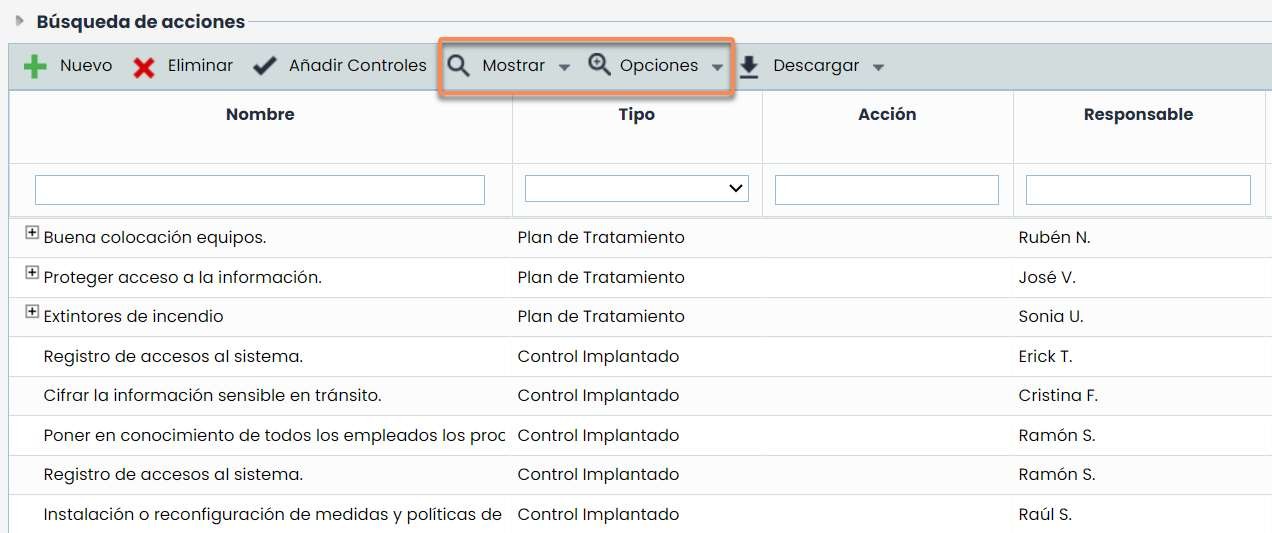
In the controls view, all implemented controls will be displayed by default, but there is the option to filter the control list through the Show button, allowing the choice to view All (Implemented and Treatment Plans) or specific ones, whether only the Implemented controls or those defined in the Treatment Plan. New controls can also be added, and existing ones deleted.
To access the control file and obtain more detailed information about it, select the Options > Details button available in the top bar of the window.
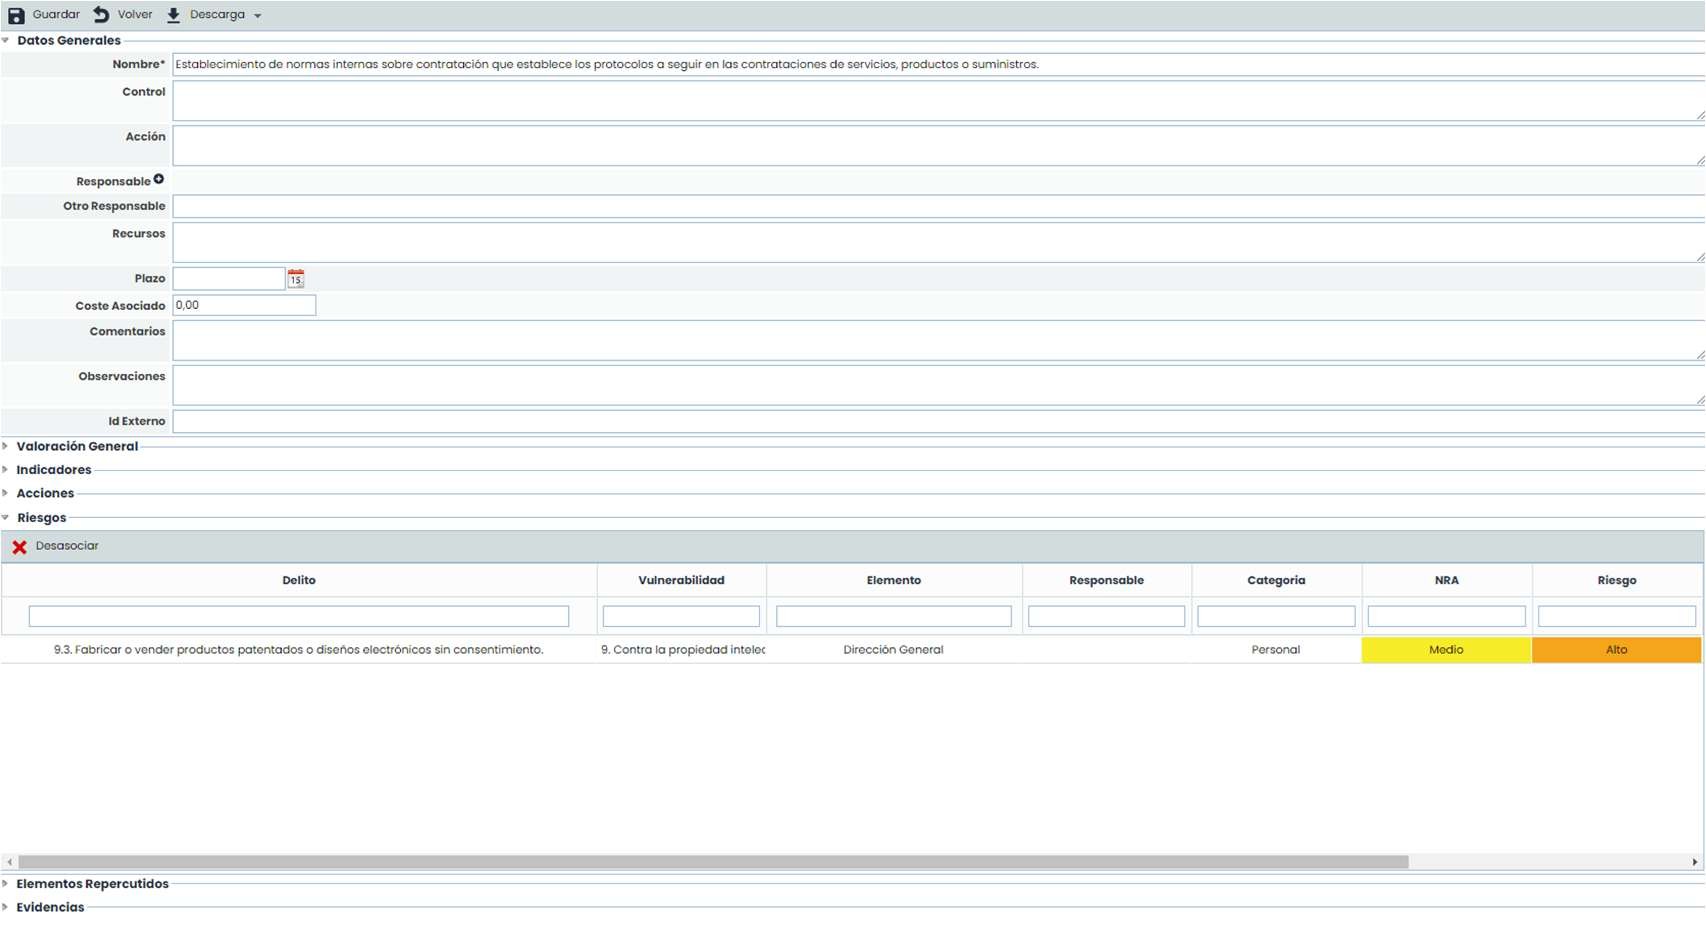
In the control file, information can be reviewed or modified through the different sections. Actions can be created, the risks it mitigates can be reviewed, evidence can be associated, etc.
Evidence Management
Through this option, evidence can be created that will later be linked to the implemented controls or the risk treatment plans. Documentation available in the Document Manager option can also be associated.
By default, active evidence will be displayed. To view all evidence, click the Show > All button. To access detailed information about the evidence, click on the evidence name. Upon accessing the form, the type of evidence (previously configured in Settings > Configuration > General > Evidence Configuration) can be defined, documentation can be associated, and it can be linked with controls, among other options.
Risk Management
This functionality allows establishing and managing Treatment Plans that will mitigate risks above the acceptable risk level.
One of the available risk analyses must be selected to work on it.

Risk Management Planning
By default, the “Risk Management Planning” tab is accessed.
In the upper window, all risks above the acceptable risk level (NRA) will be displayed. To view all, click the Show > Show All button. In the lower window, the treatment plans will be displayed: new plans can be created, existing ones deleted, or implemented controls included, which, once selected, will become treatment plans.
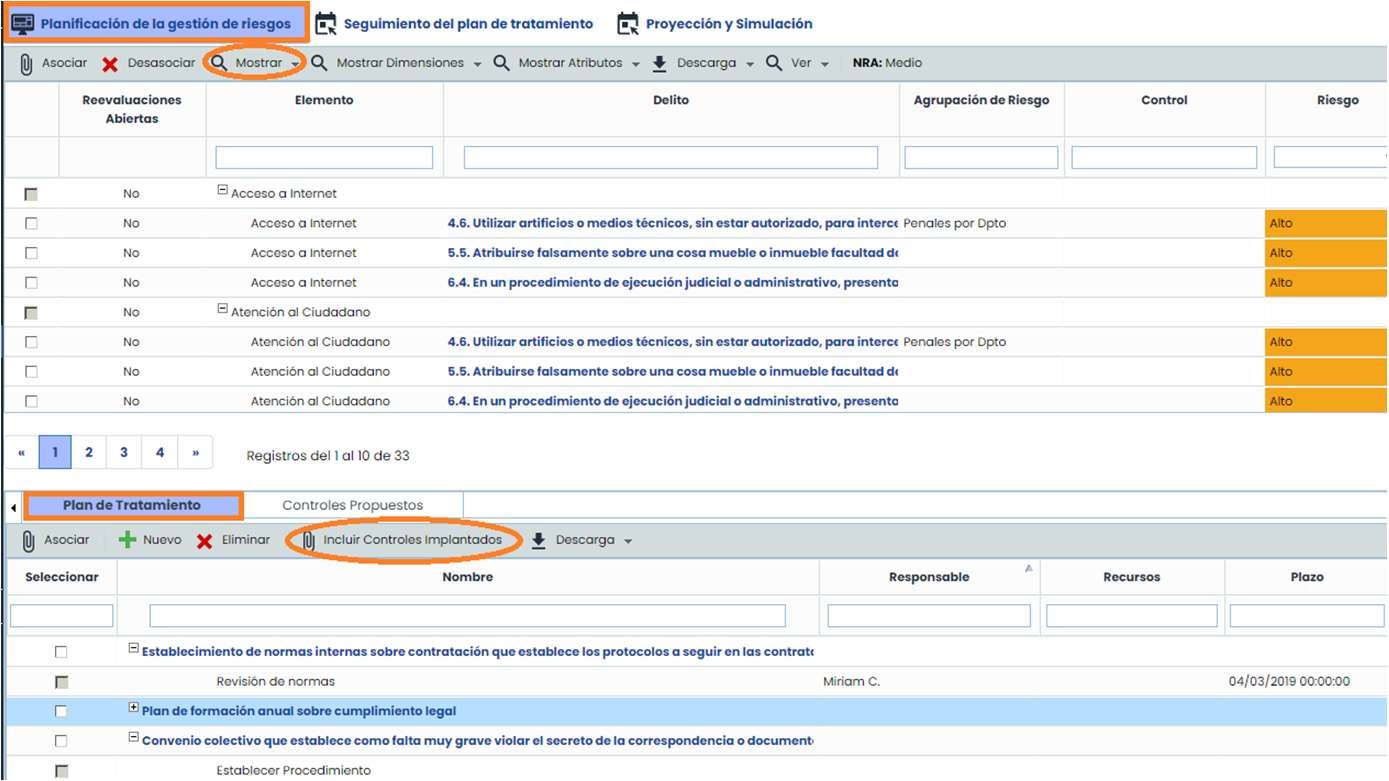
To carry out the association of the risk and its respective treatment plans, the risk must be marked in the upper window, the treatment plan in the lower window, and the Associate button must be pressed.

Treatment Plan Tracking
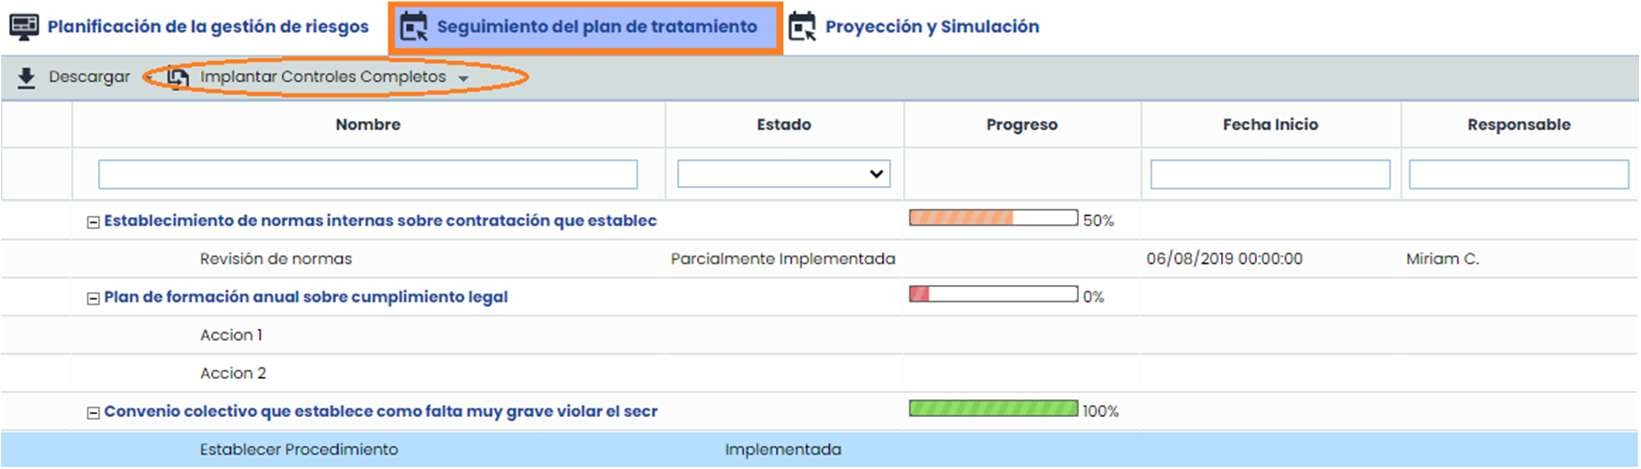
In the “Treatment Plan Monitoring” option, the deadlines defined for the completion of each of them can be seen, along with their progress derived from the completion of the associated actions. If the progress of the associated actions is 100%, it will indicate that the treatment plan can be defined as an implemented control. To do this, the Implement Complete Controls button must be pressed, and all treatment plans with 100% progress will be transferred to the Control Management option, changing their category to “Implemented Control.” When implementing the plans, it must be selected whether to keep the actions or not during the transfer.
Plans
Audits
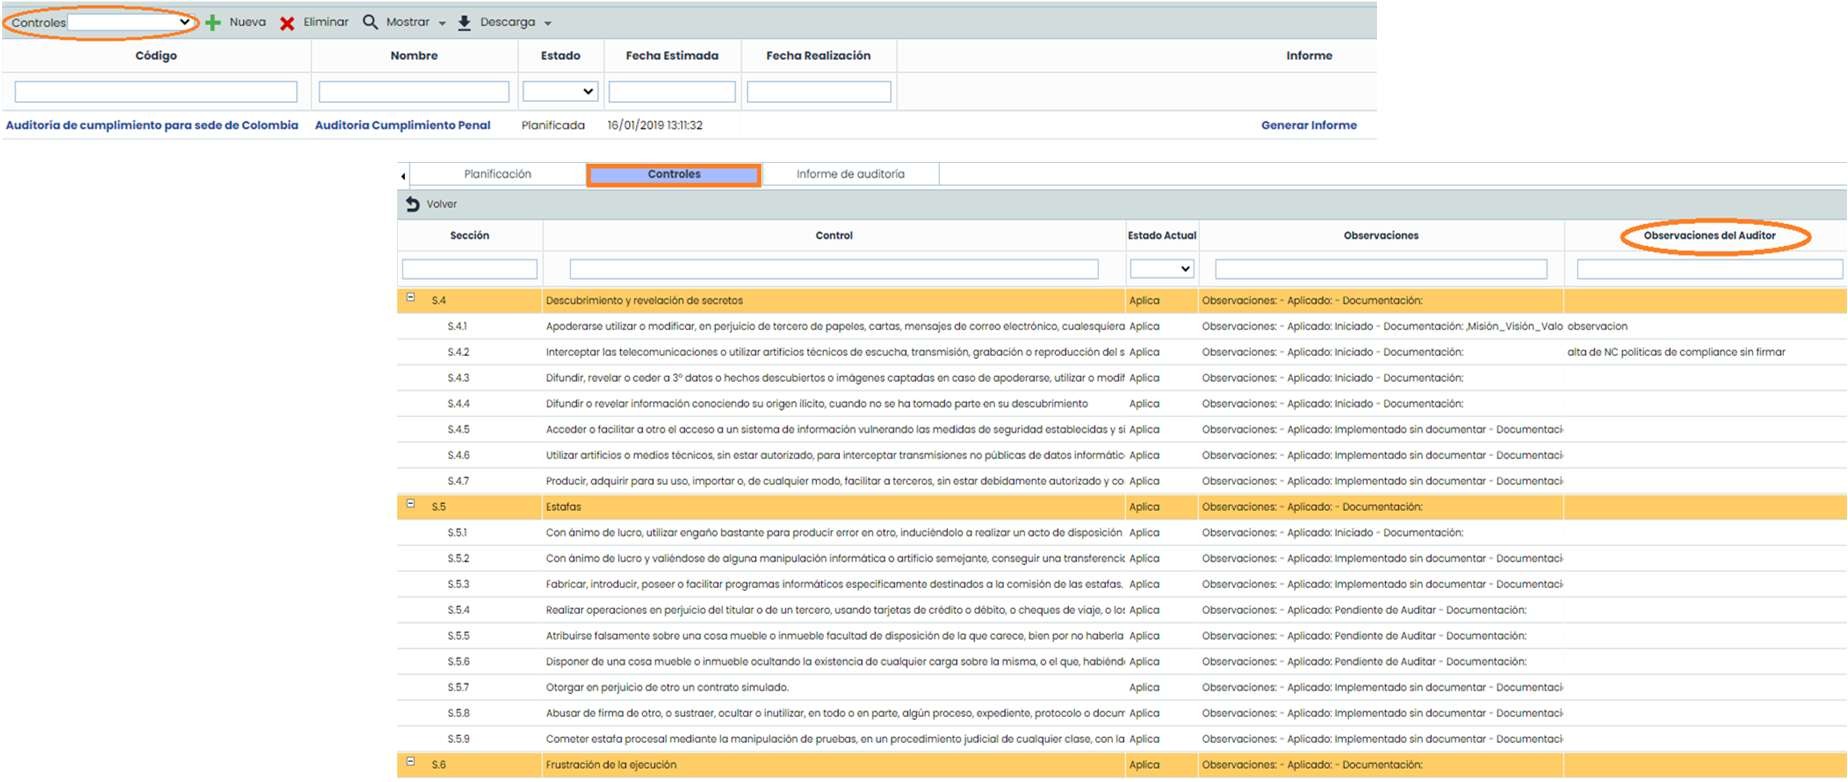
The Audit option allows scheduling the audits to be performed, viewing all those that have been carried out, as well as establishing all the points of the Management System.
On the main screen, the audits that are approved and planned are displayed by default, while closed ones do not appear. To view them, the Show > All button must be pressed. Additionally, in the Report column, the audit reports can be downloaded.

Through the Controls button that appears on the top bar of the main window, a Compliance catalog being evaluated in the “Compliance” option can be associated and the compliance status with respect to the standard can be audited.
When associating and accessing the audit, in the “Controls” tab, the auditor's observations can be recorded.
Note
When a Compliance catalog is not being audited, this tab will not appear.
Management
Tickets
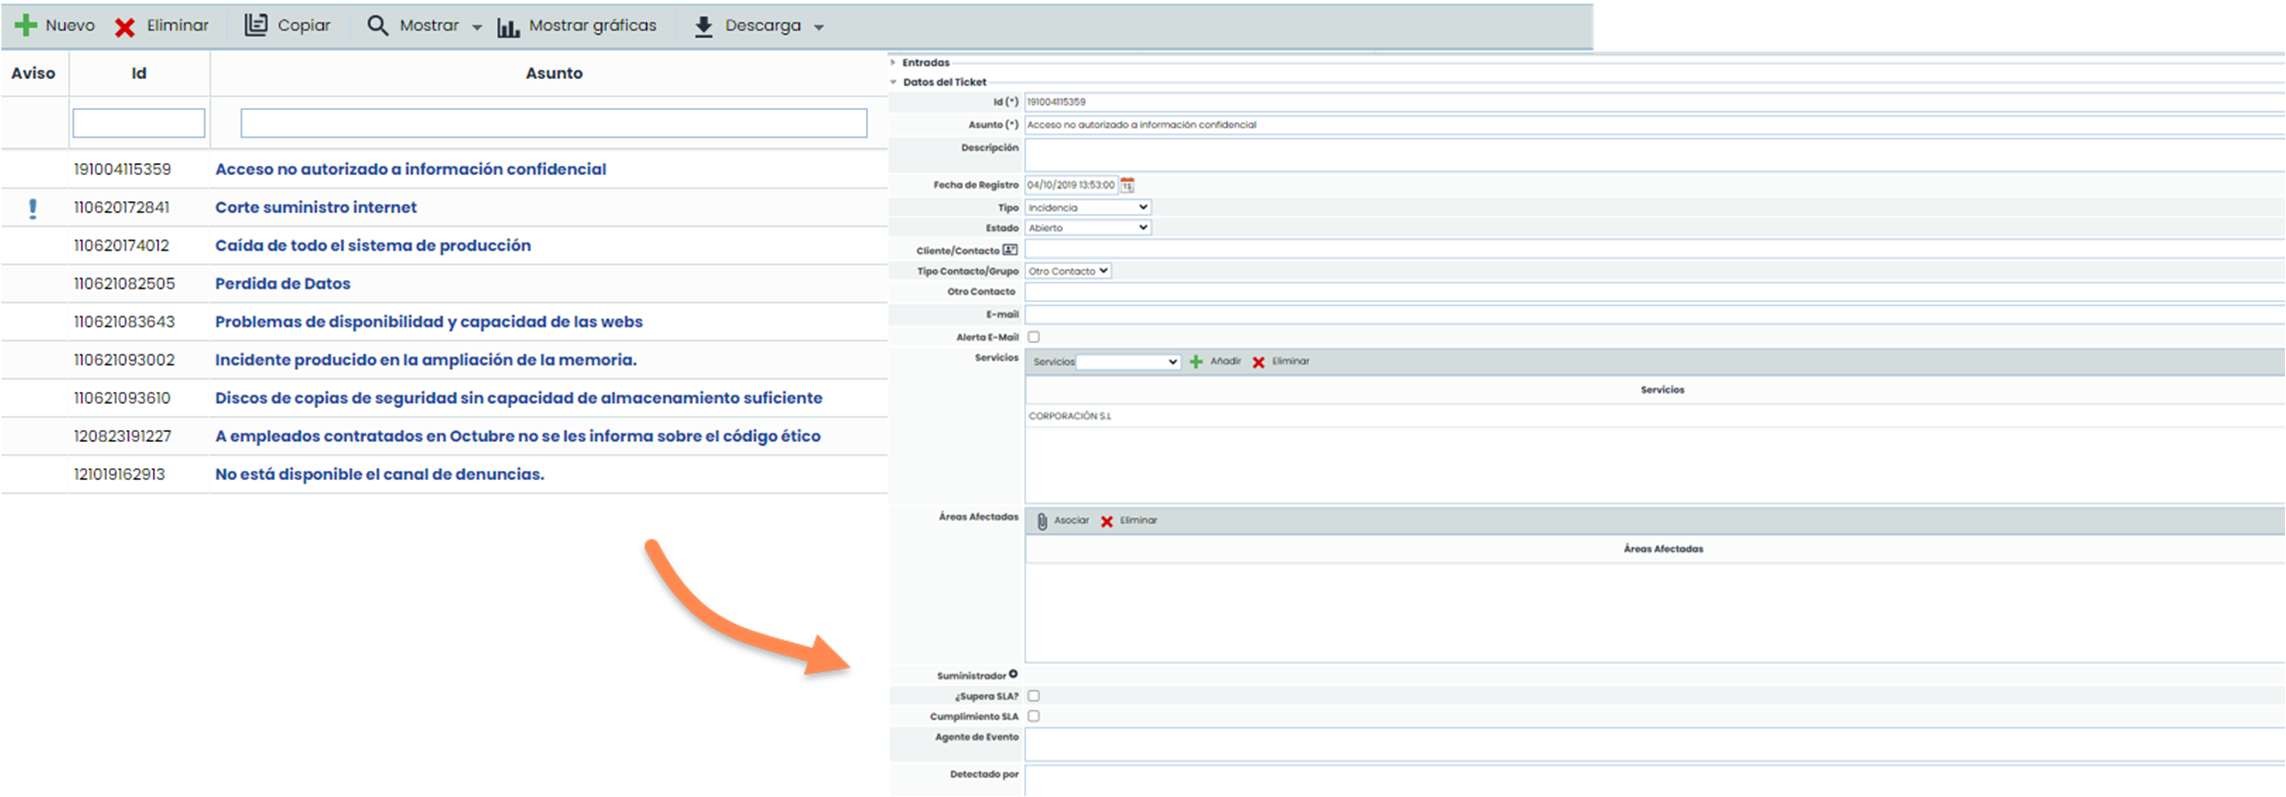
GlobalSuite® Compliance Penal has a Ticketing functionality composed of a set of options located in the Management section. These options allow managing different types of tickets based on their typology:
-
Incidents and Problems: related to any type of MS, incidents detected in them.
-
Non-Conformities: tickets related to non-conformities detected at the compliance or audit level.
-
Corrective and Preventive: linked to NCs, they are corrective actions after detecting an NC or preventive actions upon detecting a possible improvement.
Ticket form
When accessing any ticketing option, a list of all tickets for that option is displayed. New ones can be added or existing ones edited. To access the ticket form and consult or edit it, the subject of the ticket must be clicked. The form will display a series of fields organized into different sections. All fields and sections can be configured from the “Settings > Configuration > Tickets” option.
Scorecard
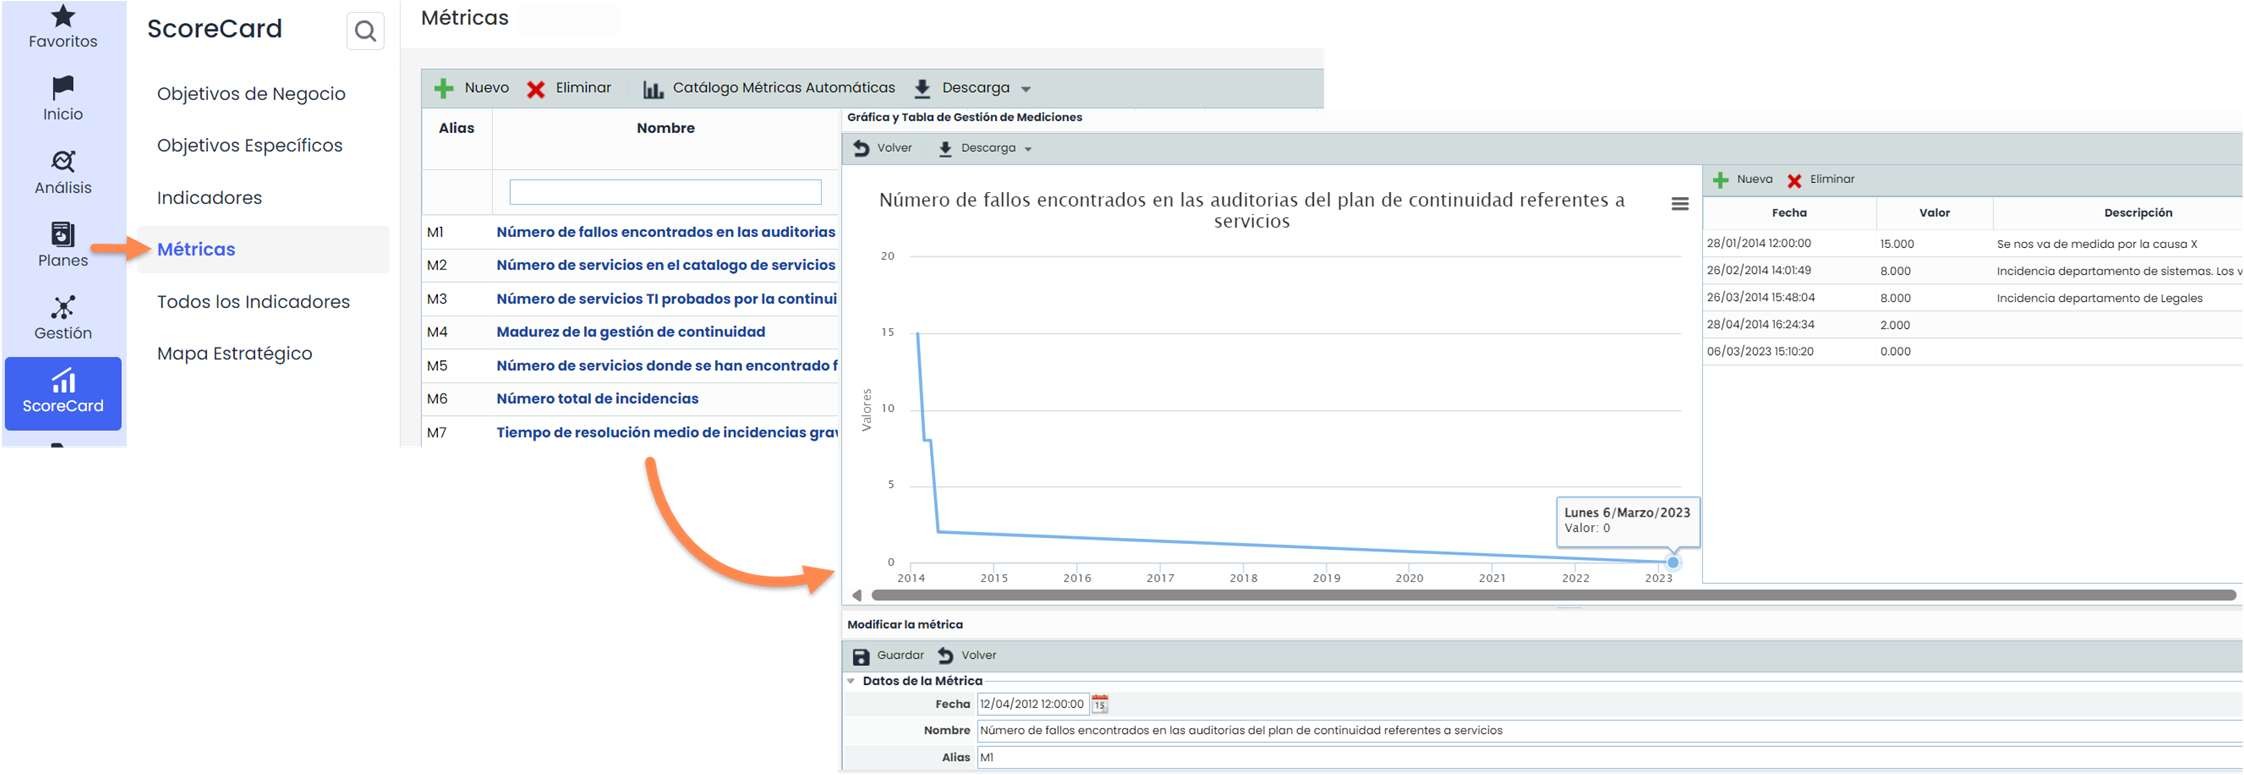
Metrics
The metrics option allows collecting different data in the tool. The data for each metric will be represented depending on its date and value. In the next stage, indicators will be established based on the combination of the metrics.
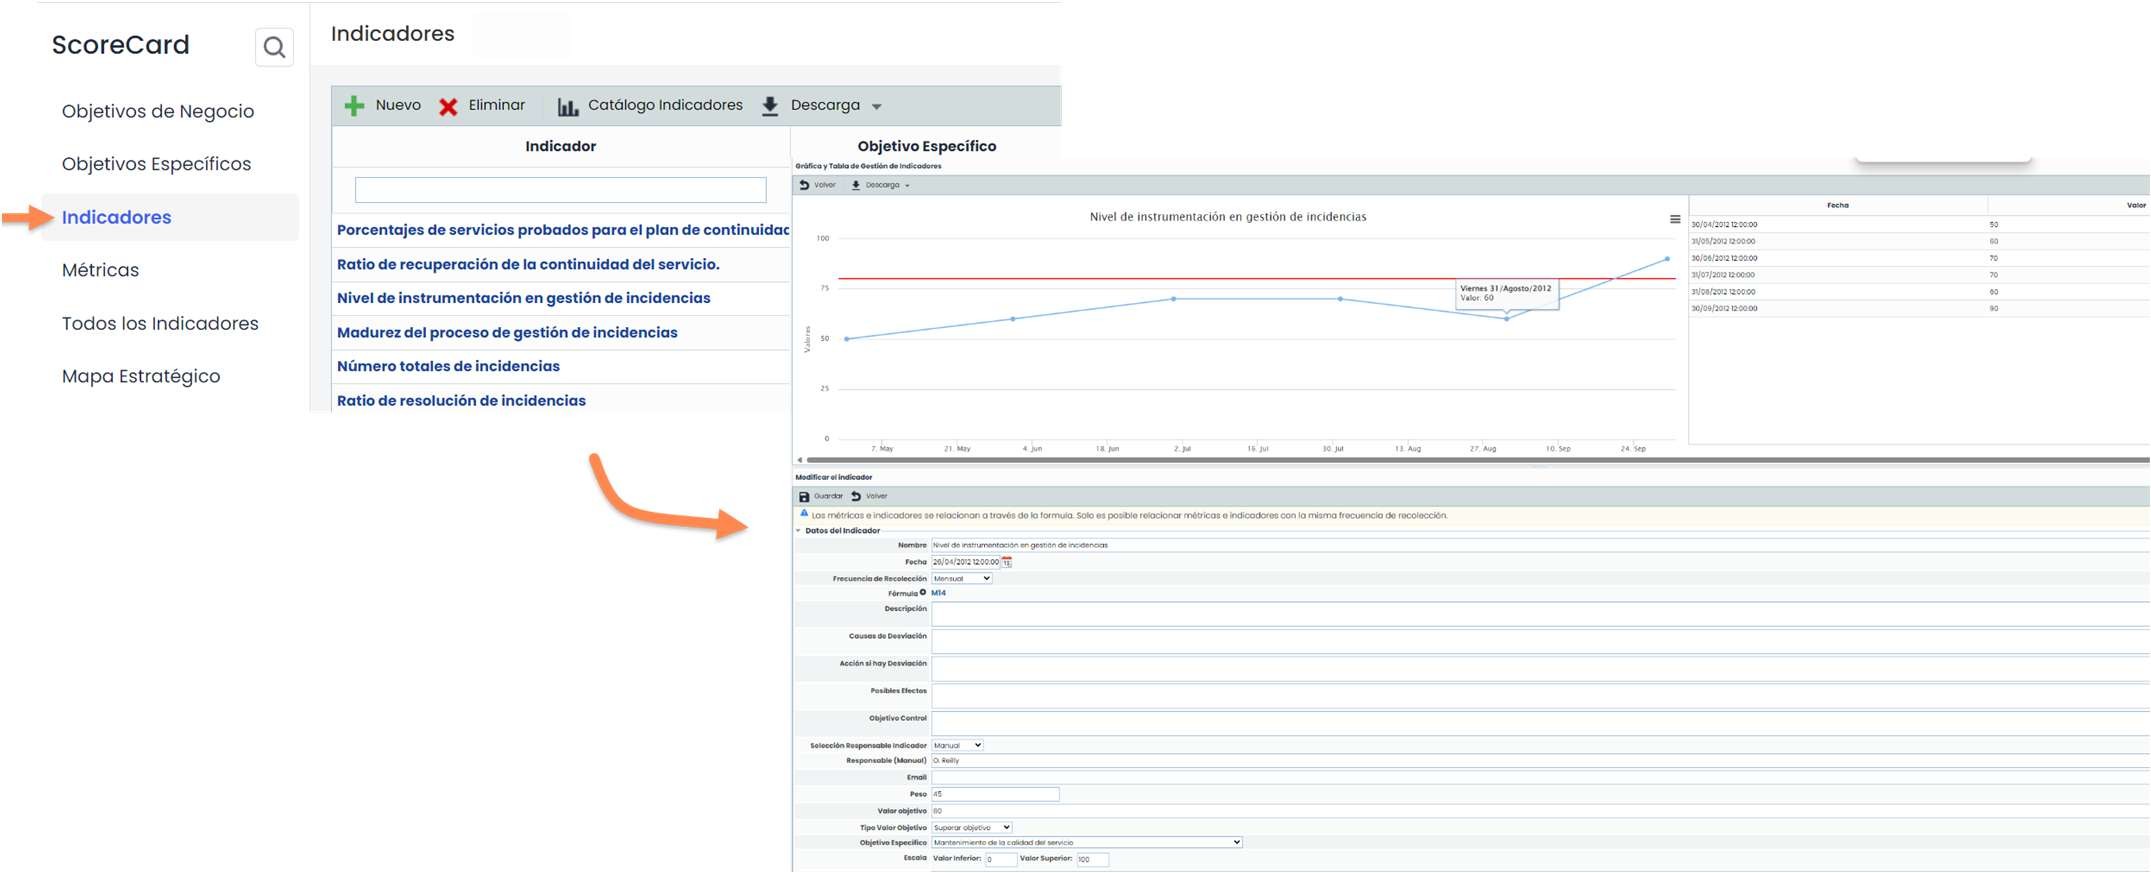
Indicators
Based on the combination of the previously established metrics, the indicators will be developed. To do this, the relationship between them must be established through a formula. To use the data entered in the metrics, the indicators must have the same collection frequency. These indicators can be used in report extraction (Sections > Reports).
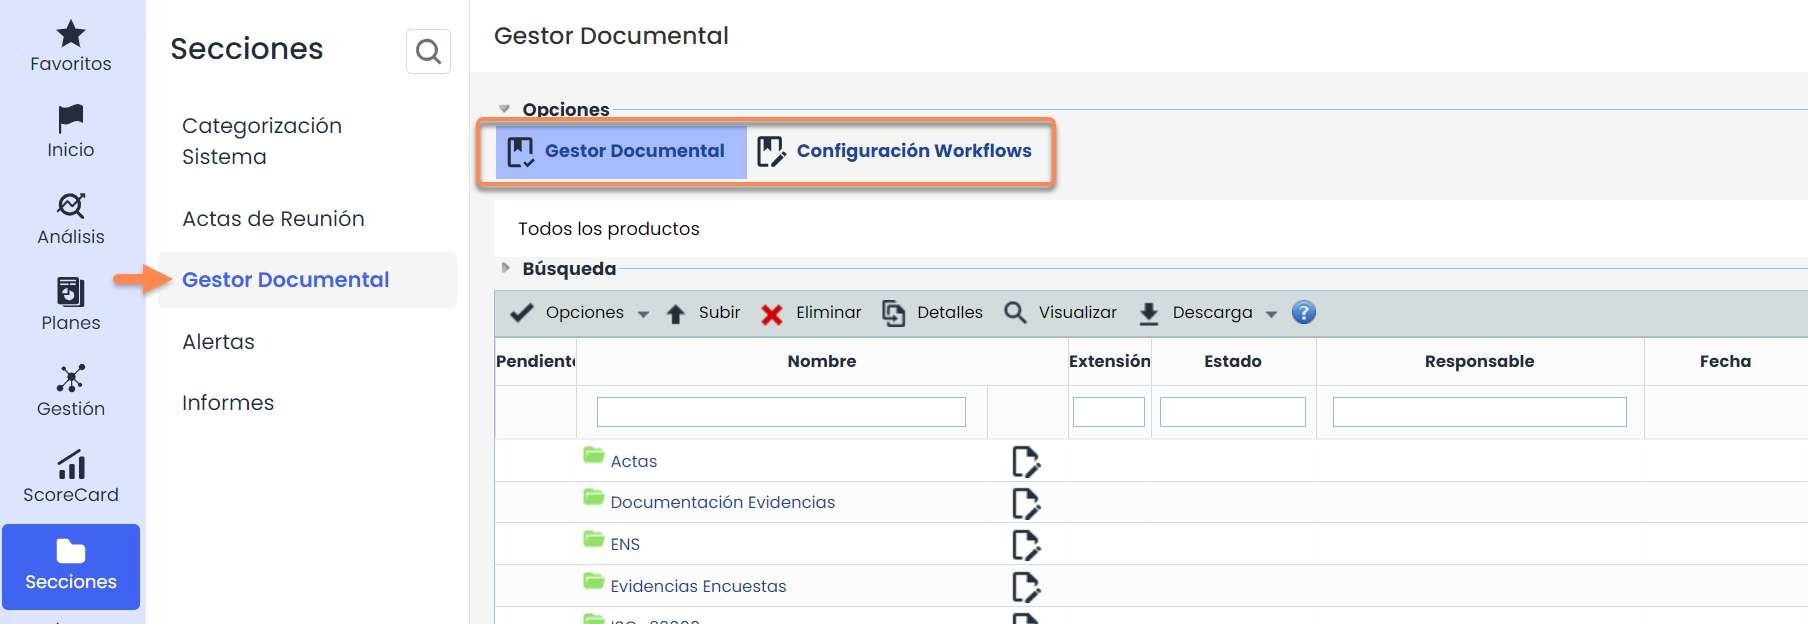
Document Manager
This functionality acts as a shared and unique repository to concentrate all the documentation derived from the organization's Management System. This option is transversal, being accessible from any of the top tabs (Home, Start, etc.).
When accessing the option, the root folders will be displayed, and within them, the subfolders or documents that make up the organization's document manager. At the top, there are a series of buttons that allow creating new folders, uploading documents, accessing their details to consult old versions, and downloading the selected documents or a zip of a folder with all its content.
In the “Workflow Configuration” tab, workflows can be created to work with when uploading/editing documents.
This option must first be activated in “Settings > Configuration > General > Workflow Activation.”