This tutorial explains how to use the Document Manager in GlobalSuite® to manage system management documentation, including creating and organizing folders, uploading and updating documents, managing versions and statuses, and deleting documentation.
The guide details the operation of the manager with the workflow disabled, as well as the available options to download content, filter documents, modify versions, and manage permissions on folders and files.
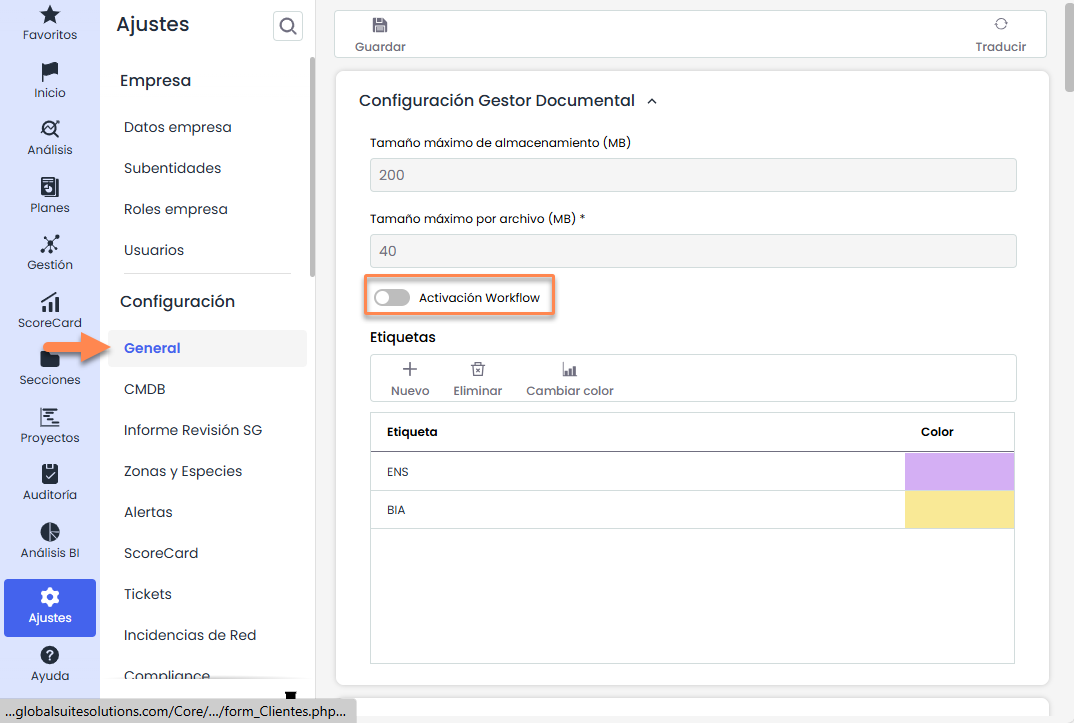
1. Configurable Options in Settings
In the section Settings>General Configuration > Document Manager Configuration , you can enable the “Workflow Activation,” which allows for Approval Flows or Workflows, so that multiple users can review files in the Document Manager and approve documents. If a simplified version of the Document Manager is desired, the checkbox should remain unchecked.
This guide explains the operation of the Document Manager with the workflow disabled.
2. Document Manager
All solutions that make up GlobalSuite® include the associated functionality of the document manager.
This Document Manager allows for both a shared and unique repository to centralize all documentation derived from the organization's Management System and the approval of documents through Approval Flows configurable by each organization. This guide will explain the use of the Document Manager with the workflow disabled.
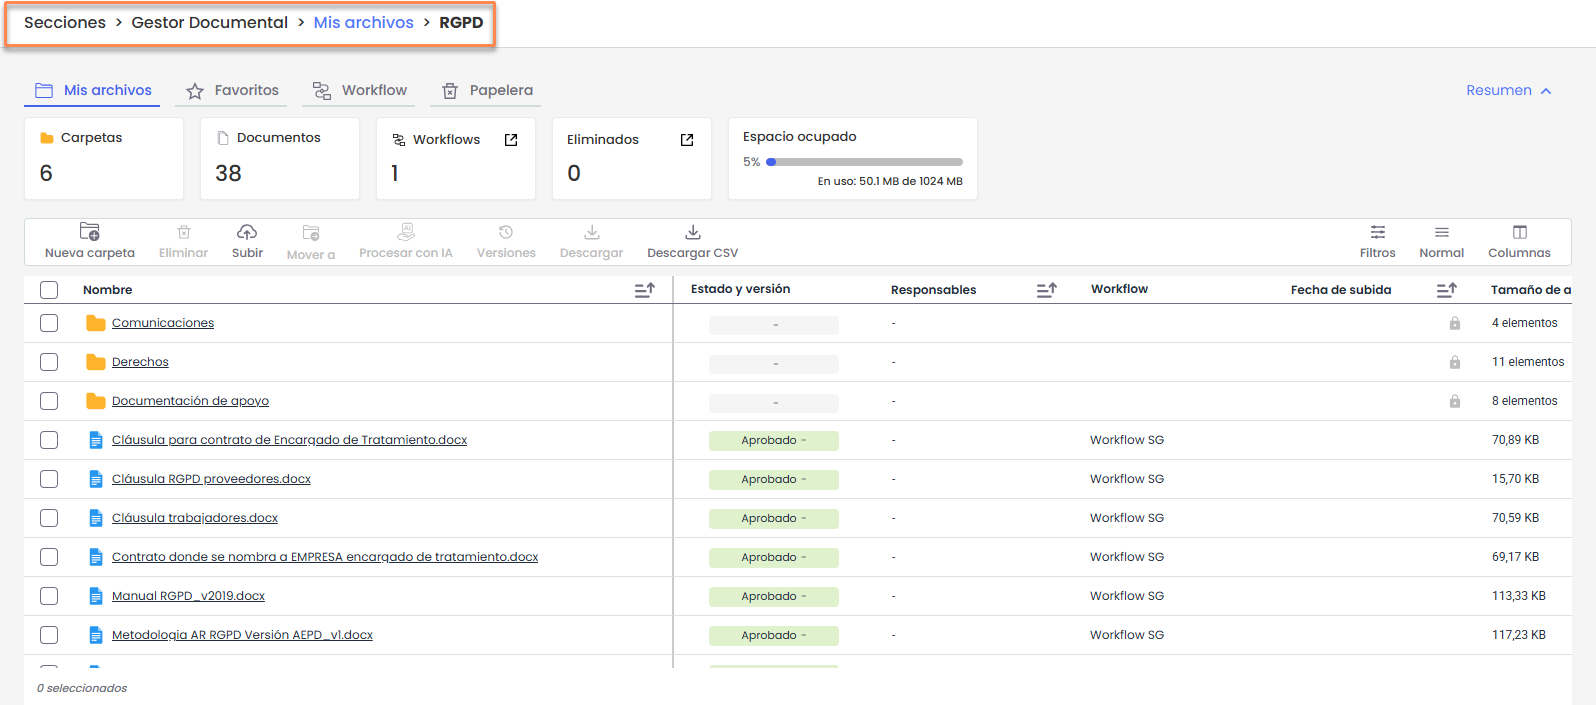
When accessing the option, the My Files tab will display the entire folder and document structure represented by the manager.
Using the navigation bar, you can see which folder you are in, and by clicking on the blue names, you can go back to previous levels.
On the main screen, it is possible to:
-
Navigate between folders by clicking on the folder name.
-
View documents contained in each folder.
-
Consult information such as status, responsible parties, and workflow.
-
Access quick actions on folders and documents from the table.
Options for folders
When hovering over a folder, the three dots (…) icon will appear on the right side of the record.
Clicking on this icon will display a menu with the different options available for managing the folder.
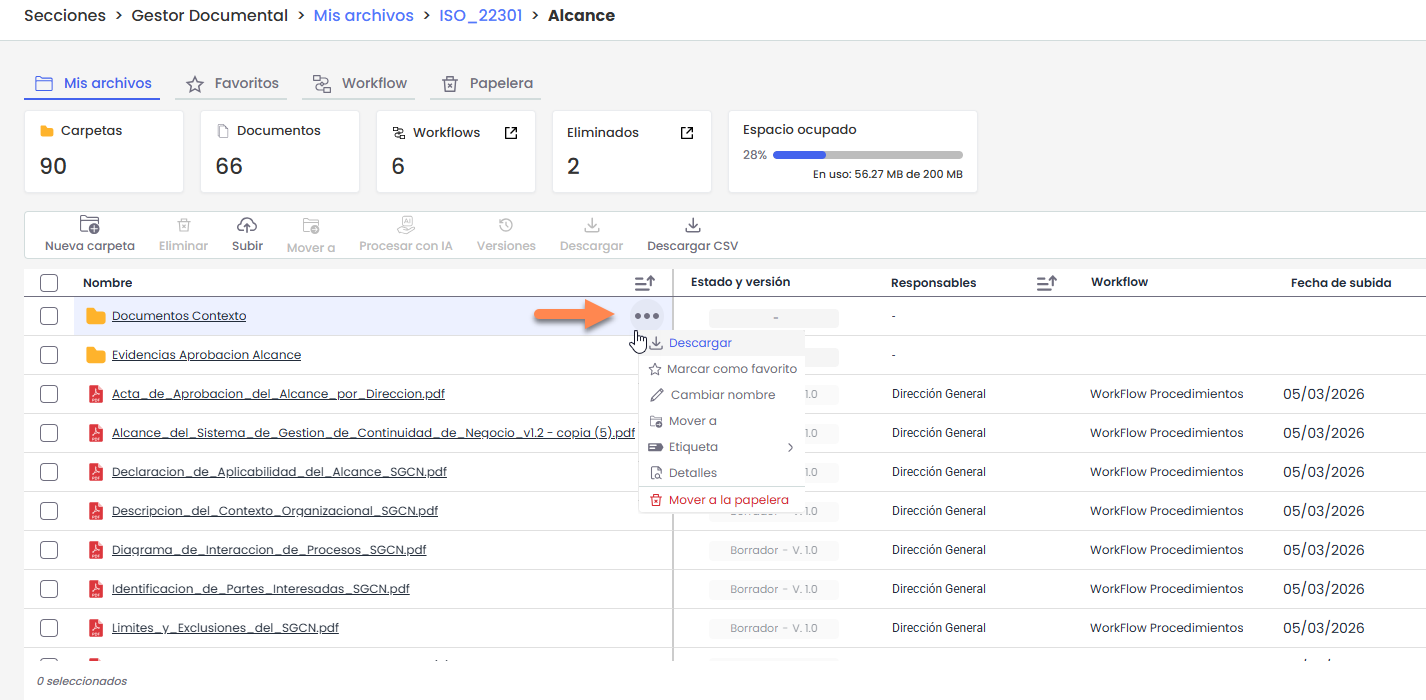
Each of these options is explained below:
-
Download: Allows you to download the entire folder content in .zip format. Once the process is complete, the file will be available in User Profile > Downloads.
-
Mark as favorite: Adds the folder to the favorites section for quick access.
-
Rename: Allows you to change the folder name.
-
Move to: Allows you to move the folder to another location within the Document Manager.
-
Tags: Allows you to associate or manage tags linked to the folder.
-
Details: Displays detailed information about the folder.
-
Move to trash: Sends the folder to the trash, where it can be managed later according to the available permissions.
Options for files
For files, the operation is the same.
When hovering over the document, the three dots (…) icon will appear on the right side of the record.
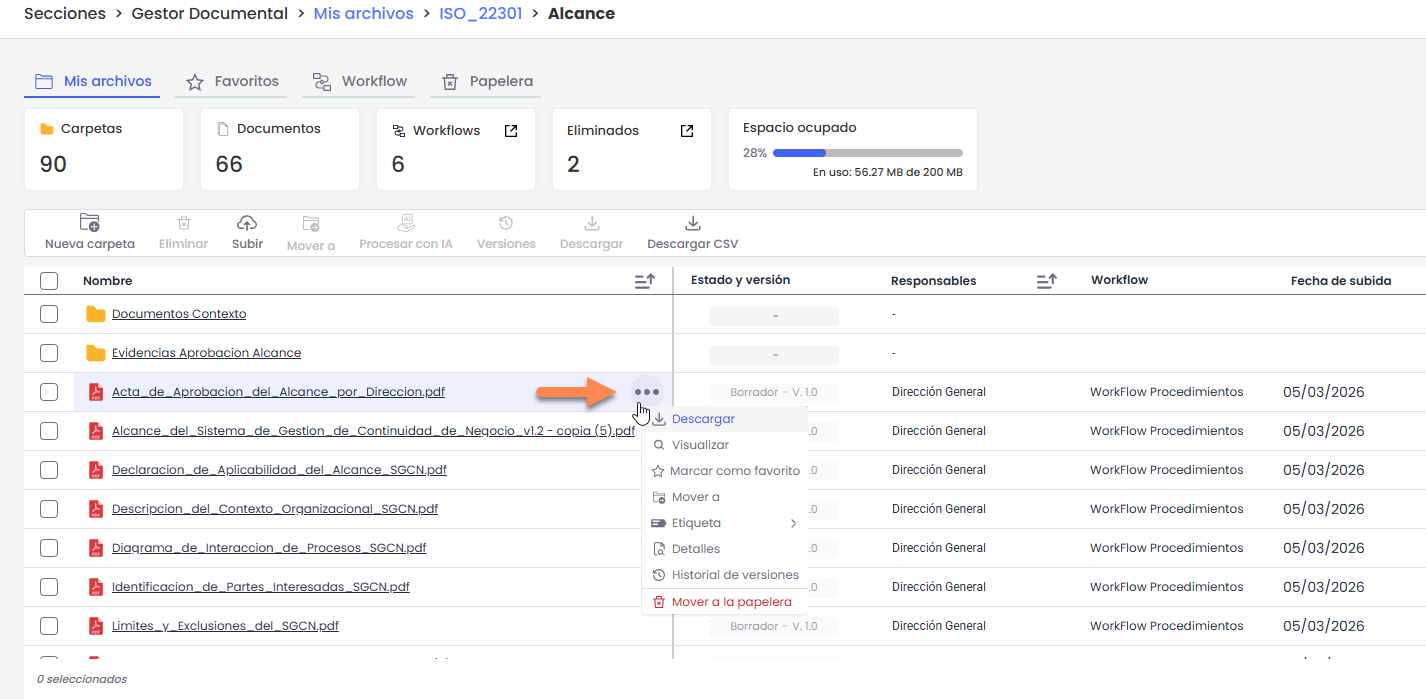
Clicking on this icon will display the menu with the following options:
-
Download: Allows you to download the file in its original format. The download is direct.
-
View: Allows you to preview the document without downloading it (available for files with PDF, JPEG, JPG, BMP, or PNG extensions).
-
Mark as favorite: Adds the document to the favorites section for quick access.
-
Move to: Allows you to move the document to another folder within the Document Manager.
-
Tags: Allows you to associate or manage tags linked to the document.
-
Details: Displays general information about the document and allows access to its configuration.
-
Version history: Allows you to consult the different versions of the document, as well as its status and associated changes.
-
Move to trash: Sends the document to the trash, where it can be managed later according to the available permissions.
Actions available in the top bar
At the top of the Document Manager, you will find the different action options available for the elements displayed in the table.
These options are enabled or disabled depending on whether elements are selected and the number of selected elements.
-
New folder: Allows you to create a new folder within the current location. It will only be active when no documents or folders are selected.
-
Upload: Allows you to upload a new document to the current folder. It is active when no elements are selected.
-
Process with AI: Allows you to execute the automatic processing of the document using Artificial Intelligence functionalities (if enabled). This option is only activated when a single document is selected. For more information: How to process documents with AI from the Document Manager in GlobalSuite®? | GlobalSuite Solutions
-
Versions: Allows access to the version history of the selected document. It is enabled only when a single document is selected.
-
Delete: Allows you to delete one or more selected documents and/or folders simultaneously. Deleted elements are always sent to the Trash.
-
Move to: Allows you to move one or more selected documents and/or folders to another location within the Document Manager.
When selecting this option, a window will open to choose the destination folder. You will need to navigate to the desired location and click “Move here” to confirm the transfer.
-
Download: Allows you to download one or more selected elements simultaneously.
-
Download CSV: Generates a CSV file with the information of the elements displayed in the current view. This option is always available, regardless of the selection.
Filters and search
The Document Manager allows filtering the information displayed in the table using different criteria.
By default, the following filtering fields are displayed:
-
Responsible parties
-
Workflow
-
Tags
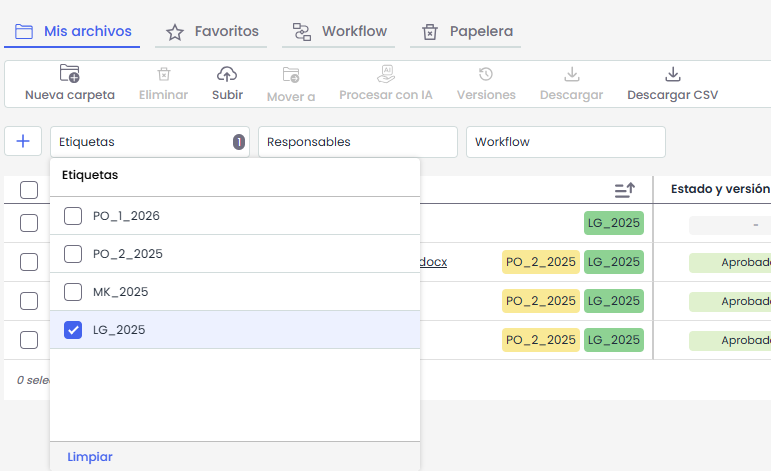
By clicking the “+” button, all additional fields available for filtering will be displayed (e.g., version, upload date, or other configured fields).
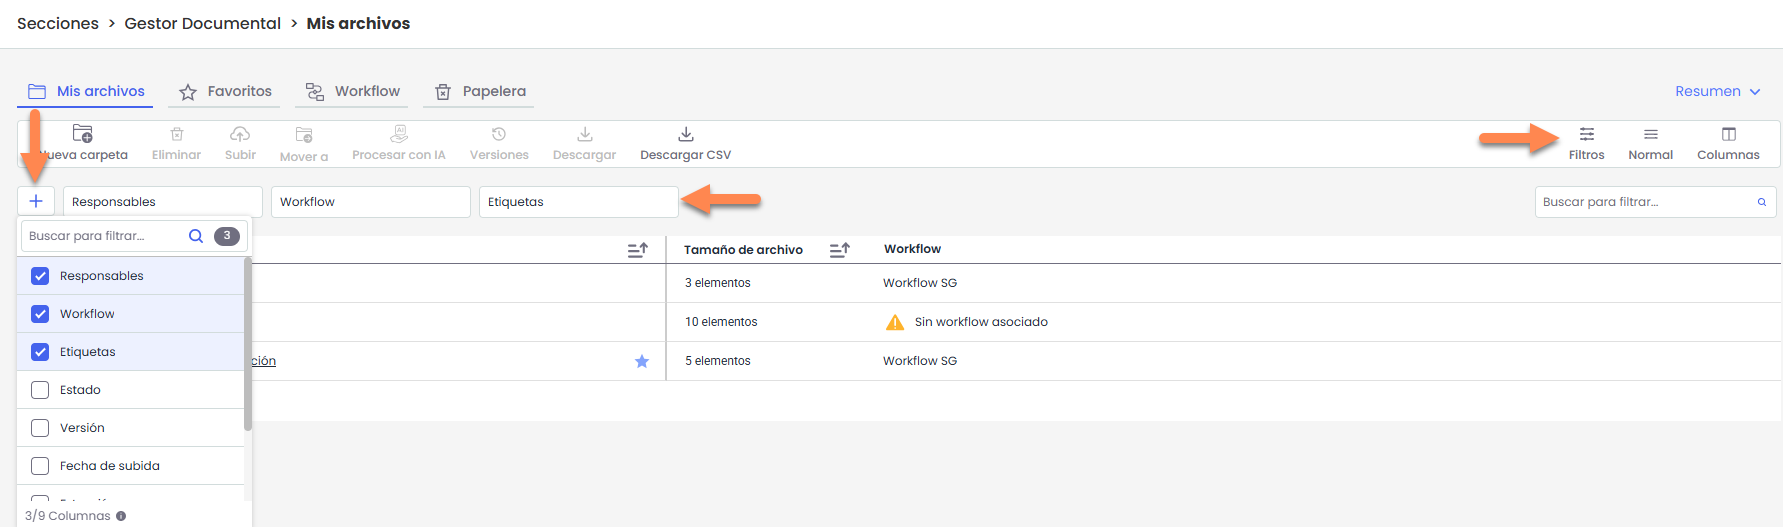
Depending on the type of field selected, the system will display different filtering options. For example:
-
In list-type fields (such as Tags or Statuses), the available values for selection will be displayed.
-
In date fields (such as Upload Date), the option to filter by a specific date or a date range will be enabled.
The range can be selected manually using the calendar or through predefined ranges shown on the left (e.g., This week, Current month, Last 3 months, etc.).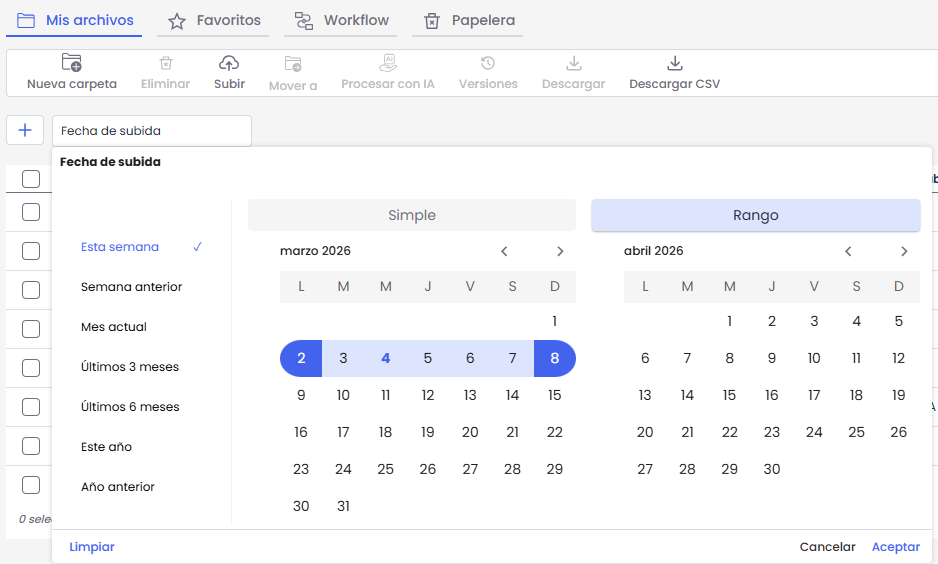
-
In text fields, it will be possible to manually enter values.
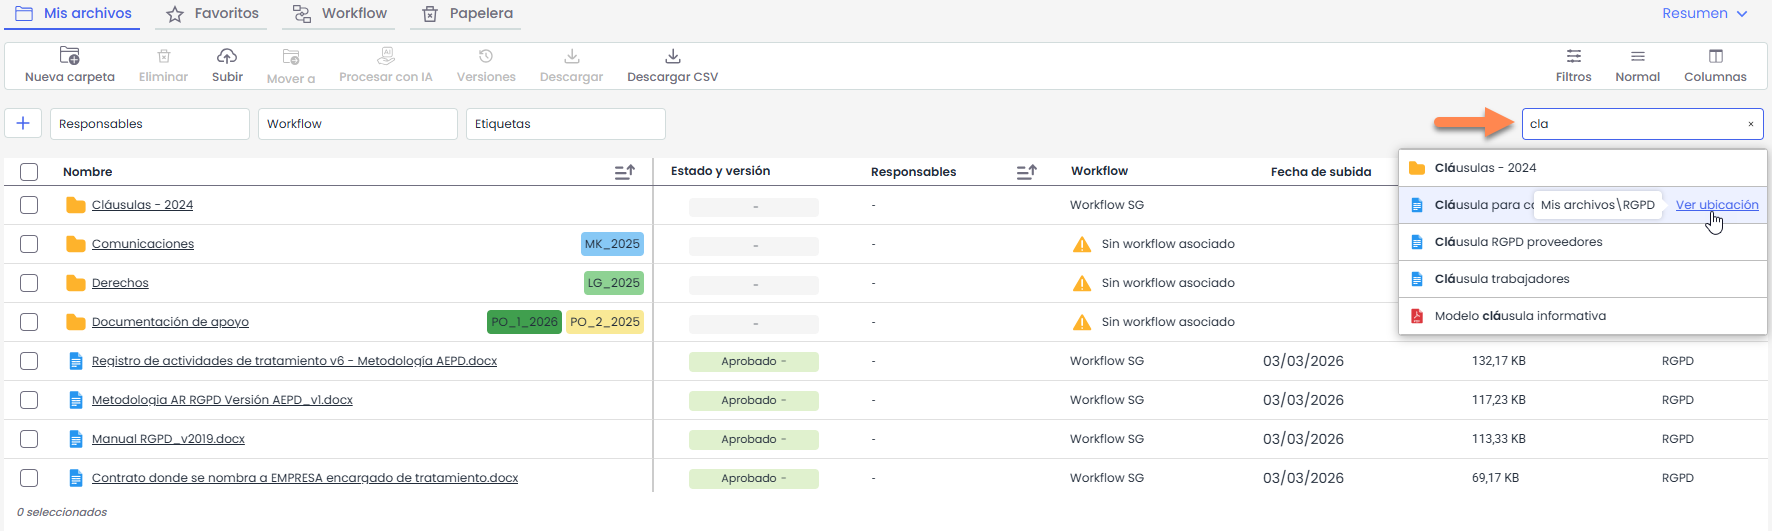
Quick search by name
On the right side, there is the field “Search to filter…”, which allows for a quick search by folder or file name.
When entering the first letters, the system will automatically display the matches found.
In the displayed results:
-
When hovering over an element, the option “View location” will appear, allowing direct access to the folder where the file is located.
-
Clicking on the file name will open the document if the format is compatible with viewing. Otherwise, it will be automatically downloaded.
-
Pressing Enter will display all matches in the table.
Scope of filters and searches
Filters and searches are applied from the location where the user is positioned, including its subfolders.
Searches are not performed in higher-level folders.
When filters or searches are applied, the table automatically adds the column “Location”, which indicates the folder where each file or folder matching the applied criteria is located.
To return to the original view, it will be necessary to clear the active filters.
3. Permissions and Folders
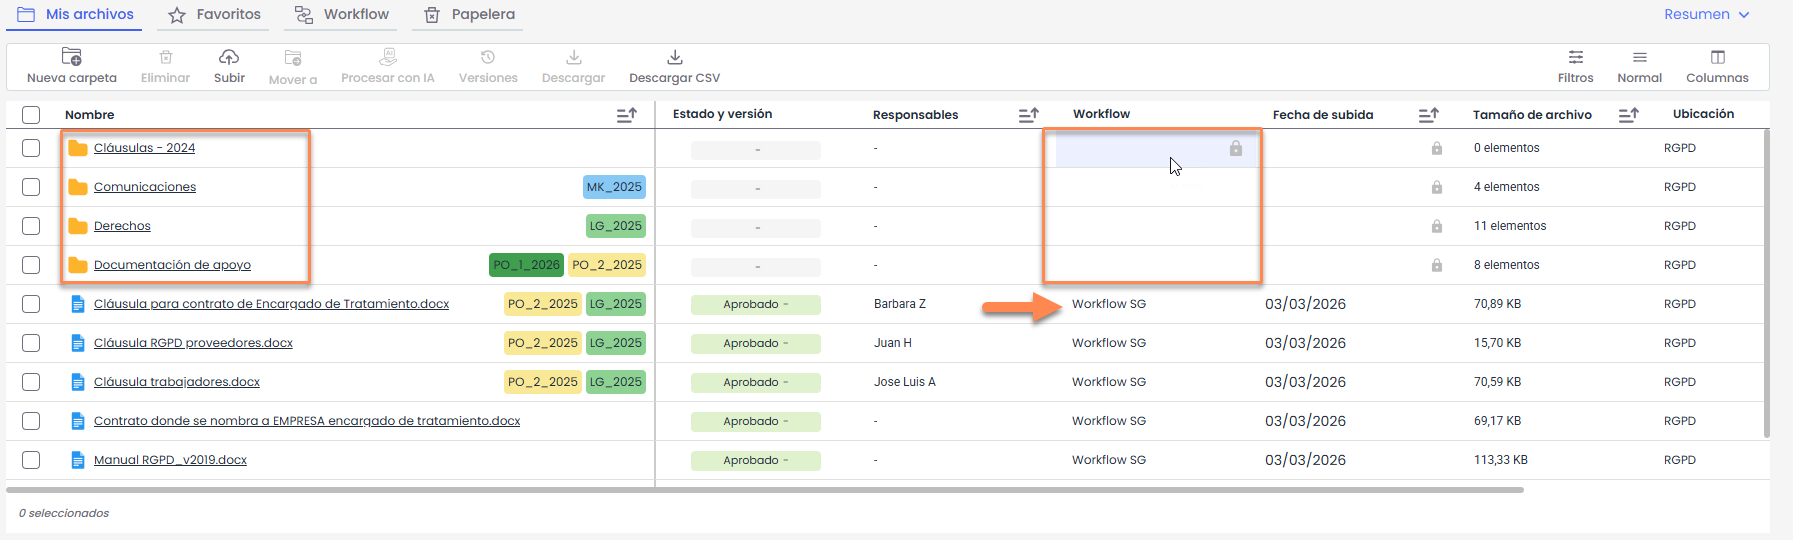
The Document Manager is configured with a set of default folders based on the management systems the company has. These folders can be modified, deleted, or new ones created by the responsible parties (Document Manager administrators).
-
When the “Workflow Activation” flag is not activated, no Workflow can be associated with the folders. If a file is uploaded, the “Workflow MS” will be set by default. A couple of examples are attached:
-
It can be seen that when creating folders, no WF can be associated.
-
It is noted that when uploading a file, a Workflow is applied by default without the option to choose another. The WF can be changed when the “Workflow Activation” flag is enabled in Settings.
4. Update Documentation
Documents can be uploaded by selecting the folder where the document is to be located and clicking the “Upload” button. A screen will appear to select the document, and once chosen, it will be uploaded to the selected folder. It is possible to select up to 10 files simultaneously in a single upload.
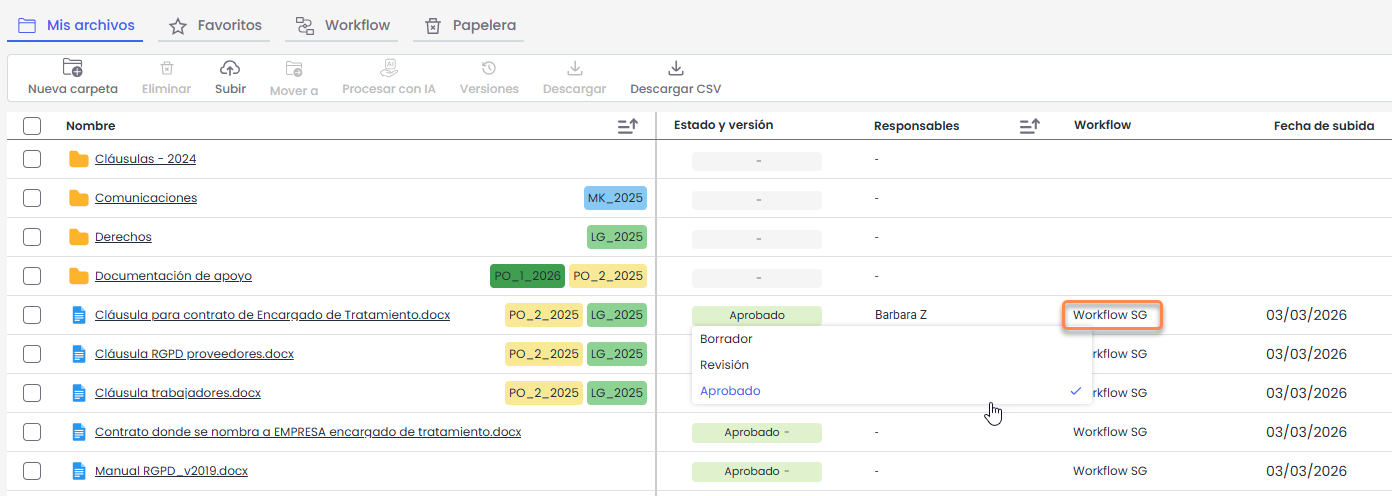
Change document status
The status of a document can be modified by double-clicking on the “Status” field in the table.
The list of statuses configured in the approval flow (e.g., “Workflow MS”) will then be displayed, allowing the desired status to be selected.
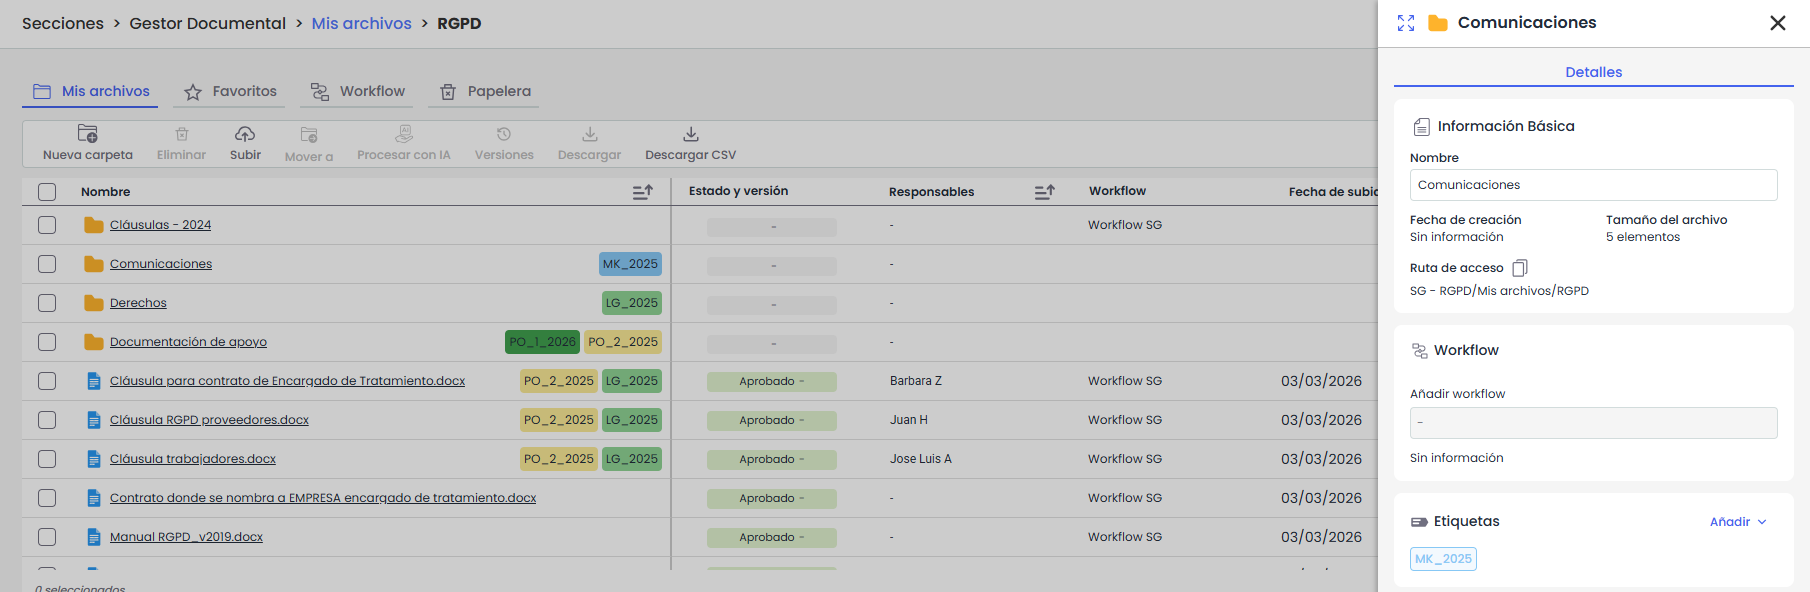
Update folder data
To view detailed information about a folder, hover over it. The three dots (…) icon will appear on the right side of the record.
Clicking on this icon will display a menu of options. To access detailed information, the “Details” option must be selected.
A side panel will open with the folder information, where it is possible to:
-
View and modify the name.
-
Check the creation date and the number of items it contains.
-
View the access path.
-
View and add tags.
Update document data
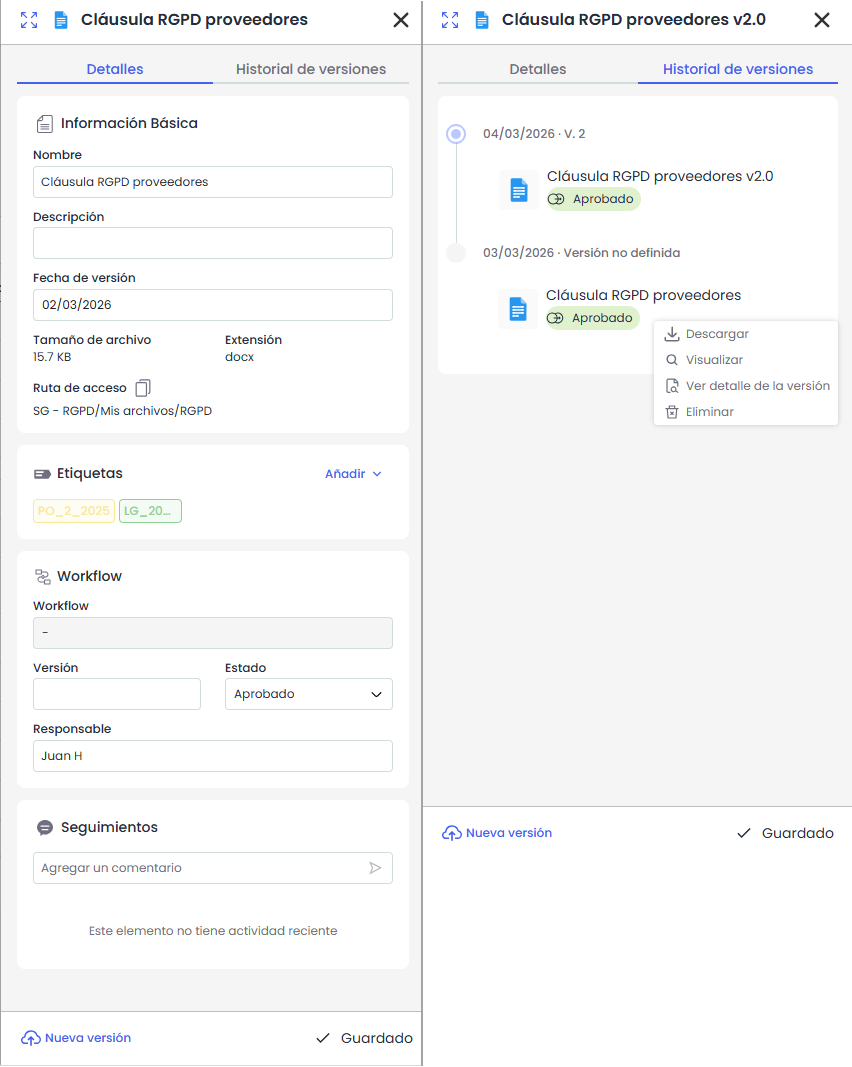
By selecting “Details” for a document, a side panel with its information will open.
This panel is divided into two tabs and displays the data corresponding to the active/current version of the document.
Details
From the “Details” tab, it is possible to:
-
View and modify the name and description of the document.
-
Check the version date, the size, the extension, and the access path.
-
View and change the status of the document (according to the configured workflow).
-
Check or assign the responsible person.
-
Add or manage tags.
-
Upload a new version of the document (with no version limit).
-
Add follow-ups.
Version history
In the “Version History” tab, all document versions are displayed, ordered chronologically from the most recent to the oldest.
From here, it is possible to:
-
Check the details of previous versions.
-
View or download previous versions.
-
Delete versions.
-
Mark a version as “active version”.
5. Document deletion
The deletion of documents and folders is done through the “Move to Trash” option, available:
-
From the context menu (three-dot icon).
-
From the Details panel.
-
From the top bar, by selecting one or more items.
By selecting this option, documents or folders will be moved to the Trash.
Trash
Documents and folders sent to the Trash will remain there for 30 days before being automatically deleted.

From the Trash tab, it is possible to:
-
Restore: returns the document or folder to its original location.
-
Delete: permanently deletes the selected item.
-
Download CSV: downloads a file with the list of items in the trash.
When a folder is sent to the trash, it is moved completely with all its contents (files and subfolders).
In the trash, it is not possible to explore its contents; only the folder is displayed as a single item.
When restoring a folder or document, they return to their original location and retain the same status they had before being sent to the trash.
The occupied space is not freed until the item is permanently deleted from the trash.
Version deletion
When a document is sent to the trash, the active version along with all its associated versions is moved.
It is not possible to send intermediate versions to the trash individually.
If a specific version is deleted from the Version History, it is permanently deleted and does not go to the trash.